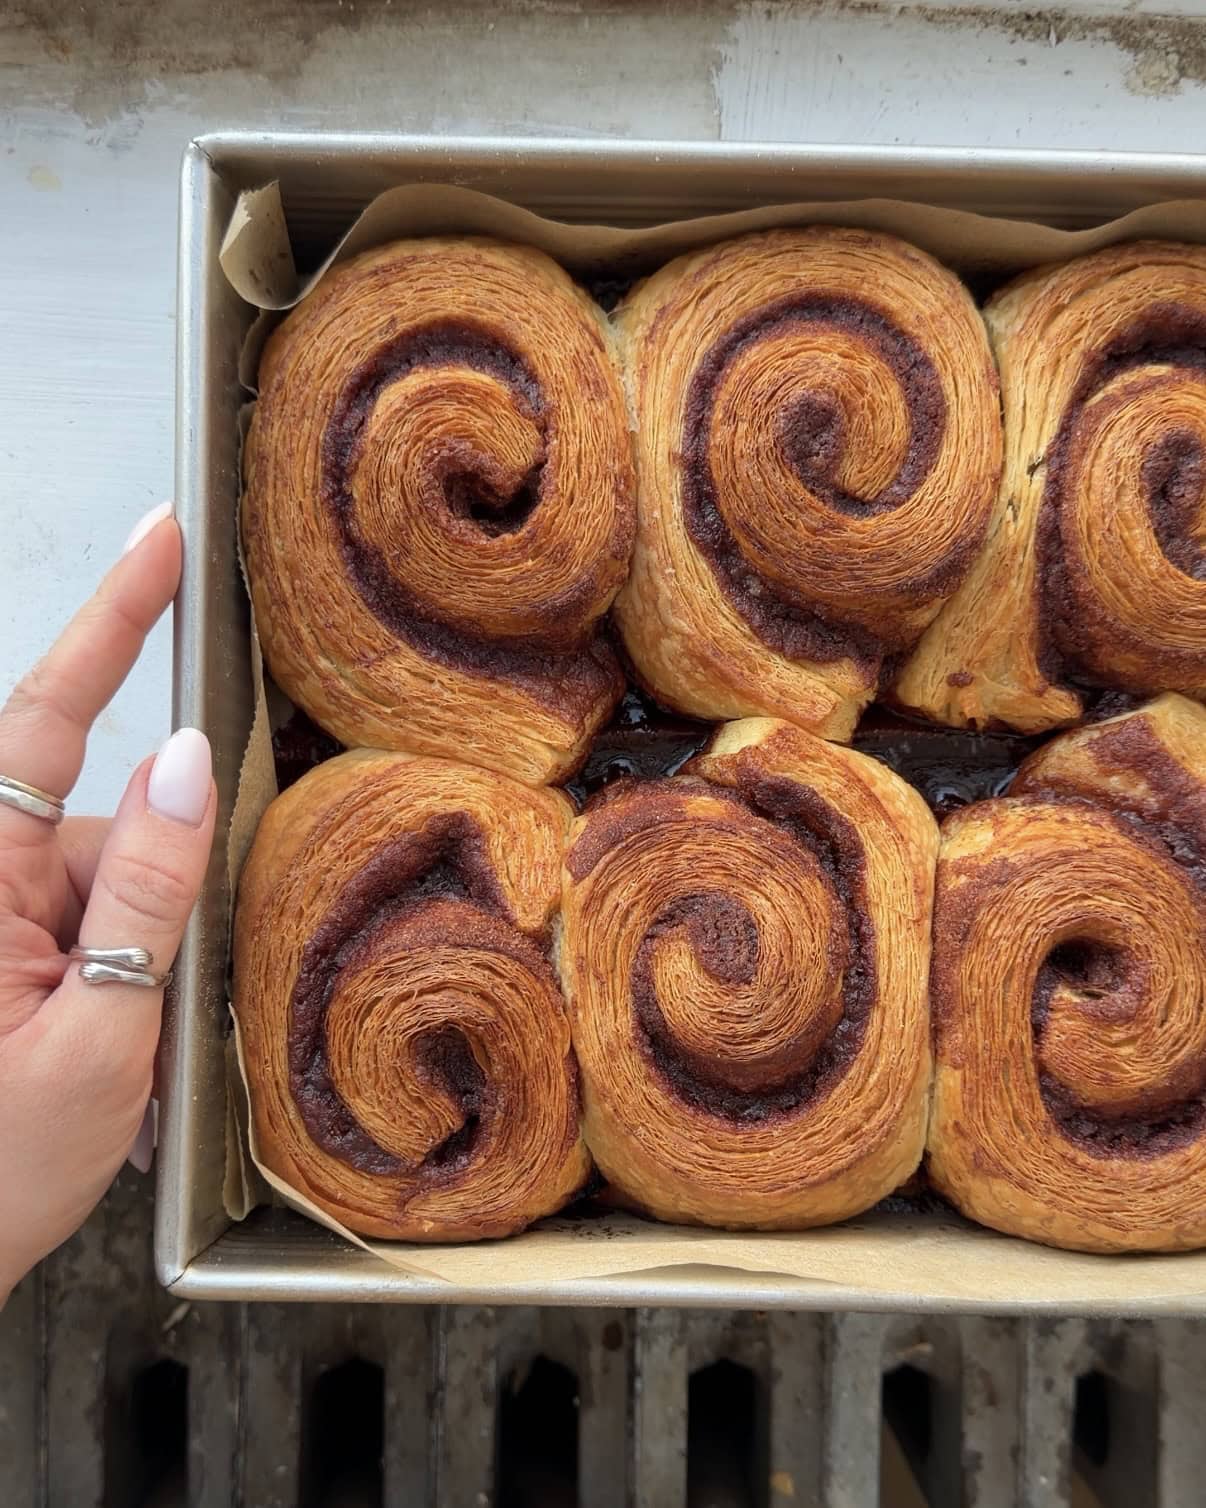
Think your classic cinnamon roll but made with the same, flaky buttery dough as a croissant, these Croissant Cinnamon Rolls take a bit of effort but are so worth it.
What type of butter is best for Croissant Dough?
I’m never one to tell you that you absolutely have to use a specific product but Kerrygold Salted butter makes a WORLD of difference when laminating dough. It is soft even when fridge cold which makes layering and rolling out the dough 10 times easier. Don’t worry about the added salt, you won’t notice it and its quite a bit softer than the unsalted. If you can’t get Kerrygold salted just make sure to at least buy a high quality European butter with at least 82% fat content.
What type of pan is best for croissant cinnamon rolls?
I have made these in both a classic 9″ x 13″ brownie style pan and a quarter sheet pan which usually measures closer to 9″ x 12″ but with shorter sides. Both will work great! I haven’t tested them in a cast iron or glass dish but they are baked very hot so I wouldn’t recommend glass.
What is Croissant Dough?
Croissant dough is a laminated dough made with a brioche that is either yeast or sourdough based and then layered or “laminated” with butter. It’s very important the butter stays cold throughout the entire process because that is what cause the beautiful layers and crisp flake.
Tips for making Croissant Cinnamon Rolls
- Take your time and know that every time you make a laminated dough, you’ll get better!
- Use Kerrygold Salted butter for your butter block, I know it may seem extra but the higher fat content and salt make this butter softer and 10x easier to work with. If you use regular grocery store butter it will likely be too hard and splinter in your dough or melt before you have a chance to do the laminations.
- Watch this full length youtube video where I go over every detail while you make them.
- If you feel like your dough or butter are too warm and getting melty, or your home is quite warm, increase the fridge rest times to 50 minutes.
- Keep your lines and corners of the butter and the dough as straight and crisp as possible, this will lead to better layers and lamination.
- Unlike most yeasted doughs, we don’t want these to proof somewhere super warm just a low 70 degree room is best. If it’s too warm, the butter will melt out and all of your hard work will be lost.
- Don’t be afraid to bake these until deeply golden!
Additional recipes to try!
Ingredients for Cinnamon Roll Croissants
- All Purpose Flour: Any all purpose flour will work for this! I have not yet tried any other flours with this recipe.
- Sugar: This recipe uses granulated sugar in the dough and the filling and powdered sugar in the frosting.
- Yeast: In this recipe, instant yeast is used. However, if you are using active dry, simply whisk it in with the warm milk and let it sit for 10 minutes first and then add in the remaining ingredients.
- Salt: A tiny bit fine sea salt is added but not much because we are using a salted butter.
- Milk: Milk is the liquid in the dough and the frosting; however, it will also work with non-dairy milks such as almond milk.
- Eggs: I use standard large eggs from the store. There is one whole egg in the dough.
- Vanilla: Vanilla extract enhances the flavors of the filling and frosting of the cinnamon roll.
- Cinnamon: A good bit of cinnamon goes into the filling to give them their strong cinnamon roll flavor.
- Butter: The butter adds the rich fat necessary for the dough and the filling and the frosting. I recommend Kerrygold salted butter for this. *see tips for more info
- Mascarpone: Mascarpone is used in the frosting of these cinnamon rolls but if you don’t have it or prefer a cream cheese frosting, fee free to omit.
- Cream Cheese: If you like a thicker frosting as opposed to more of a glaze, you’ll want half a block of full fat cream cheese for the frosting of these.

How to make Croissant Cinnamon Rolls?
*This recipe can be split between two days, laminate the dough in the evening and then shape and bake in the morning. Or you can do it all in one day but note that if you start around 6 am they will be done around 2 or 3 pm.
Laminated Dough
Brioche
- In the bowl of a stand mixer, add in the flour, sugar, and yeast – whisk to combine.
- Add in the egg, warm milk, butter, and salt.
- Use a dough hook to knead everything together on medium low speed for 5 minutes until the dough holds together and the bowl is clean. The dough does not need to be smooth!
- Lay a piece of plastic wrap over a quarter sized baking sheet or full sized if that fits in your fridge. Roughly shape the dough into a rectangle, the exact size and thickness really aren’t that important but at least 5″ x 10″.
- Lay another sheet of plastic over the dough and wrap the edges around the dough to make an airtight seal.
- Place the dough into the fridge and set a timer for 30 minutes.
Butter Block
- After the 30 minutes have passed, leave the dough in the fridge. We’re now starting on the butter block.
- Take two sheets of parchment paper, they should be at least 12″x12″. On one of them draw a 9″ x 9″ square with a pencil approximately in the center. Flip the paper with the square over, you should be able to see your drawing through the paper and set the other sheet aside for now.
- Cut your 300 grams of Kerrygold salted butter blocks into 1/2″ thick slices and lay them onto the parchment within the square in a single layer. Should look like a paved square of yellow kerrygold bricks.
- Lay the second sheet of parchment over top and use a rolling pin to gently roll over the butter and parchment, causing them to stick together.
- Flip the whole sandwich of parchment and butter over so that you can now see your square drawing again. Continue pressing and rolling until the butter reaches the edges of the square. Use a knife and bench scraper as needed to create a 9″ x 9″ level (as perfect as you can), straight edged square of butter.
- Place the butter block, still inside of the parchment, flat in the fridge. Set a timer for 10 minutes.
Laminate the Dough
- After the timer goes off, leave the butter block in the fridge but take the dough out.
- Lightly flour your work surface and unwrap the dough. Roll it into a rectangle that measures 9″ x 18″. Use flour as needed to keep it from sticking, but brush off any excess before moving on.
- Take the butter block out of the fridge and peel away one sheet of parchment paper. Flip the block, exposed butter side down, onto the center of the dough. Peel away the second sheet of parchment and set aside.
- Now fold the short sides of dough over the butter to enclose it, it’s ok if the dough edges don’t quite reach each other. Stretch them gently till they do. The sides will show the two layers of dough and one layer of butter, no need to squish the dough together to enclose it.
- Turn the dough & butter block so that the center seem where the dough edges met is oriented north south not east west. Use flour as needed and roll it out until it measures about 20″ x 10″.
- Trim off about 1/4″ from each short end to create clean edges. Then letter fold it so the top third folds over the middle third and then the bottom third folds up and over the other two.
- Take your time to make sure everything is lining up nicely. Turn the dough envelope 90 degrees so that it is tall and skinny not short and wide. Wrap it back up in the plastic wrap, and place it back in the fridge for 45 minutes.
- After the 45 minutes have passed, take it out of the fridge and unwrap it. With it in the same tall and skinny orientation, use the rolling pin to roll it out to the same size (20″ x 10″) making sure along the way to keep the edges straight.
- Once again, trim the short edges into clean crips lines (approximately 1/4″ or 1/2″ off each end). Repeat the letter folding, brushing off any excess flour as needed. Rewrap the dough and place it back in the fridge for 45 minutes.
- Repeat the rolling, trimming and folding once more and then rewrap and let chill for an hour in the fridge. If you are prepping the dough the night before, this is the step where you will leave it in the fridge and move onto the fillings and assembly in the morning.
Fillings
- During the last hour of chilling, you can prep both the fillings.
- In one medium mixing bowl add in 125 grams of soft salted butter, 125 grams granulated sugar, salt, 1.5 tablespoons cinnamon, and vanilla. Use a fork to smoosh it together until completely mixed. Set aside.
- In a separate smaller mixing bowl stir together 75 grams granulated sugar and 1.5 tablespoons of cinnamon.
Assemble the Cinnamon Rolls
- After at least an hour of chilling, take the dough out of the fridge. Again using flour as needed roll the dough into a 16″ x 12-14″ rectangle. You’re gonna need to use some muscle for this and be sure to roll all the way to the edges. Whatever side was already longer will become 16″ and the shorter sides will become 12-14″. There is a range because it is difficult to roll the dough out so if you get to 12.5″ and give up I don’t blame you.
- Trim 1/4″ of dough off both of the long sides this time (not the short sides like before). Spread the first filling (the one with butter) over the surface of the dough. I like to use an offset spatula but the back of a spoon will work too. It should be soft and spreadable but not melted. Make sure to spread it evenly all the way to the edges.
- Sprinkle the second filling over the surface and use the back of the spoon to gently smooth it into the first filling.
- Starting with the long side closest to you, roll the dough and filling up.
- You can choose between 12 more normal sized cinnamon rolls or 8 jumbo (this is what is pictured).
- If making 12, give the whole roll a few squeezes to lengthen it to 18″. If making 8, leave it as is.
- Trim off 1/4″ from one end to give a clean starting slice. If making 8, mark 2 inch marks along the top of the roll. If making 12, mark 1.5″ marks along the top. Use a sharp knife to slice through the roll, cutting the cinnamon rolls.
Proof
- Line a 9″x13″ baking pan or a 9″x12″ quarter sheet pan with a sheet of parchment. You can use one of the ones from earlier that was used for the butter block, just lay it buttered side up.
- Arrange 2 rows of 4 if making 8 cinnamon rolls or 3 rows of 4 if making 12, onto the parchment lined pan. Place them so that the “tails” or ends of each roll are facing towards another roll. This will help keep them from completely unrolling.
- If making 8, I find they hold their shape a bit better if you leave more space between the rows and the edge of the pan and a little less between the two rows if that makes sense.
- Drape the top with a sheet of plastic wrap and set at room temperature for about an hour and a half. This will change dramatically based on how warm your room is. Also if you left the dough in the fridge overnight they will take a bit longer to proof. DO NOT put them somewhere warm to speed up the proofing. The butter will melt out and the layers will disappear.
- After 1.5 hours, place a rack in the center of the oven and heat to 425 F.
Bake the Cinnamon Rolls
- They won’t be as puffy as classic cinnamon rolls but they will have visibly gotten thicker and grown. For me this usually takes a total of 2 hours. *If your oven runs hot I would err on the side of 400 F. Mine runs cold so I heat it to 450 F knowing that it sits at 425 F.
- Once the oven is hot and the rolls are puffy and touching one another, bake them in the hot oven for 15 minutes. Then rotate the pan 180 degrees and bake for another 10-15 minutes until deeply golden brown.
- Remove the pan from the oven and let them cool for at least 10-15 minutes.
- In the meantime make the icing.
Icing
- There are so many different preferences on icing so if you have a favorite cinnamon roll cream cheese frosting, feel free to make that!
- For a thicker, frosting like a cream cheese frosting, I prefer this one which is a combo of mascarpone and cream cheese. In a mixing bowl, add in the mascarpone, cream cheese, salt, vanilla and powdered sugar. Beat until smooth and add milk as needed to thin it out.
- If you prefer more of a thin icing (usually I do), leave out the cream cheese and add more milk to the recipe above!
- Dollop the frosting over the cooled cinnamon rolls and use the back of a spoon to spread.
- Store leftovers in an airtight container at room temperature.


Croissant Cinnamon Rolls
Equipment
- 9" x 13" metal pan
Ingredients
Brioche
- 500 grams all purpose flour
- 50 grams granulated sugar
- 15 grams instant yeast
- 1 egg large
- 250 milliliters whole milk
- 60 grams salted butter soft
- 1/4 teaspoon fine sea salt
Butter Block
- 300 grams Salted butter COLD! Highly recommend Kerrygold Salted butter
Fillings
- 125 grams salted butter soft
- 200 grams granulated sugar
- 3 tablespoons cinnamon
- 1/4 teaspoon fine sea salt
- 1 teaspoon vanilla extract
Frosting
- 227 grams mascarpone room temperature
- 113 grams cream cheese room temperature
- 180 grams powdered sugar
- 1/4 teaspoon fine sea salt
- 1 teaspoon vanilla bean paste or vanilla extract
- 2 tablespoons whole milk more as needed
Instructions
- *This recipe can be split between two days, laminate the dough in the evening and then shape and bake in the morning. Or you can do it all in one day but note that if you start around 6 am they will be done around 2 or 3 pm.
Brioche
- In the bowl of a stand mixer, add in the flour, sugar, and yeast – whisk to combine.
- Add in the egg, warm milk, butter, and salt.
- Use a dough hook to knead everything together on medium low speed for 5 minutes until the dough holds together and the bowl is clean. The dough does not need to be smooth!
- Lay a piece of plastic wrap over a quarter sized baking sheet or full sized if that fits in your fridge. Roughly shape the dough into a rectangle, the exact size and thickness really aren't that important but at least 5" x 10".
- Lay another sheet of plastic over the dough and wrap the edges around the dough to make an airtight seal.
- Place the dough into the fridge and set a timer for 30 minutes.
Butter Block
- After the 30 minutes have passed, leave the dough in the fridge. We're now starting on the butter block.
- Take two sheets of parchment paper, they should be at least 12"x12". On one of them draw a 9" x 9" square with a pencil approximately in the center. Flip the paper with the square over, you should be able to see your drawing through the paper and set the other sheet aside for now.
- Cut your 300 grams of Kerrygold salted butter blocks into 1/2" thick slices and lay them onto the parchment within the square in a single layer. Should look like a paved square of yellow kerrygold bricks.
- Lay the second sheet of parchment over top and use a rolling pin to gently roll over the butter and parchment, causing them to stick together.
- Flip the whole sandwich of parchment and butter over so that you can now see your square drawing again. Continue pressing and rolling until the butter reaches the edges of the square. Use a knife and bench scraper as needed to create a 9" x 9" level (as perfect as you can), straight edged square of butter.
- Place the butter block, still inside of the parchment, flat in the fridge. Set a timer for 10 minutes.
Laminate the Dough
- After the timer goes off, leave the butter block in the fridge but take the dough out.
- Lightly flour your work surface and unwrap the dough. Roll it into a rectangle that measures 9" x 18". Use flour as needed to keep it from sticking, but brush off any excess before moving on.
- Take the butter block out of the fridge and peel away one sheet of parchment paper. Flip the block, exposed butter side down, onto the center of the dough. Peel away the second sheet of parchment and set aside.
- Now fold the short sides of dough over the butter to enclose it, it's ok if the dough edges don't quite reach each other. Stretch them gently till they do. The sides will show the two layers of dough and one layer of butter, no need to squish the dough together to enclose it.
- Turn the dough & butter block so that the center seem where the dough edges met is oriented north south not east west. Use flour as needed and roll it out until it measures about 20" x 10".
- Trim off about 1/4" from each short end to create clean edges. Then letter fold it so the top third folds over the middle third and then the bottom third folds up and over the other two.
- Take your time to make sure everything is lining up nicely. Turn the dough envelope 90 degrees so that it is tall and skinny not short and wide. Wrap it back up in the plastic wrap, and place it back in the fridge for 45 minutes.
- After the 45 minutes have passed, take it out of the fridge and unwrap it. With it in the same tall and skinny orientation, use the rolling pin to roll it out to the same size (20" x 10") making sure along the way to keep the edges straight.
- Once again, trim the short edges into clean crips lines (approximately 1/4" or 1/2" off each end). Repeat the letter folding, brushing off any excess flour as needed. Rewrap the dough and place it back in the fridge for 45 minutes.
- Repeat the rolling, trimming and folding once more and then rewrap and let chill for an hour in the fridge. If you are prepping the dough the night before, this is the step where you will leave it in the fridge and move onto the fillings and assembly in the morning.
Fillings
- During the last hour of chilling, you can prep both the fillings.
- In one medium mixing bowl add in 125 grams of soft salted butter, 125 grams granulated sugar, salt, 1.5 tablespoons cinnamon, and vanilla. Use a fork to smoosh it together until completely mixed. Set aside.
- In a separate smaller mixing bowl stir together 75 grams granulated sugar and 1.5 tablespoons of cinnamon.
Assemble
- After at least an hour of chilling, take the dough out of the fridge. Again using flour as needed roll the dough into a 16" x 12-14" rectangle. You're gonna need to use some muscle for this and be sure to roll all the way to the edges. Whatever side was already longer will become 16" and the shorter sides will become 12-14". There is a range because it is difficult to roll the dough out so if you get to 12.5" and give up I don't blame you.
- Trim 1/4" of dough off both of the long sides this time (not the short sides like before). Spread the first filling (the one with butter) over the surface of the dough. I like to use an offset spatula but the back of a spoon will work too. It should be soft and spreadable but not melted. Make sure to spread it evenly all the way to the edges.
- Sprinkle the second filling over the surface and use the back of the spoon to gently smooth it into the first filling.
- Starting with the long side closest to you, roll the dough and filling up.
- You can choose between 12 more normal sized cinnamon rolls or 8 jumbo (this is what is pictured).
- If making 12, give the whole roll a few squeezes to lengthen it to 18". If making 8, leave it as is.
- Trim off 1/4" from one end to give a clean starting slice. If making 8, mark 2 inch marks along the top of the roll. If making 12, mark 1.5" marks along the top. Use a sharp knife to slice through the roll, cutting the cinnamon rolls.
Proof
- Line a 9"x13" baking pan or a 9"x12" quarter sheet pan with a sheet of parchment. You can use one of the ones from earlier that was used for the butter block, just lay it buttered side up.
- Arrange 2 rows of 4 if making 8 cinnamon rolls or 3 rows of 4 if making 12, onto the parchment lined pan. Place them so that the "tails" or ends of each roll are facing towards another roll to keep them from completely unrolling.
- If making 8, I find they hold their shape a bit better if you leave more space between the rows and the edge of the pan and a little less between the two rows if that makes sense.
- Drape the top with a sheet of plastic wrap and set at room temperature for about an hour and a half – this will change dramatically based on how warm your room is. Also if you left the dough in the fridge overnight they will take a bit longer to proof. DO NOT put them somewhere warm to speed up the proofing, you'll melt out the butter and the layers will disappear.
- After 1.5 hours, place a rack in the center of the oven and heat to 425 F.
Bake
- They won't be as puffy as classic cinnamon rolls but they will have visibly gotten thicker and grown. For me this usually takes a total of 2 hours. *If your oven runs hot I would err on the side of 400 F. Mine runs cold so I heat it to 450 F knowing that it sits at 425 F.
- Once the oven is hot and the rolls are puffy and touching one another, bake them in the hot oven for 15 minutes. Then rotate the pan 180 degrees and bake for another 10-15 minutes until deeply golden brown.
- Remove the pan from the oven and let them cool for at least 10-15 minutes.
- In the meantime make the icing.
Icing
- There are so many different preferences on icing so if you have a favorite cinnamon roll cream cheese frosting, feel free to make that!
- For a thicker, frosting like a cream cheese frosting, I prefer this one which is a combo of mascarpone and cream cheese. In a mixing bowl, add in the mascarpone, cream cheese, salt, vanilla and powdered sugar. Beat until smooth and add milk as needed to thin it out.
- If you prefer more of a thin icing (usually I do), leave out the cream cheese and add more milk to the recipe above!
- Dollop the frosting over the cooled cinnamon rolls and use the back of a spoon to spread.
- Store leftovers in an airtight container at room temperature.
Notes
- Take your time and know that every time you make a laminated dough, you’ll get better!
- Use Kerrygold Salted butter for your butter block, I know it may seem extra but the higher fat content and salt make this butter softer and 10x easier to work with. If you use regular grocery store butter it will likely be too hard and splinter in your dough or melt before you have a chance to do the laminations.
- Watch this full length youtube video where I go over every detail while you make them.
- If you feel like your dough or butter are too warm and getting melty, or your home is quite warm, increase the fridge rest times to 50 minutes.
- Keep your lines and corners of the butter and the dough as straight and crisp as possible, this will lead to better layers and lamination.
- Unlike most yeasted doughs, we don’t want these to proof somewhere super warm just a low 70 degree room is best. If it’s too warm, the butter will melt out and all of your hard work will be lost.
Nutrition
This page may contain affiliate links. This means that if you click on one of the product links above and complete a purchase, I’ll receive a small commission at no extra cost to you. I will never place a link nor make a recommendation on a product or service that I don’t love or use personally. Read our privacy policy here. Thank you for supporting Red Currant Bakery.


Ok as someone who regularly makes cinnamon buns I DONT THINK I CAN EVER MAKE THEM AGAIN BECAUSE THESE ARE TOO GOOD. Seriously start to finish no issues, recipe written really easy to follow and my gooooodness they are so worth every effort. Seriously the best of both worlds, soft and fluffy inside cinnamon buns buttery flaky croissants outside. Make these.
Just spent all night making these and oh my god, they were so good. I could have eaten the whole tray. A true labor of love!!! This was my first time laminating dough so I was really nervous but Audrey’s instructions were super clear and detailed as always and the buns turned out perfectly. Your arms will be sore, but it is so worth it. I didn’t have whole milk (snow storm problems) so I used heavy cream with no issues.
Absolutely incredible. So gorgeous and flaky, but the center was still slightly soft and luscious.. topped with the icing, it was perfection. Made them last weekend & already making them again!
I tried it and everything went really good, the recipe is so well written!!
For me it’s a bit too much work for cinnamon rolls, but is it possible to make real croissants out of the dough or should I look for another recipe to try that?
Do you have recommendations?
Hi! Thank you so much, it should work no problem for standard croissants as well but I haven’t tested it so I can’t say with 100% certainty.
I made these yesterday for the first time and they turned out amazing!! I was pretty nervous, as I have no experience with making laminated dough. But I followed along with the YouTube video she posted which was super helpful. Will be making them again!!
I’ve had 2 cinnamon roll LOVERS separately tell me that these are the best they’ve ever had. I love that they’re “gooey” without being undercooked dough and they’re not at all bready. So worth the effort!!