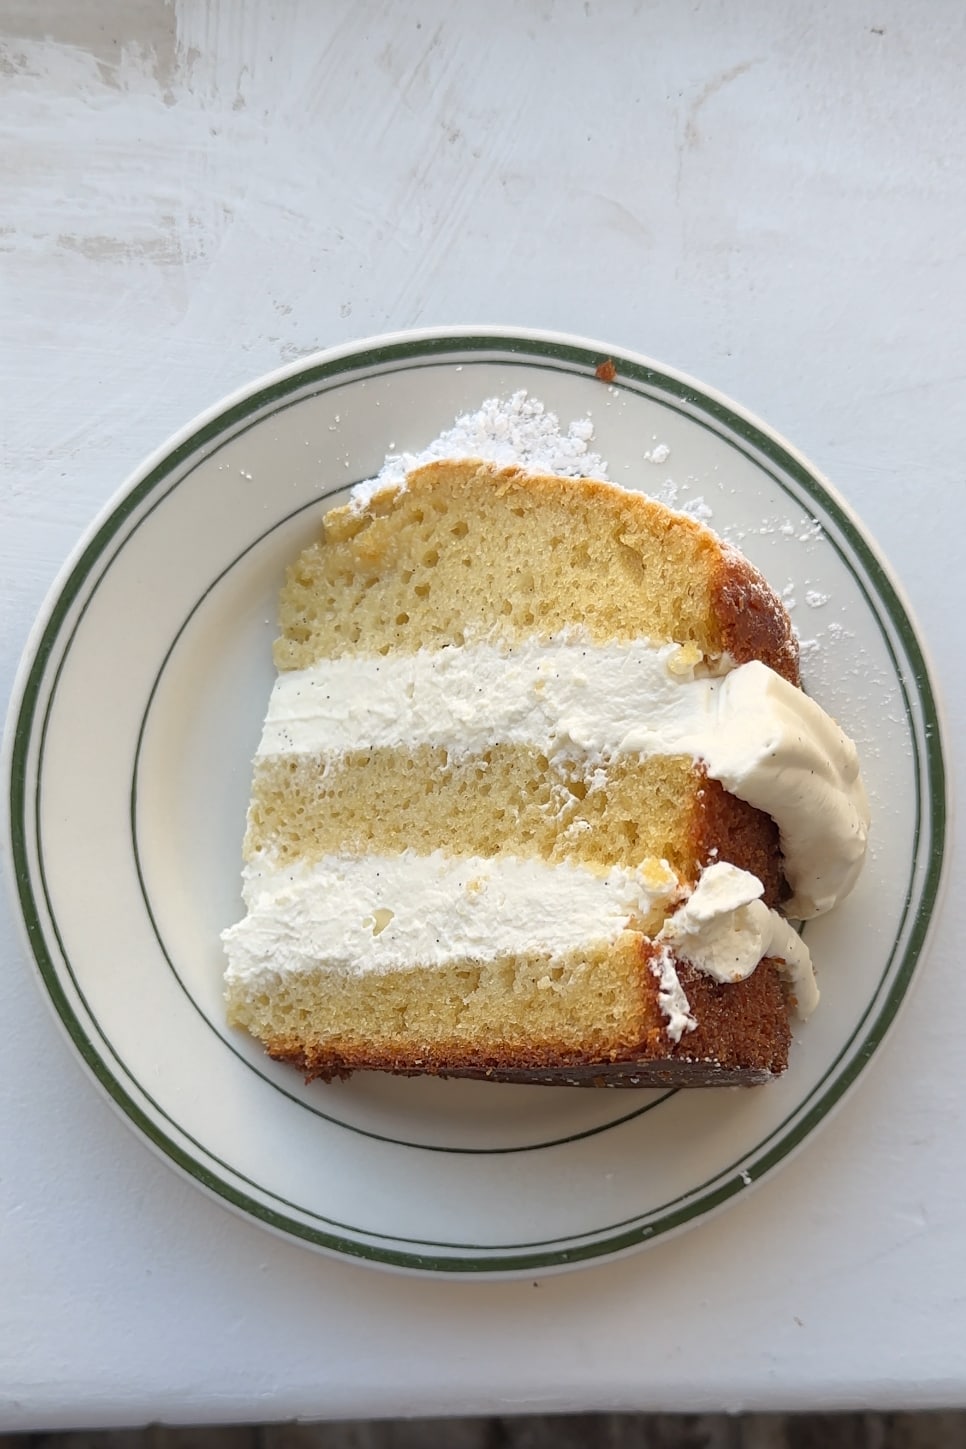
Three layers of vanilla sponge cake, a vanilla milk soak, and vanilla bean mascarpone whipped cream, this Vanilla Layer Cake is a moist and soft and full of vanilla flavor.
Why do you soak a cake?
Layer cakes are often “soaked” with a simple syrup to keep them moist or save a dry cake. In this case I wanted to make sure the mascarpone frosting didn’t lose moisture to the cake but I also wanted to add flavor to the cake. The vanilla milk soak is different from a classic water and white sugar soak and I think it’s DELISH – it tastes similar to a vanilla milk steamer. That being said you can use any soak that you want!
Is mascarpone the same as whipping cream?
No. Mascarpone is actually a type of fresh cheese that is thick but soft like cream cheese. For this cake it is the base of the filling/frosting and gets whipped together with cream to make a more stable whipped cream.
What can you use instead of vanilla beans?
Both the mascarpone whipped cream and the vanilla milk soak have vanilla beans in them. But if you don’t have any or don’t want to splurge, you can either replace them with just 2 teaspoons of vanilla extract or 2 teaspoons of vanilla bean paste.
Tips for making a simple vanilla layer cake
- If you want to make a full 9″ cake, multiply all the cake ingredients by 1.5 aka instead of 2 eggs, use 3. This cake can be easily scaled so you could also double it and make two thinner 9″ cakes.
- Triple check that your pan is the correct size and that your baking soda and baking powder haven’t expired!
- This cake is a great base for so many flavors so don’t be afraid to play around with fillings, frostings, and soaks but I do love how simple and elegant this one is.
- Use a baking spray with flour in it to spray the bottom of your cake pan, try not to spray the sides as it can make the cake rise oddly. Alternatively, grease the pan with soft butter and line the bottom with a round sheet of parchment paper.
- To scrape the vanilla beans out of the vanilla pods, press down wherever they are creased lengthwise to try and remove the crease. Then use a pairing knife to slice the pod in half lengthwise. If possible try to only cut through one layer of pod and not all the way through. Butterfly the now sliced pod open to reveal the vanilla bean. Use the dull edge of the knife to scrape the insides out of the bean.
- Be careful not to over whip the mascarpone frosting. It can easily split if you do, so it’s better to stop when it is still soft and if needed, whip a little more by hand just before assembling. If you do happen to over whip it, pour a little extra heavy cream in the bowl and use a spatula or spoon to stir it together.
- I prefer to soak and assemble the cake on the day it is baked, I find the syrup soaks in better to the layers and it is easy to cut into three layers when the cake has just cooled to room temperature.
Additional Cake Recipes to try!
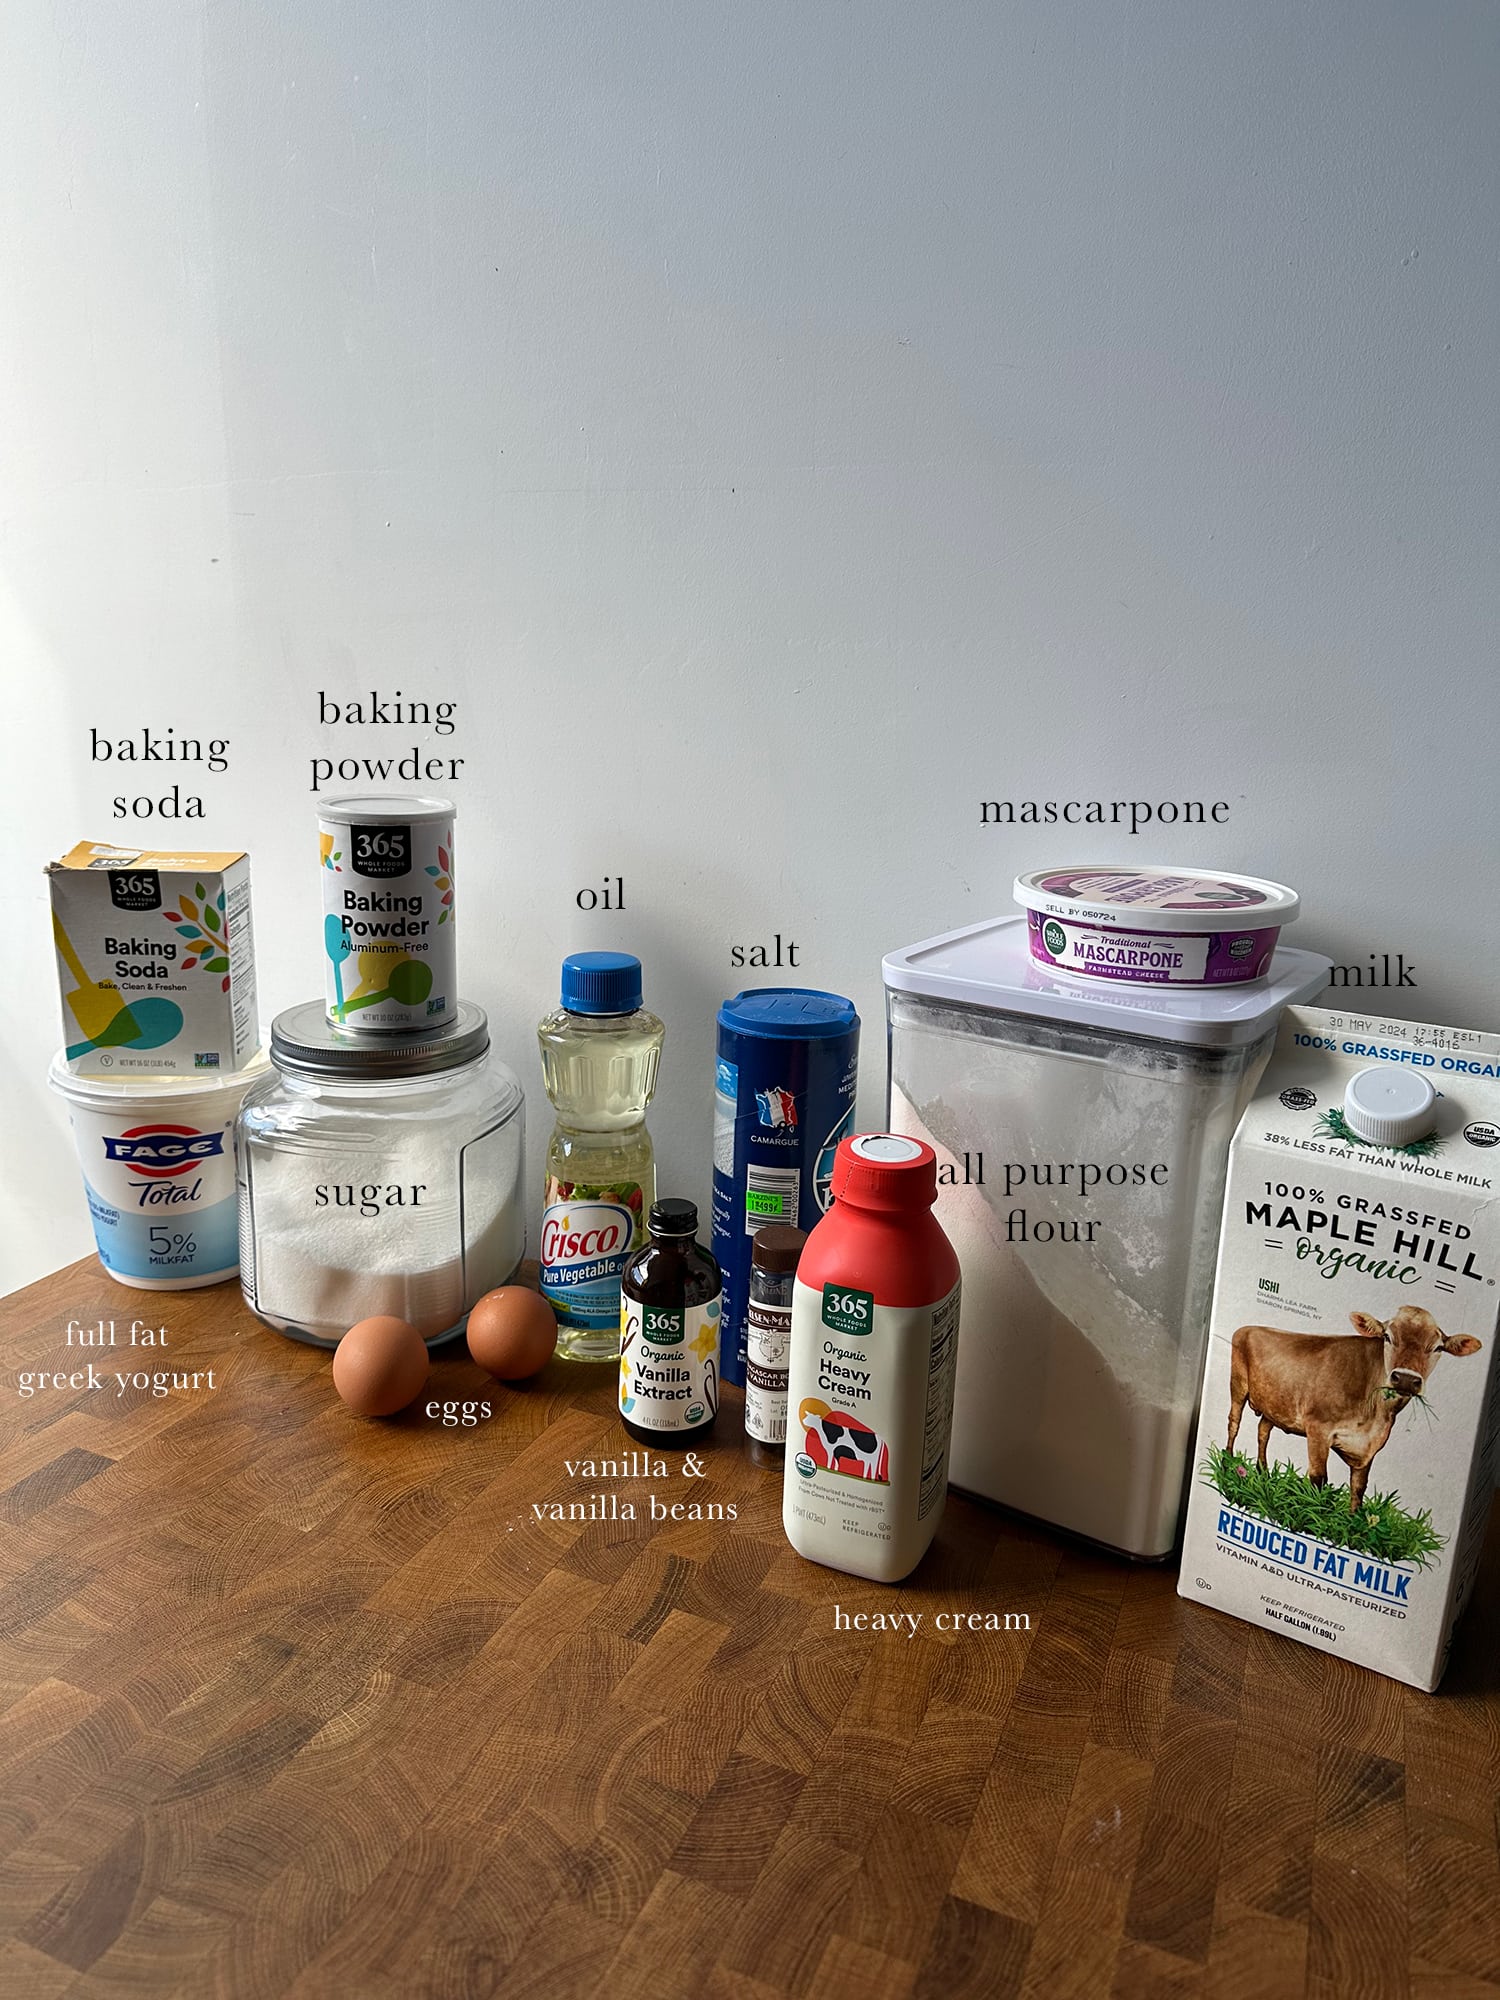
Vanilla Layer Cake Ingredients
- All Purpose Flour: Any all purpose flour will work for this cake! I have not yet tried any other flours with this recipe.
- Baking Soda & Baking Powder: These both help make the cake rise – make sure to check the expiration date! If they are expired, they won’t be very effective.
- Salt: A little bit of salt enhances the flavors and balances out the sweetness.
- Vanilla Extract: Vanilla adds flavor to the cake, filling and soak.
- Eggs: I use standard large eggs from the store.
- Sugar: This cake uses granulated sugar in the cake batter, soak, and mascarpone filling. Optionally also dust the top of the cake with powdered sugar
- 5% Fat Greek Yogurt: Full fat greek yogurt adds richness and moisture to the cake. You can also use Sour cream.
- Oil: Oil adds moisture to this cake and keeps it from drying out. I recommend using a neutral oil such as vegetable, canola, or avocado oil.
- Mascarpone: Mascarpone adds a little extra umph to an otherwise simple whipped cream.
- Vanilla Beans: I love adding vanilla beans to the mascarpone filling and milk soak for extra flavor and for the beautiful flecks but you could leave them out or use vanilla bean paste
- Heavy Cream: Heavy cream or heavy whipping cream will work, just make sure it’s cold.
- Milk: Any milk will work for the soak and cake but I tend to use whole milk or 2% for a richer taste.

How to make a Vanilla Cake?
- Preheat the oven to 350 F and place a rack in the middle of the oven.
Vanilla cake batter
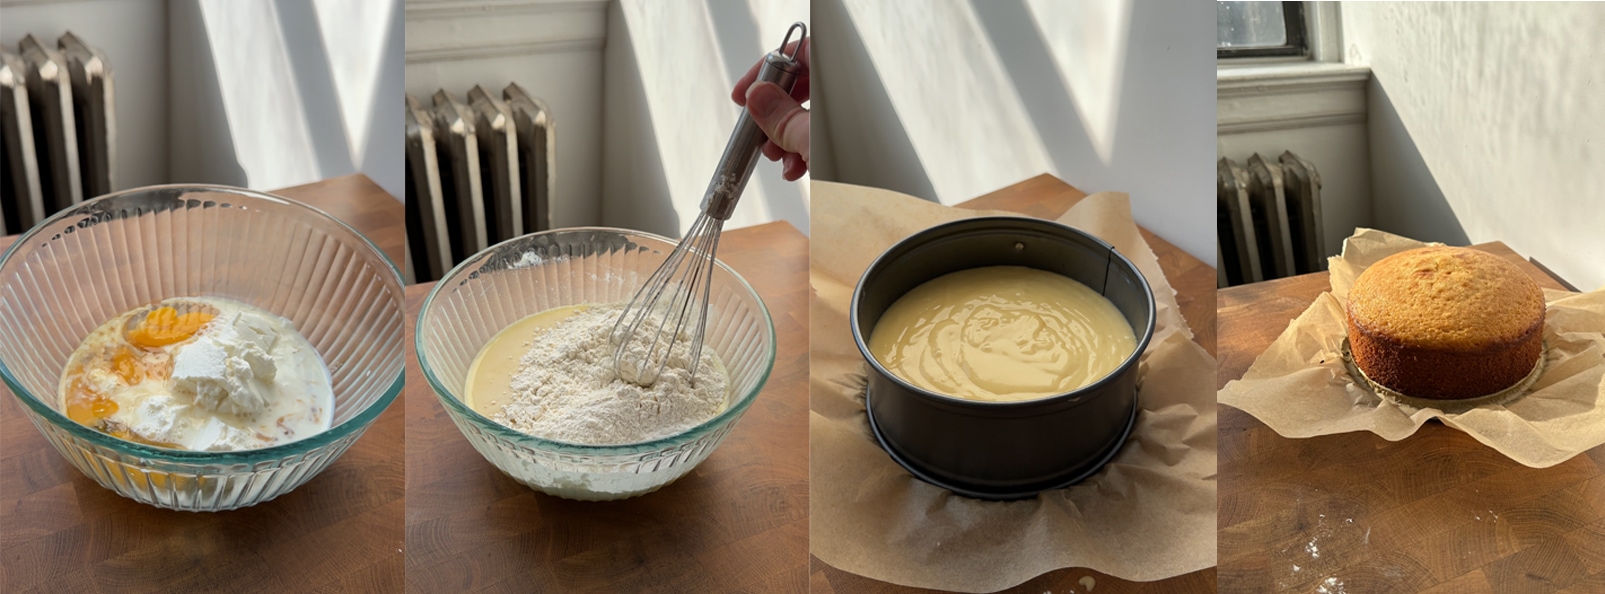
- In a medium bowl, whisk together the eggs, sugar, salt, yogurt, milk, and vanilla extract until smooth.
- Pour in the oil and whisk again.
- Lastly, pour in the flour, baking soda and baking powder.
- Whisk once more until combined and smooth.
- Scrape the sides and bottom of the bowl.
- Spray the cake pan with your baking spray and then pour in the vanilla batter.
- Smooth out the cake with a rubber spatula.
Bake
- Bake the cake in the preheated oven for 25 minutes. After 25 minutes, rotate the cake 180 degrees and bake for another 10-15 minutes.
- When the cake is finished baking, check it by sticking a toothpick into the center of the cake. If the toothpick comes out clean, the cake is fully baked.
- Remove the cake from the oven and leave it to cool for 10 minutes before removing the spring form.
- After 10 minutes, remove the springform.
- Allow the cake to cool completely before assembling.
Vanilla Mascarpone frosting
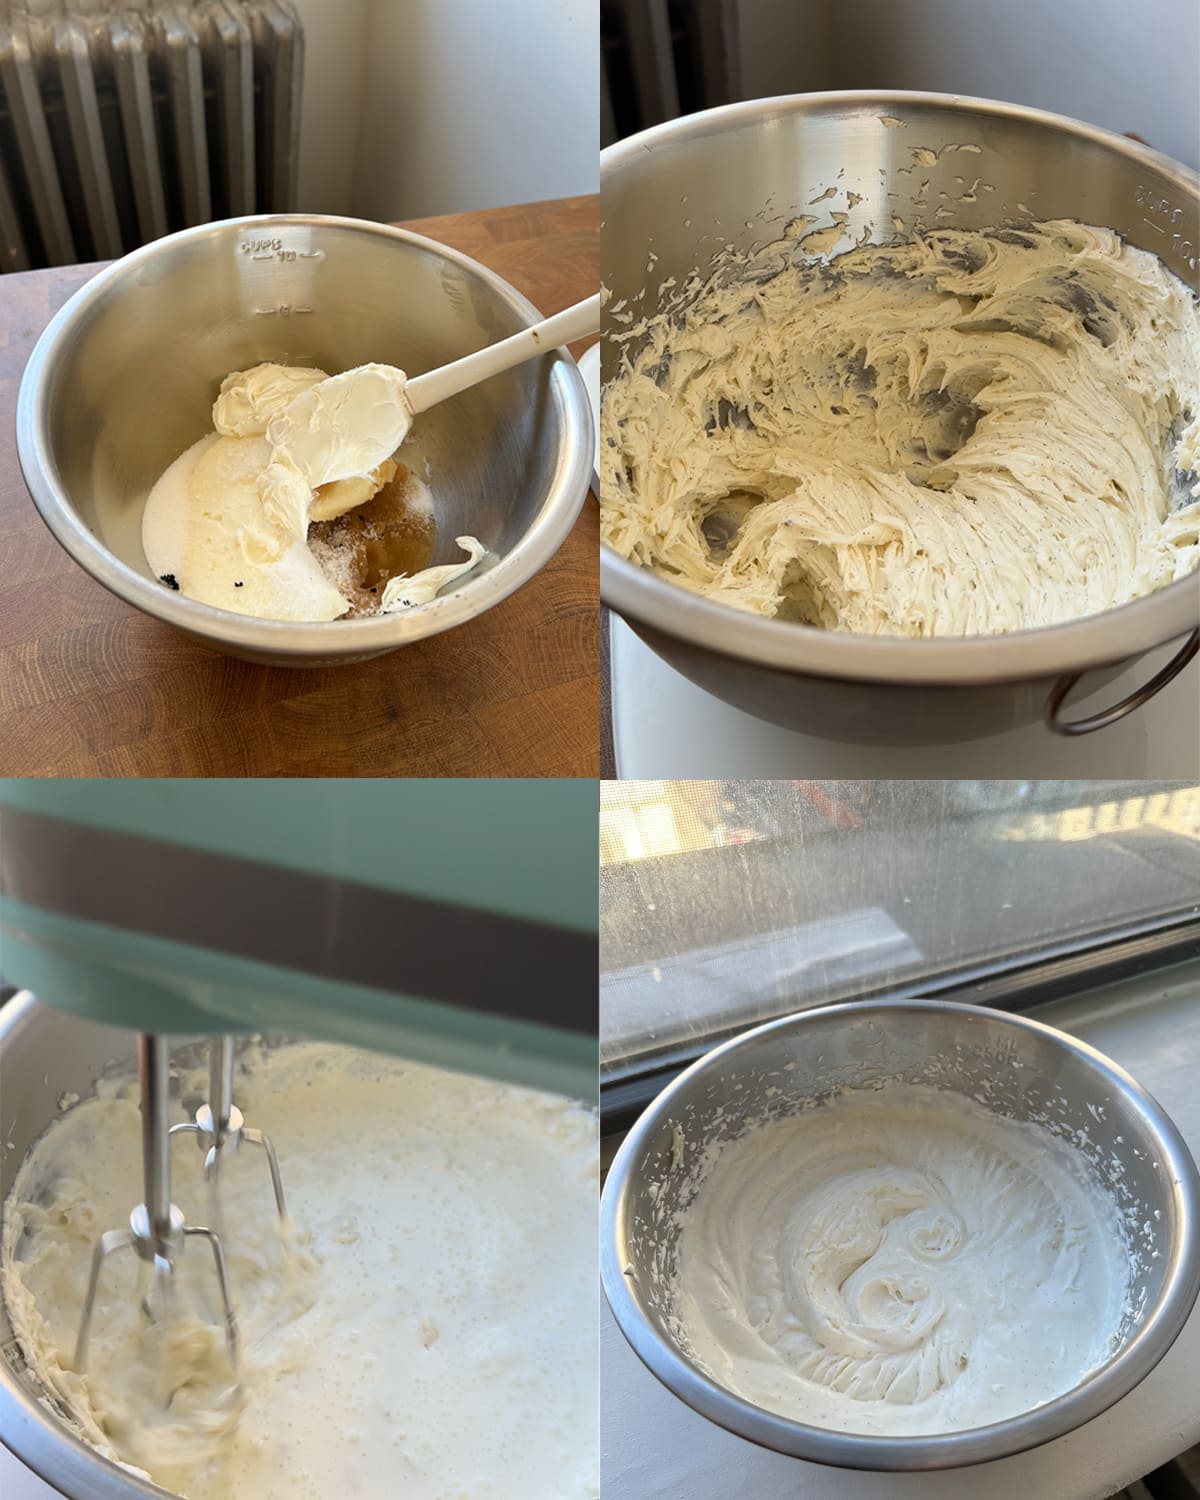
- In a medium mixing bowl, add in the cold mascarpone, sugar, vanilla bean insides, salt, and vanilla extract.
- Use the paddle attachment to cream the mascarpone mixture on medium speed for 3 minutes until the sugar has fully dissolved. If using a hand mixer, the regular beater attachments will work.
- Turn off the mixer and pour in the cold heavy cream.
- Switch to the whisk attachment and whip on medium speed until medium stiff peaks form. Do not over whip it, it’s better to under whip rather than over whip. If you over whip it, pour in a little extra heavy cream and use a rubber spatula to fold it in.
- Set aside until ready to assemble.
Vanilla Bean Milk Cake Soak
- In a medium pot, add in the sugar, milk, one vanilla bean plus the insides scraped out into the pot, as well as the empty vanilla pod from the mascarpone whipped cream.
- Place over medium low heat and whisk until the sugar has dissolved. Remove from the heat and pour through a sieve into a heat safe bowl to strain out any big vanilla pod pieces.
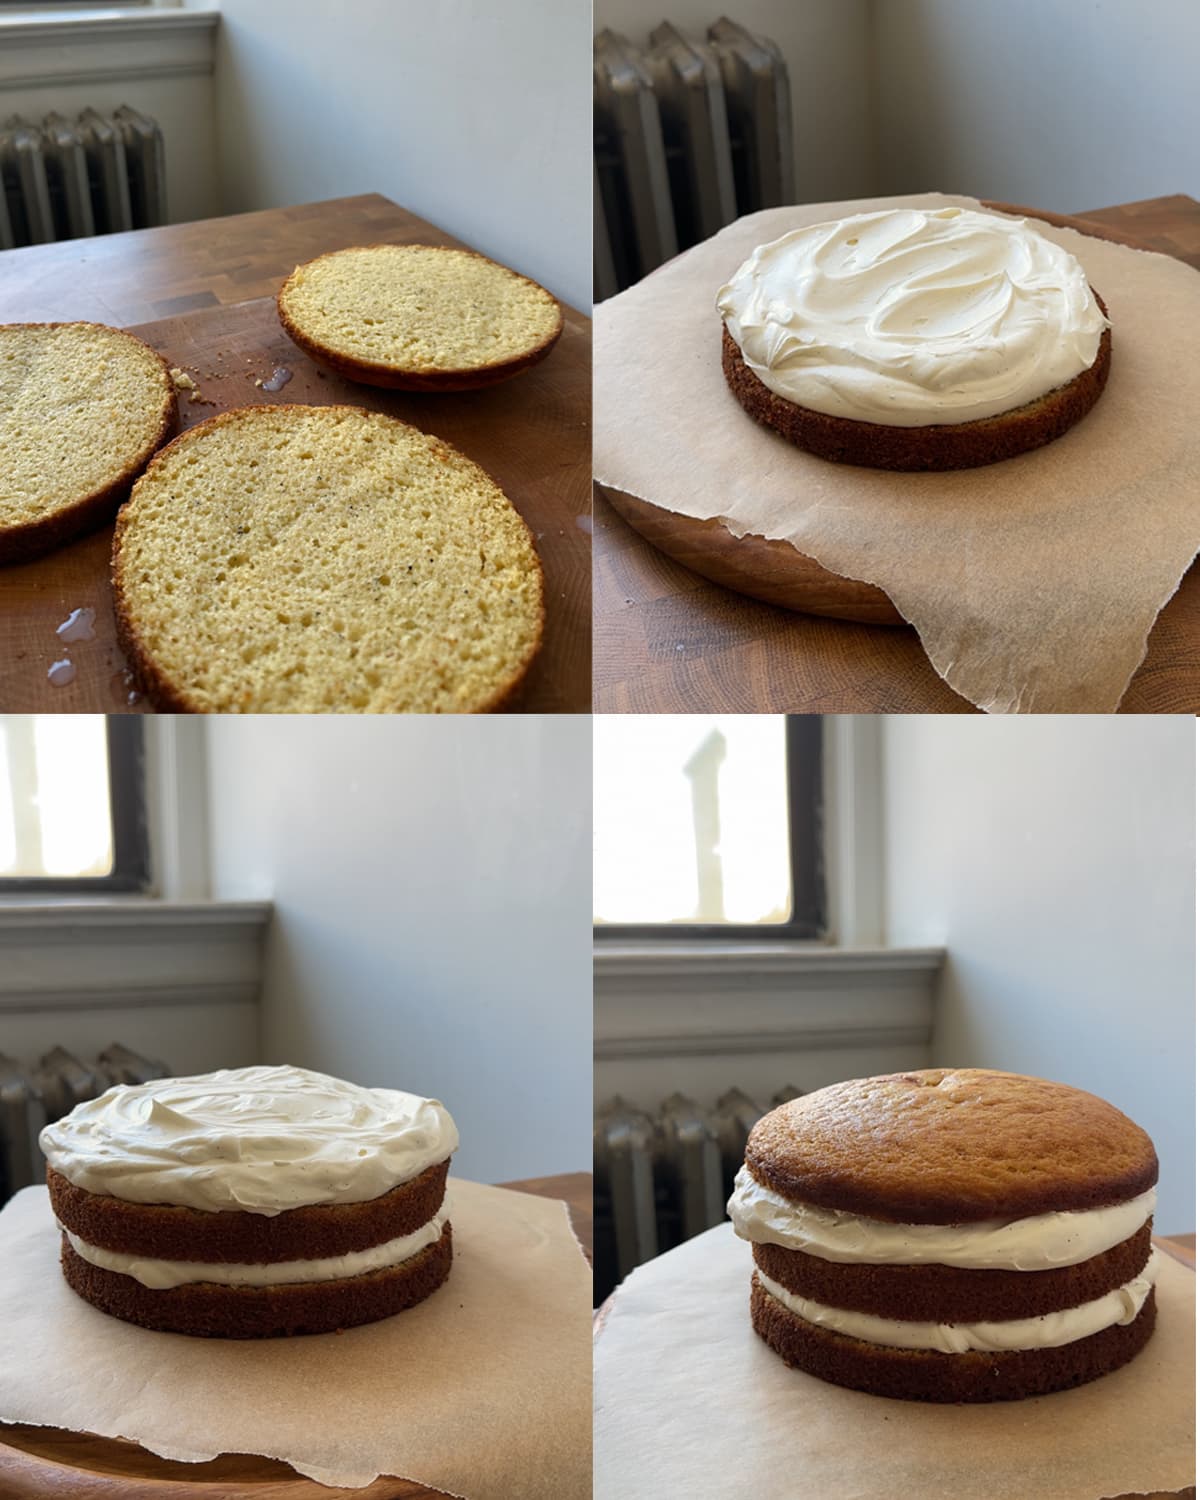
Assemble
- * If you want to fully frost the outside of the cake, level off the domed top of the cake first.
- Slice the cake into 3 layers with a serrated knife.
- Brush the top of the bottom and middle layers, and the bottom of the top layer, with the vanilla milk soak until it has all been used up.
- Place the bottom layer of the cake onto a dish or cake stand, ideally lined with parchment for easy transportation.
- Scoop one third of the mascarpone frosting onto the bottom layer of cake and use the back of a spoon or rubber spatula to spread it out. Stop about 1/4″ from the edge of the cake.
- Layer the middle layer of cake over the frosting and press down gently.
- Repeat the frosting layer on the middle layer of cake.
- Flip the top layer back over and place it soak side down onto the frosting layer.
- Either, dust the top of the cake with powdered sugar or scoop the remaining frosting onto the top of the cake. Using the back of a spoon to make loose swoops on top.
- *If you want to fully frost the cake, make 1.5 times the frosting. Once layered, place the fridge in the cake for at least an hour to let it firm up before frosting the sides of the cake.
- If time leave the cake to firm up slightly for an hour before slicing but it can be sliced and served immediately.


Vanilla Layer Cake
Equipment
- Stand Mixer
- 7" Metal Cake Pan
Ingredients
Cake
- 2 eggs room temperature
- 175 grams granulated sugar
- 2 teaspoons vanilla extract
- 1/2 teaspoon fine sea salt
- 100 grams full fat greek yogurt room temperature
- 90 grams oil neutral
- 50 grams whole milk
- 150 grams all purpose flour
- 1/2 teaspoon baking soda
- 1/2 teaspoon baking powder
Mascarpone Whipped Cream
- 226 grams mascarpone 8 ounces, cold
- 80 grams granulated sugar
- 2 teaspoons vanilla extract
- 1/2 teaspoon fine sea salt
- 350 milliliters heavy cream cold, more as needed
Vanilla Milk Soak
- 80 grams granulated sugar
- 150 milliliters milk
- 1 vanilla bean *optional, replace with 2 teaspoons vanilla extract or vanilla bean paste
Instructions
Vanill Cake Batter
- Preheat the oven to 350 F and place a rack in the middle of the oven.
- In a medium bowl, whisk together the eggs, sugar, salt, yogurt, milk, and vanilla extract until smooth.
- Pour in the oil and whisk again.
- Lastly, pour in the flour, baking soda and baking powder.
- Whisk once more until combined and smooth.
- Scrape the sides and bottom of the bowl.
- Spray the cake pan with your baking spray and then pour in the vanilla batter.
- Smooth out the cake with a rubber spatula.
Bake the Cake
- Bake the cake in the preheated oven for 25 minutes. After 25 minutes, rotate the cake 180 degrees and bake for another 10-15 minutes.
- When the cake is finished baking, check it by sticking a toothpick into the center of one section of the cake. If the toothpick comes out clean, the cake is fully baked.
- Remove the cake from the oven and leave it to cool for 10 minutes before removing the spring form.
- After 10 minutes, run a knife between the cake and the edge of the pan, then remove the springform.
- Allow the cake to cool completely before assembling.
Vanilla Mascarpone Whipped Cream
- In a medium mixing bowl, add in the cold mascarpone, sugar, vanilla bean insides, salt, and vanilla extract.
- Use the paddle attachment to cream the mascarpone mixture on medium speed for 3 minutes until the sugar has fully dissolved. If using a hand mixer, the regular beater attachments will work.
- Turn off the mixer and pour in the cold heavy cream.
- Switch to the whisk attachment and whip on medium speed until medium stiff peaks form. Do not over whip it, it's better to under whip rather than over whip. If you over whip it, pour in a little extra heavy cream and use a rubber spatula to fold it in.
- Set aside until ready to assemble.
Vanilla Bean Milk Soak
- In a medium pot, add in the sugar, milk, one vanilla bean plus the insides scraped out into the pot, as well as the empty vanilla pod from the mascarpone whipped cream.
- Place over medium low heat and whisk until the sugar has dissolved. Remove from the heat and pour through a sieve into a heat safe bowl to strain out any big vanilla pod pieces.
Assemble
- * If you want to fully frost the outside of the cake, level off the domed top first.
- Slice the cake into 3 layers with a serrated knife.
- Brush the top of the bottom and middle layers, and the bottom of the top layer, with the vanilla milk soak until it has all been used up.
- Place the bottom layer of the cake onto a dish or cake stand, ideally lined with parchment for easy transportation.
- Scoop one third of the mascarpone frosting onto the bottom layer of cake and use the back of a spoon or rubber spatula to spread it out. Stop about 1/4" from the edge of the cake.
- Layer the middle layer of cake over the frosting and press down gently.
- Repeat the frosting layer on the middle layer of cake.
- Flip the top layer back over and place it soak side down onto the frosting layer.
- Either, dust the top of the cake with powdered sugar or scoop the remaining frosting onto the top of the cake. Using the back of a spoon to make loose swoops on top.
- *If you want to fully frost the cake, make 1.5 times the frosting. Once layered, place the fridge in the cake for at least an hour to let it firm up before frosting the sides of the cake.
- If time leave the cake to firm up slightly for an hour before slicing but it can be sliced and served immediately.
Notes
- If you want to make a full 9″ cake, multiply all the cake ingredients by 1.5 aka instead of 2 eggs, use 3. This cake can be easily scaled so you could also double it and make two thinner 9″ cakes.
- Triple check that your pan is the correct size and that your baking soda and baking powder haven’t expired!
- This cake is a great base for so many flavors so don’t be afraid to play around with fillings, frostings, and soaks but I do love how simple and elegant this one is.
- Use a baking spray with flour in it to spray the bottom of your cake pan, try not to spray the sides as it can make the cake rise oddly. Alternatively, grease the pan with soft butter and line the bottom with a round sheet of parchment paper.
- To scrape the vanilla beans out of the vanilla pods, press down wherever they are creased lengthwise to try and remove the crease. Then use a pairing knife to slice the pod in half lengthwise. If possible try to only cut through one layer of pod and not all the way through. Butterfly the now sliced pod open to reveal the vanilla bean. Use the dull edge of the knife to scrape the insides out of the bean.
- Be careful not to over whip the mascarpone frosting. It can easily split if you do, so it’s better to stop when it is still soft and if needed, whip a little more by hand just before assembling. If you do happen to over whip it, pour a little extra heavy cream in the bowl and use a spatula or spoon to stir it together.
- I prefer to soak and assemble the cake on the day it is baked, I find the syrup soaks in better to the layers and it is easy to cut into three layers when the cake has just cooled to room temperature.
- Both the mascarpone whipped cream and the vanilla milk soak have vanilla beans in them. But if you don’t have any or don’t want to splurge, you can either replace them with just 2 teaspoons of vanilla extract or 2 teaspoons of vanilla bean paste.
Nutrition
This post may contain affiliate links. This means that if you click on one of the product links above and complete a purchase, I’ll receive a small commission at no extra cost to you. I will never place a link nor make a recommendation on a product or service that I don’t love or use person


Oh my god this cake was everything. Ever since she posted a preview i was waiting for the second she’d post the recipe! I made it immediately and it was beyond delicious. The only addition was i steeped Earl gray tea in the milk soak! It was perfect, my new go to cake!!
Aww thank you so much Ellie!!! I love the idea of adding Earl Gray tea!
OMG, i used this recipe to make a tiramisu cake, so instead of this soak i used coffee but when i tried the sponge by itself it was the best vanilla cake I’ve ever tasted so now its my goto, Thanks for sharing this amazing recipe!
Ummm that’s GENIUS! Thank you so much Maria!
This cake *delivered.* so simple, but just perfect. Something I can see recommending to others and coming back to again and again! I made this as two layers with the measurements as given but pouring the batter equally in 2, 6-inch cake pans 🙂
Thank you so much Kim! I’m so glad you enjoyed it!
Hi, cake sounds delicious but I can’t take oil, I can taste oil in cake and its not nice for me anyway, even netual oil. So could I possibly use melted butter or ghee? Thks ❤
Hi Leigh! I recommend making the cake batter from my marble loaf cake but leave out the chocolate additions and bake it the way that this cake is baked.
I ended up swapping a few ingredients just because of what I already had in my pantry and fridge (oat milk instead of whole, 0% fat yogurt instead of full fat, bread flour instead of all purpose) and the cake still came out great which is probably a sign of a really good recipe! As someone who lives alone, I also like how the proportions are designed for a smaller cake size than the usual 9 inch round
Yayyy this makes me so happy, thank you Claudia!
This cake came out so well! I didn’t use all of the milk soak but it was still so light and fluffy. 10/10 will definitely make this again !
Yay thank you so much Safiyyah!
I made this cake gluten free, I followed all measurements and instructions exactly except for the flour I used Bobs red mill 1:1 baking flour and the cake came out like perfection!!! My guests couldn’t even tell it was gluten free!!
Oh my goodness this is great news! Thank you so much for sharing!
Hi! I really want to try this recipe but only have a 8in pan on hand. Do you have any suggestions like the tip you had for using a 9in pan? Thanks a lot!
Hi! I would bake the recipe as is in an 8″ pan but check the cake 15 minutes sooner. Then decide how tall you want it to be to determine if you need to bake another layer. I hope that helps/makes sense, I’m not sure exactly how tall one batch in an 8″ pan will be since I haven’t tested it.
This is my first recipe of yours that I’m making and I loved it. The instructions were really clear, it came out perfect and everyone loved it! I added strawberry puree in the icing and some strawberries in the middle and it was delicious!
Oh my goodness, thank you Laura! I’m so glad you enjoyed it!
This cake is absolutely everything. I didn’t know I was capable of making something so delish! Did this recipe but topped with strawberries and it was TO DIE FOR! Thank you for this recipe <3 forever grateful
Yayyy thank you so much Millie!!!
my boyfriend made this for my birthday. so delicious! he didn’t make the milk soak, it was moist enough!!
Aww yay I’m so glad! Thank you so much Thea!
made quite a few layer cakes but this one is the new fav. the mascarpone whipped cream is perfect! definitely going to recycle it on all sorts of recipes. baked in two 6 inch cake pans for 20-25 mins at 350 with cake strips to keep the sponge flat. thanks so much for the lovely recipe!
Aww yay thank you so much Sophie!!!
Best vanilla sponge ever!
Hi!! I love this recipe, do you think I could make it into cupcakes?
Yes, absolutely!
Can I use this recipe to make cupcakes?
Yes!
I made this cake for a Galentine’s party and it was amazing!! I doubled the cake recipe and used 3 9” inch pans baked for about 20 minutes. The cake was so moist and had an amazing spongy texture. I didn’t use the milk soak due to time but that would have been the best addition! Will be my go-to vanilla cake recipe from now on!
I made this cake last year when this recipe was first posted, and my mom asks me to make it now for every occasion. It’s so delicious!
Delicious cake!!! The combo of the cake, the soak, and the frosting was 10/10
This cake is simply the best cake I’ve ever made. I subbed the neutral oil for browned butter and it was INCREDIBLE. So tender and tasty. It will be my go to cake base from now on. Make sure you really let everything come up to room temp before mixing the batter as it makes a huge difference.
The base is amazing! I swapped some of the vanilla extract for almond and added poppy seeds. Made a raspberry jelly to add between the layers (and mixed some into the mascarpone frosting for color). Decorated with fresh raspberries and sliced almonds!
I love love this recipe! I made it into a rose cake with raspberry preserves and white chocolate Russian buttercream… I love mascarpone cream but it is not as stable… but I will use it as well in certain situations… actually, this cake replaced my favorite recipe by Sugar Geek Show… so it is quite an achievement. it is easier to make and I love the texture. Same with your chocolate cake. The only thing I am not crazy about is the dome. I wonder if there is any way to fix it… do you think maybe trying wet strips around the pan would help? I just feel so much cake goes to waste. Not exactly to waste, because I will eat it! But it is harder to figure out how much dough you really need if you making a bigger cake… Or if you bake it in 3 pans then you end up with 3 domes…. :((. Othewise, it is fabulous!!!!
Best vanilla cake!! It comes out soft and moist. Don’t skip on the milk syrup. The cake overall has the right sweetness. I did this cake for a graduation celebration and everyone loved it. Thank you for this recipe.