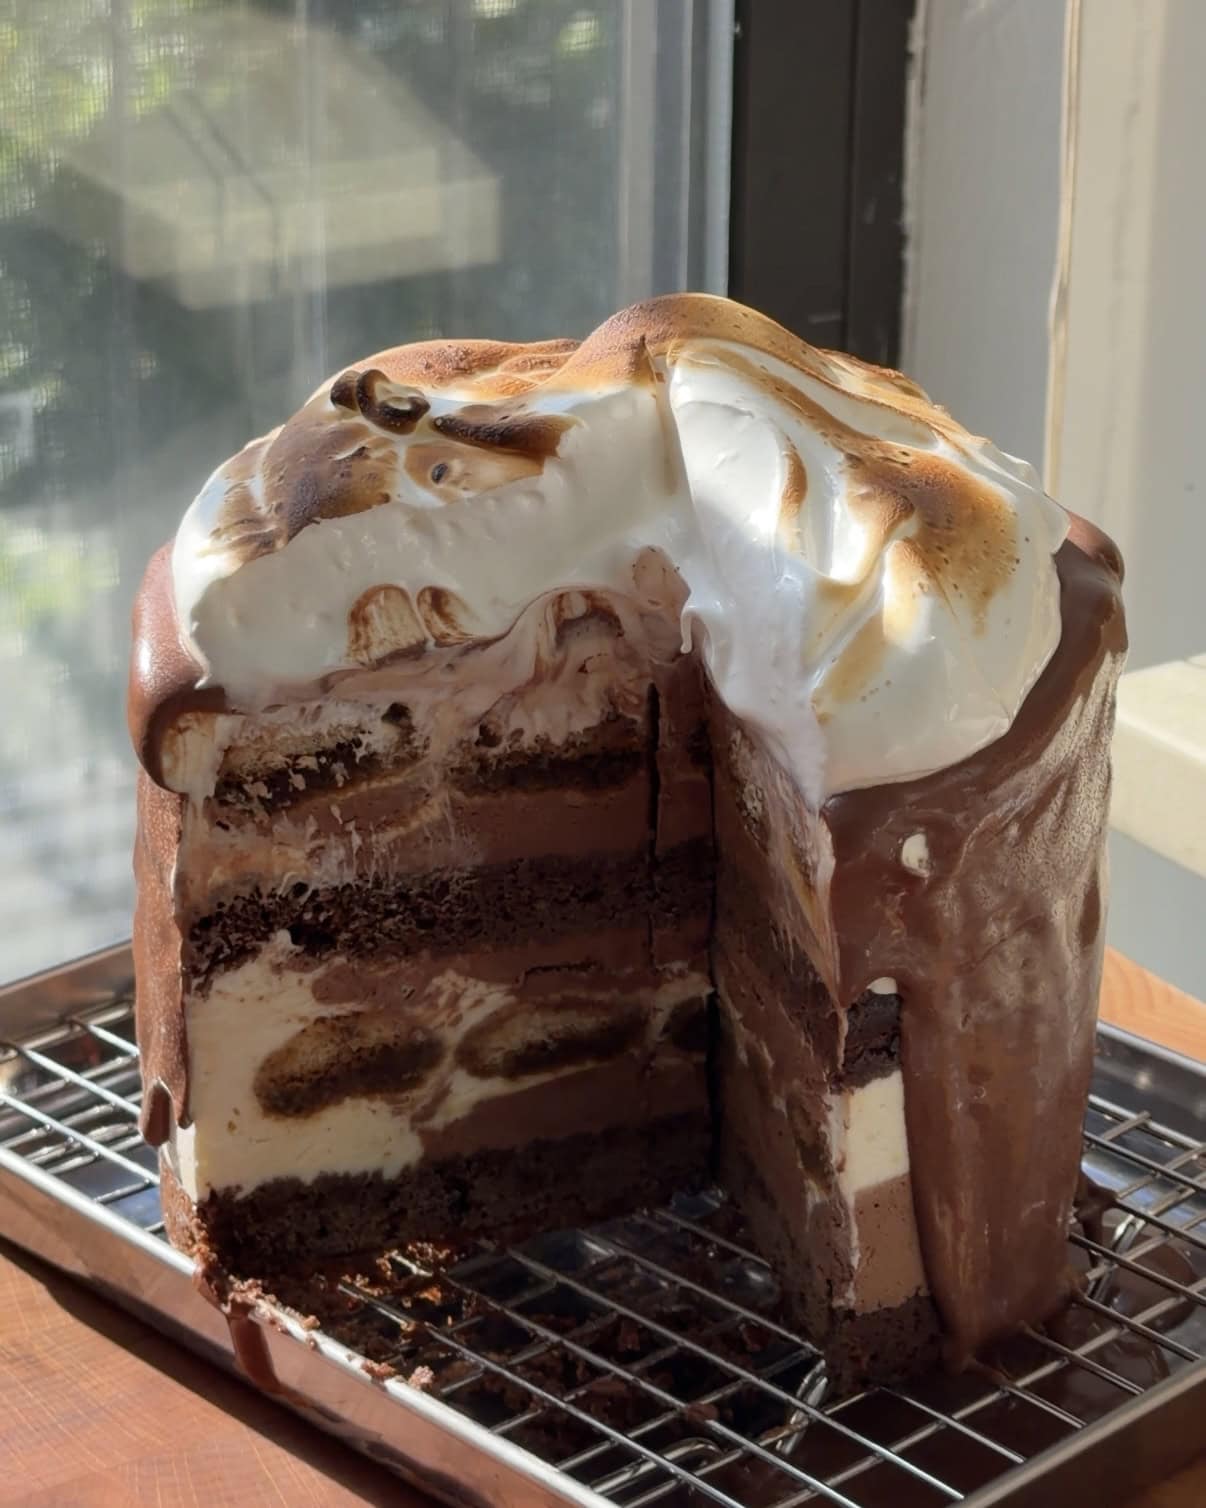
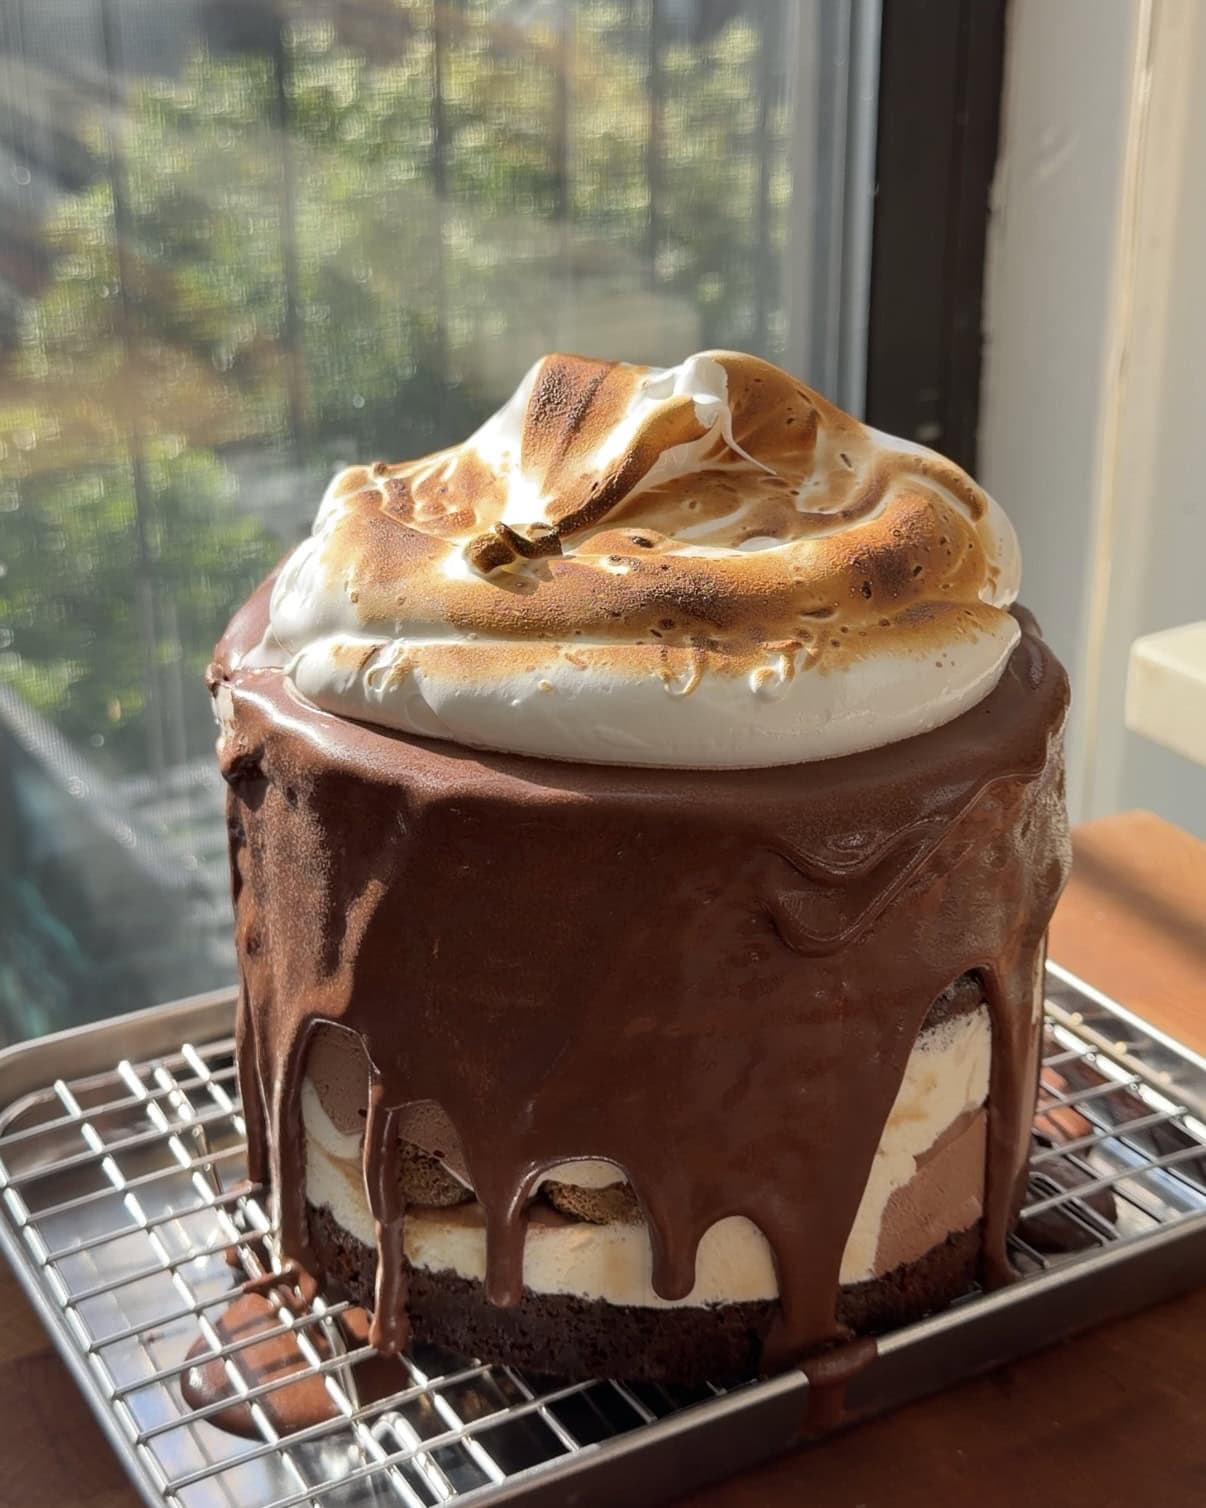
Layers of chocolate cake and lady fingers soaked with a brown sugar espresso syrup, layered with vanilla and chocolate ice cream, topped with chocolate ganache and meringue, this Chocolate Tiramisu Ice cream cake is perfect for summer.
Do I need an ice cream maker?
Nope, you don’t need an ice cream maker to make this Chocolate Tiramisu Ice Cream Cake. This recipe uses a no churn ice cream base but in a pinch you could also use store bought ice cream, just make sure it’s soft enough to really settle into the layers.
Can this cake be made in advance?
Yes! Because this cake needs to freeze I almost insist you make it the day before so it can freeze overnight. I think you could get away with making it first thing in the morning – think 8 or 9 am if you then plan to serve it in the evening.
Store bought vs homemade lady fingers
I always use store bought lady fingers for ease, especially when you’re making everything else yourself. That being said you can absolutely make your own!
Tips for making a Chocolate Tiramisu Ice Cream Cake
- Make sure all the ingredients are at room temperature – this will help get a smooth and fluffy cake batter.
- If you don’t have an espresso machine or a mokka pot, you can use strongly brewed coffee, but the flavor will be less intense. You can also go to a coffee shop and get 3 double shots! I don’t recommend using instant unless you really like the taste of it because you will be able to taste it.
- I made this in a 6″ pan but it can easily be scaled up to 8″ with a little area of a circle math.
- To assemble this cake you’ll have the best success with a sheet of acetate and a cake collar. I love this cake ring from ikea but any ring or even a springform pan will work to create the stability to stack the cake. In order for everything to fit, you’ll also want to use a sheet of acetate, this is more optional but it will give you a cleaner finish. If you don’t have the acetate to go inside of the cake collar, you can eliminate the second layer of ladyfingers or cake.
- If you aren’t in the mood to make both the chocolate ganache and meringue you can just make whichever one you want!
- To torch the meringue you will need a kitchen torch but it’s not necessary to torch it! I usually use this one but in my move it seems to have broken so I ordered this one in a pinch and so far so good but I haven’t had it for long.
Additional recipes to try!
Ingredients for Chocolate Tiramisu Ice Cream Cake
- All Purpose Flour: Any all purpose flour will work for this cake, I use King Arthur all-purpose flour!
- Sugar: White granulated sugar is used in the cake and meringue.
- Baking Soda & Baking Powder: These both help make the cake rise – make sure to check the expiration date! If they are expired, they won’t be very effective.
- Salt: Fine sea salt helps balance out all of the sweetness in the cake and enhances the flavors.
- Cocoa Powder: Dutch Processed or natural cocoa powder will work! I use Ghirardelli 100% cocoa powder.
- Butter: Butter adds moisture and richness to the cake. I use salted butter but you could use unsalted too for this cake.
- Sour Cream: Sour cream is used in the cake to make it nice and fluffy but full fat greek yogurt will work too!
- Vanilla: Vanilla adds flavor and enhances the sweetness of the cake and the ice cream layers, I like to add vanilla bean paste into the ice cream too but it’s more optional.
- Eggs: I use standard large eggs from the store, make sure the eggs for the cake are at room temperature. The eggs for the meringue should be cold to make separating them easier.
- Espresso: Espresso is used in both the cake batter and the soak. If you don’t have an espresso machine you can get some at a local coffee shop or use strongly brewed coffee, it just won’t be as strong.
- Brown Sugar: Dark brown sugar is used for the espresso brown sugar soak but light brown sugar will work too if that’s all you have!
- Sweetened Condensed Milk: I like to have my can in the fridge so that it is cold when whipped with the cream. That being said don’t fret if yours is in the pantry – it may just take longer to whip.
- Heavy Cream: Cold heavy whipping cream is used for the no churn ice cream to give it the aeration you need for the no churn method. Heavy cream is also used for the ganache.
- Lady Fingers: I always use store bought lady fingers but you can absolutely make your own.
- Chocolate: High quality bar chocolate is used in the chocolate ice cream and for the chocolate ganache. It’s important not to use chocolate chips as they won’t melt properly.
How to make a Chocolate Tiramisu Ice Cream Cake
Make the Chocolate Cake
- Preheat the oven to 350 F and place a rack in the center of the oven.
- In the bowl of a stand mixer, add in the flour, sugar, salt, baking powder, and baking soda, and cocoa powder. Whisk to combine.
- Add in the egg, butter, sour cream, vanilla, and espresso. Beat with a mixer until just smooth.
- Scrape the sides and bottom of the bowl.
- Spray the bottom 6″ metal cake pan with your baking spray or line with a parchment round and then pour in the chocolate batter.
- Smooth out the cake with a rubber spatula.
- Bake in the hot oven for 15 minutes. After 15 minutes, rotate the cake 180 degrees and bake for another 10-12 minutes until the center is set and a toothpick comes out clean.
- Once baked, remove the cake from the oven. Leave it to cool for 15 minutes before removing from the cake pan. Remove the cake and leave it to cool completely on a cooling rack.
Make the Brown Sugar Espresso soak
- In a heat safe mug or bowl, add in the dark brown sugar.
- I like to pull my espresso shots directly over the brown sugar to start dissolving the sugar. But if you made the espresso on the stove or in a coffee pot, simply pour it over the brown sugar. Stir to dissolve.
- If you bought espresso at a coffee shop you’ll need to get it hot again in order to dissolve the brown sugar.
- Set aside to cool while you make the ice cream.
Vanilla & Chocolate Ice Cream
- In a double boiler or in the microwave melt the chocolate. Set aside to cool slightly.
- In a large mixing bowl, add in the sweetened condensed milk along with both vanillas, salt, and heavy cream. Whip on medium high if using a stand mixer or high if using a hand mixer until it stiffens. You won’t be able to get super stiff peaks but it should hold lines and volume. This does take a while especially with a hand mixer.
- Pour 475 grams into a separate bowl. Pour the cooled chocolate into the original bowl with the remaining ice cream base. Whip the chocolate into the ice cream base until smooth.
Assemble the Cake
- Use a large serrated knife to level off the top of the cake. Then cut the cake in half into two layers.
- Lay a piece of parchment paper on a flat tray or plate that will fit the cake and fit in your freezer.
- Place the bottom chocolate cake layer on the parchment and then place the cake ring around the cake with the acetate ring between the cake and the cake ring/collar. Tighten until snug around the cake.
- Use a pastry brush to brush the surface of the cake with a couple tablespoons of the espresso soak. Pour the remaining soak into a small baking dish or bowl that is just big enough to fit the lady fingers but not so big that it’s not deep enough to actually soak the lady fingers.
- Add 1/4 of each of the ice creams over the base layer of cake. Don’t swirl too much because the lady fingers and layering will already cause them to swirl.
- Soak one lady finger at a time for 3-5 seconds on each side and cover the layer of cream with them. For a 6″ cake I used 4.5 lady fingers per layer.
- Repeat with another layer of both ice creams. Then add on the second layer of cake, and repeat with soaking it, adding the ice creams, adding soaked lady fingers, and then finally the remaining ice cream.
- Cover the surface with a sheet of plastic wrap. Place it in the freezer to set overnight or at least 10 hours.
Toppings
Ganache
- I like to make both a chocolate ganache and meringue for the top but you can absolutely just pick one or go super simple and dust the top with cocoa powder.
- If topping with chocolate ganache, add the chopped chocolate into a medium heat safe bowl. Heat the heavy cream in a pot or the microwave until just steaming hot, not boiling.
- Pour the hot cream over the chocolate, cover with a lid and let it sit for 1 minute. After a minute has passed, remove the lid and whisk slowly until smooth. Let it sit to cool for at least 10 minutes before using.
Meringue
- Ideally, make the meringue the day you plan to serve the pie.
- In a large metal mixing bowl (or the bowl portion of a double boiler) add in the egg whites, a pinch of salt, and white granulated sugar.
- In a separate pot (or the bottom of a double boiler) add in two inches of water. Bring the water to a gentle simmer and then turn the heat to low to keep it simmering.
- Place the mixing bowl over the simmering water and whisk constantly until the sugar has dissolved into the egg whites. Check to make sure that the mixture is done cooking by rubbing some of it between your fingers and feeling if the sugar has fully dissolved. If it is fully dissolved, turn off the heat and remove the bowl from the pot.
- Allow the mixture to cool for 5-10 minutes. Use an electric mixer to whip the meringue on high speed until almost stiff peaks form. We’re going for a s’mores marshmallowy kind of texture.
To Serve
- Just before serving, remove the cake from the freezer. Take off the collar and unwrap the acetate ring.
- Pour the slightly cooled ganache overtop and use the back of a spoon to spread it gently. If you feel like the ice cream is majorly melting. Put the cake back in the freezer for about 10 minutes. Then spoon the meringue on top and torch being careful not to burn the chocolate ganache.
- Use a sharp knife to cut the cake into 8 slices. This takes a bit of force and pressure but it shouldn’t be too hard. Serve immediately, store any leftovers in the freezer.

Chocolate Tiramisu Ice Cream Cake
Ingredients
Chocolate Cake
- 75 grams all purpose flour
- 85 grams granulated sugar
- 1/4 teaspoon fine sea salt
- 1/4 teaspoon baking powder
- 1/4 teaspoon baking soda
- 20 grams cocoa powder natural
- 1 egg large, room temperature
- 65 grams salted butter soft
- 50 grams sour cream
- 1 teaspoon vanilla extract
- 36 grams espresso brewed weight
Brown Sugar Espresso Soak
- 100 grams dark brown sugar
- 100 grams espresso brewed weight (approximately 3 double shots)
Vanilla & Chocolate Ice Cream
- 114 grams 70% chocolate
- 400 grams sweetened condensed milk 1 can
- 1 teaspoon vanilla extract
- 1 teaspoon vanilla bean paste sub 1 teaspoon vanilla extract if needed
- 3/4 teaspoon fine sea salt
- 400 grams heavy whipping cream cold
Lady Fingers
- 9 lady fingers
Chocolate Ganache
- 114 grams 70% chocolate
- 125 grams heavy cream
Meringue
- 3 egg whites
- 150 grams granulated sugar
- 1/4 teaspoon fine sea salt
Instructions
Chocolate Cake
- Preheat the oven to 350 F and place a rack in the center of the oven.
- In the bowl of a stand mixer, add in the flour, sugar, salt, baking powder, and baking soda, and cocoa powder. Whisk to combine.
- Add in the egg, butter, sour cream, vanilla, and espresso. Beat with a mixer until just smooth.
- Scrape the sides and bottom of the bowl.
- Spray the bottom 6" metal cake pan with your baking spray or line with a parchment round and then pour in the chocolate batter.
- Smooth out the cake with a rubber spatula.Bake in the hot oven for 15 minutes. After 15 minutes, rotate the cake 180 degrees and bake for another 10-12 minutes until the center is set and a toothpick comes out clean.
- Once baked, remove the cake from the oven and leave it to cool for 15 minutes before removing from the cake pan. Remove the cake and leave it to cool completely on a cooling rack.
Brown Sugar Espresso Soak
- In a heat safe mug or bowl, add in the dark brown sugar.
- I like to pull my espresso shots directly over the brown sugar to start dissolving the sugar but if you made the espresso on the stove or in a coffee pot, simply pour it over the brown sugar. Stir to dissolve.
- If you bought espresso at a coffee shop you'll need to get it hot again in order to dissolve the brown sugar.
- Set aside to cool while you make the ice cream.
Vanilla & Chocolate Ice Cream
- In a double boiler or in the microwave melt the chocolate. Set aside to cool slightly.
- In a large mixing bowl, add in the sweetened condensed milk along with both vanillas, salt, and heavy cream. Whip on medium high if using a stand mixer or high if using a hand mixer until it stiffens. You won't be able to get super stiff peaks but it should hold lines and volume. This does take a while especially with a hand mixer.
- Pour 475 grams into a separate bowl. Pour the cooled chocolate into the original bowl with the remaining ice cream base. Whip the chocolate into the ice cream base until smooth.
Assemble
- Use a large serrated knife to level off the top of the cake. Then cut the cake in half into two layers.
- Lay a piece of parchment paper on a flat tray or plate that will fit the cake and fit in your freezer.
- Place the bottom chocolate cake layer on the parchment and then place the cake ring around the cake with the acetate ring between the cake and the cake ring/collar. Tighten until snug around the cake.
- Use a pastry brush to brush the surface of the cake with a couple tablespoons of the espresso soak. Pour the remaining soak into a small baking dish or bowl that is just big enough to fit the lady fingers but not so big that it's not deep enough to actually soak the lady fingers.
- Add 1/4 of each of the ice creams over the base layer of cake. Don't swirl too much because the lady fingers and layering will already cause them to swirl.
- Soak one lady finger at a time for 3-5 seconds on each side and cover the layer of cream with them. For a 6" cake I used 4.5 lady fingers per layer.
- Repeat with another layer of both ice creams. Then add on the second layer of cake, and repeat with soaking it, adding the ice creams, adding soaked lady fingers, and then finally the remaining ice cream.
- Cover the surface with a sheet of plastic wrap. Place it in the freezer to set overnight or at least 10 hours.
Toppings
- I like to make both a chocolate ganache and meringue for the top but you can absolutely just pick one or go super simple and dust the top with cocoa powder.
- If topping with chocolate ganache, add the chopped chocolate into a medium heat safe bowl. Heat the heavy cream in a pot or the microwave until just steaming hot, not boiling.
- Pour the hot cream over the chocolate, cover with a lid and let it sit for 1 minute. After a minute has passed, remove the lid and whisk slowly until smooth. Let it sit to cool for at least 10 minutes before using.
- Ideally, make the meringue the day you plan to serve the pie.
- In a large metal mixing bowl (or the bowl portion of a double boiler) add in the egg whites, a pinch of salt, and white granulated sugar.
- In a separate pot (or the bottom of a double boiler) add in two inches of water. Bring the water to a gentle simmer and then turn the heat to low to keep it simmering.
- Place the mixing bowl over the simmering water and whisk constantly until the sugar has dissolved into the egg whites. Check to make sure that the mixture is done cooking by rubbing some of it between your fingers and feeling if the sugar has fully dissolved. If it is fully dissolved, turn off the heat and remove the bowl from the pot.
- Allow the mixture to cool for 5-10 minutes. Use an electric mixer to whip the meringue on high speed until almost stiff peaks form. We’re going for a s’mores marshmallowy kind of texture.
- Just before serving, remove the cake from the freezer. Take off the collar and unwrap the acetate ring.
- Pour the slightly cooled ganache overtop and use the back of a spoon to spread it gently. If you feel like the ice cream is majorly melting. Put the cake back in the freezer for about 10 minutes. Then spoon the meringue on top and torch being careful not to burn the chocolate ganache.
- Use a sharp knife to cut the cake into 8 slices. This takes a bit of force and pressure but it shouldn't be too hard. Serve immediately, store any leftovers in the freezer.
Notes
- Make sure all the ingredients are at room temperature – this will help get a smooth and fluffy cake batter.
- You don’t need an ice cream maker to make this Chocolate Tiramisu Ice Cream Cake. This recipe uses a no churn ice cream base but in a pinch you could also use store bought ice cream, just make sure it’s soft enough to really settle into the layers.
- If you don’t have an espresso machine or a mokka pot, you can use strongly brewed coffee, but the flavor will be less intense. You can also go to a coffee shop and get 3 double shots! I don’t recommend using instant unless you really like the taste of it because you will be able to taste it.
- I made this in a 6″ pan but it can easily be scaled up to 8″ with a little area of a circle math.
- To assemble this cake you’ll have the best success with a sheet of acetate and a cake collar. I love this cake ring from ikea but any ring or even a springform pan will work to create the stability to stack the cake. In order for everything to fit, you’ll also want to use a sheet of acetate, this is more optional but it will give you a cleaner finish. If you don’t have the acetate to go inside of the cake collar, you can eliminate the second layer of ladyfingers or cake.
- If you aren’t in the mood to make both the chocolate ganache and meringue you can just make whichever one you want!
- To torch the meringue you will need a kitchen torch but it’s not necessary to torch it! I usually use this one but in my move it seems to have broken so I ordered this one in a pinch and so far so good but I haven’t had it for long.
This page may contain affiliate links. This means that if you click on one of the product links above and complete a purchase, I’ll receive a small commission at no extra cost to you. I will never place a link nor make a recommendation on a product or service that I don’t love or use personally. Read our privacy policy here. Thank you for supporting Red Currant Bakery.


I baked this exactly as written for my sister’s June birthday (less the meringue) and it turned out awesome! I didn’t think about it until it was too late, but I should have gotten decaf espresso since we ate it at night and I think it kept me up haha.
The chocolate ice cream was my favorite component, but the whole cake was super yummy!