Based on a classic chocolate Babka, this chocolate espresso babka is made with an espresso dough, a dark chocolate espresso filling, and an espresso glaze.

Should Chocolate Babka be stored in the fridge?
The fridge has a tendency to dry out yeasted dough. That being said after 36 hours, I recommend storing leftover Chocolate Babka in the fridge in an airtight bag. The fridge will prevent the babka from getting moldy and then you can make the leftovers into french toast.
Is babka served warm or cold?
Traditionally Babka is sliced and served at room temperature; however, I wouldn’t judge if you had a hard time waiting for the babka to cool. That being said, you want it to cool at least 20 minutes (ideally an hour) in order to not smush the babka when slicing it.
What is the filling in Babka Bread?
Traditionally there is a chocolate babka and a cinnamon sugar babka. In this recipe I wanted to go with the classic chocolate filling but with an espresso twist using the Hoosier Hill Farms Espresso Powder.
How do I know when the dough is finished kneading?
This dough should pass the window pane test which means that when a golf ball sized piece is torn off, you should be able to stretch it gently until light passes through but without it tearing. I usually check it once all of the butter has been fully kneaded into the dough.
You may also like…
Tips for making a Chocolate Babka
- Make sure the egg and butter for the dough are both at room temperature and make sure the salt doesn’t directly touch the yeast.
- To cut down on time in the morning, I recommend making the dough the night before. Once the dough is fully kneaded and wrapped up on the quarter sized baking sheet, it can be kept in the fridge for anywhere from 1 hour to overnight. In the morning take the dough out of the fridge and continue with assembling!
- This dough takes a while to knead and it is quite soft. Don’t be scared to turn up the speed a little once it has come together but know that it will take a bit and it’s ok if it’s still a bit sticky once done kneading.
- When making yeasted dough, ensure that you allow your mixer to fully knead the dough, until it forms a smooth ball and the sides of the bowl are cleaned. This will happen twice while kneading the dough, once before the butter is added and once after.
- Keep an eye on the filling as it heats, you want everything to melt but not burn, it doesn’t really even need to bubble but it’s ok if it does.
- Chop the chocolate finely in order for it to melt as quickly as possible into the chocolate mixture.
- Try to make it as rectangular as possible. This will help when it comes shaping and cutting the twist. I use a bench scraper to keep reshaping into a rectangle as I roll it because it can be tricky to reshape at the end.
- Depending on where the heat in your oven comes from, make sure to bake the babka in the middle. If you have heat coming from the top and bottom make sure to place it just below the center rack.
- If you aren’t using this USA loaf pan, I recommend lining the loaf pan with parchment paper to prevent it from sticking.
Ingredients
- All Purpose Flour: Any all purpose flour will work for this! I have not yet tried any other flours with this recipe.
- Sugar: This recipe uses granulated sugar in the dough, filling and the simple syrup.
- Yeast: In this recipe, instant yeast is used. However, if you are using active dry, simply whisk it in with the warm milk and let it sit for 10 minutes first and then add in the remaining ingredients.
- Espresso Powder: Espresso powder is used in the dough, the filling and glaze. I recommend this espresso powder from hoosier hill farms for the best flavor.
- Salt: Fine sea salt is used to balance out the sweetness and enhance the flavors of the dough and filling.
- Milk: The dough uses milk as the liquid in the dough; I recommend using whole milk but any milk should work.
- Eggs: I use standard large eggs from the store. There is one whole egg in the dough.
- Butter: The butter adds moisture to the dough and the filling! I recommend Kerrygold unsalted butter for this.
- Cocoa Powder: Dutch Processed or Natural cocoa powder will work for the filling. A combination of cocoa powder and chocolate gives a chocolatey smooth texture and flavor.
- Heavy Cream: Heavy cream is the moisture needed to smooth and thin out the chocolate.
- 60%-70% dark chocolate: I recommend using a darker chocolate for this filling because it will create a smoother less sweet filling to balance everything else out.

How to make a Chocolate Espresso Babka
Espresso Brioche
- In the bowl of a stand mixer, add in the flour, sugar, yeast, and espresso powder and whisk to combine.
- Sprinkle in the salt. Then add in the egg and warm milk.
- Use a dough hook to knead everything together on medium low speed for 15 minutes until the dough has smooth edges and the bowl is clean.
- Add half of the butter in and knead again until incorporated (about 5 minutes). Add in the second half of the butter and knead once more until smooth. The dough should pass the window pane test *see notes section for more info.
- Line a quarter sized baking sheet with a sheet of plastic wrap. Shape the dough into a rough rectangle that is about an inch thick. Top the dough with another sheet of plastic wrap.
- Place the dough on the sheet pan into the fridge for at least an hour or up to overnight. I usually keep it in there for about 2 hours but make it work in your schedule!
Filling
- Finely chop the dark chocolate and set aside.
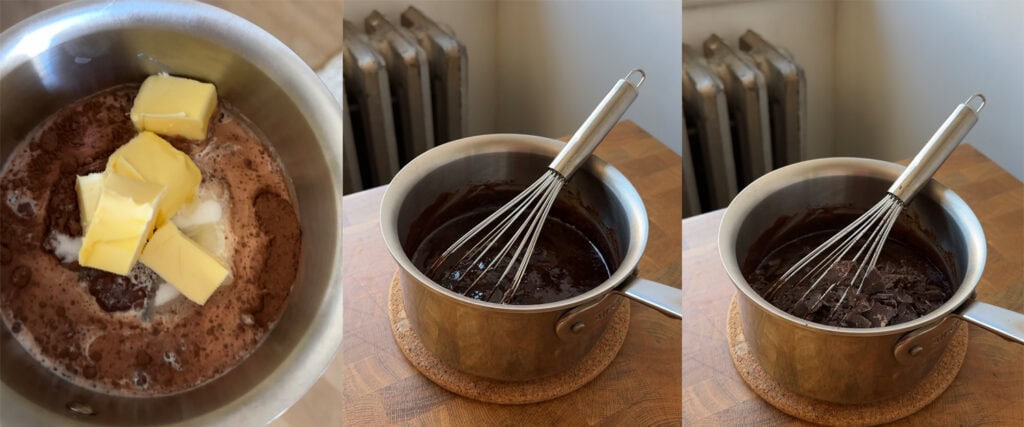
- In a small pot, add in the sugar, butter, heavy cream, salt, cocoa powder, and espresso powder.
- Place the pot over medium low heat and whisk frequently until the butter has melted and the cocoa powder has dissolved. Turn off the heat and whisk in the chopped chocolate until smooth.
- Pour the chocolate filling into a large shallow dish and place in the fridge to chill until thick but spreadable. Stir frequently to ensure even cooling.
Assemble
- Preheat the oven to 350 F and place a rack in the center of the oven. Or just below if the heat comes from the top of the oven.
- If not using this USA loaf pan, line your loaf pan with parchment paper.
- Once the dough has chilled (it won’t grow much but should be a little puffy), unwrap it and tip it out onto a lightly floured work surface. Roll it out to a 10″ x 20″ rectangle. Try to keep the dough as right angled as possible while rolling it out and use flour as needed to keep the dough from sticking.
- Spread the chocolate filling over the entire surface of the dough.
- Roll the dough up, starting with one short side. Roll it up tightly but make sure not to squeeze out the filling.
- Once fully rolled, seal the edge of the dough to the roll by pinching the dough to the roll. Give the roll a few squeezes while also ever so slightly stretching it out.
- Use a long sharp knife to cut the roll in half lengthwise. Open the two halves so that the cut sides are face up. Cross the two halves over one another creating an X.
- Then, twist the two halves together keeping the cut sides face up. Pinch the ends of each half together to keep it from untwisting. Then twist the other half together and repeat pinching the ends.
- Tuck the ends under the twist and lower it into the pan, you will have to scrunch the twist together a little to make it fit which will make the twist fatter. Gently press the twist down so that it reaches the sides of the pan.
- Cover the pan with plastic and set aside for at 30-45 minutes to proof until puffy.

Bake
- Make an egg wash by whisking an egg, a 1/4 teaspoon of sugar and a tablespoon of water together. Brush the top of the twist with the egg wash.
- Bake for 30 minutes. Then, rotate the pan 180 degrees and bake for another 20 minutes. If the twist is getting too dark, tent a piece of foil over the top of the babka.
- Make the espresso simple syrup while the babka bakes. Combine water, espresso powder, and sugar in a microwave safe bowl or glass. Heat in 15-30 second intervals, carefully stirring in between until all of the sugar has dissolved.
- The twist should be a deep golden brown once done baking. Take the pan out of the oven and spoon the simple syrup over the top.
- Let the twist cool for ten minutes and then carefully loosen the twist from the sides of the pan with a wooden or rubber spatula.
- Carefully tip the twist out, and place it upright on a sheet of parchment.
- Allow the babka to cool fully before cutting into it (if you can).


Chocolate Espresso Babka
Equipment
- 9" x 5" metal loaf pan
Ingredients
Espresso Dough
- 350 grams all purpose flour
- 50 grams granulated sugar
- 1 tablespoon espresso powder
- 10 grams instant yeast
- 5 grams fine sea salt
- 1 egg standard large, room temperature
- 180 milliliters whole milk lukewarm
- 40 grams unsalted butter room temperature
Chocolate Espresso Filling
- 130 grams dark chocolate 60%-70%
- 1.5 tablespoons espresso powder
- 80 grams unsalted butter
- 4 grams fine sea salt
- 65 grams heavy cream
- 50 grams granulated sugar
- 24 grams cocoa powder
Egg Wash
- 1 egg standard large
- 1//4 teaspoon salt
- 2 tablespoons water
Espresso Glaze
- 100 grams water
- 100 grams granulated sugar
- 1.5 tablespoons espresso powder
Instructions
Espresso Brioche
- In the bowl of a stand mixer, add in the flour, sugar, yeast, and espresso powder and whisk to combine.
- Sprinkle in the salt. Then add in the egg and warm milk.
- Use a dough hook to knead everything together on medium low speed for 15 minutes until the dough has smooth edges and the bowl is clean.
- Add half of the butter in and knead again until incorporated (about 5 minutes). Add in the second half of the butter and knead once more until smooth. The dough should pass the window pane test *see notes section for more info.
- Line a quarter sized baking sheet with a sheet of plastic wrap. Shape the dough into a rough rectangle that is about an inch thick. Top the dough with another sheet of plastic wrap.
- Place the dough on the sheet pan into the fridge for at least an hour or up to overnight. I usually keep it in there for about 2 hours but make it work in your schedule!
Filling
- Finely chop the dark chocolate and set aside.
- In a small pot, add in the sugar, butter, heavy cream, salt, cocoa powder, and espresso powder.
- Place the pot over medium low heat and whisk frequently until the butter has melted and the cocoa powder has dissolved. Turn off the heat and whisk in the chopped chocolate until smooth.
- Pour the chocolate filling into a large shallow dish and place in the fridge to chill until thick but spreadable. Stir frequently to ensure even cooling.
Assemble
- Preheat the oven to 350 F and place a rack in the center of the oven. Or just below if the heat comes from the top of the oven.
- If not using this USA loaf pan, line your loaf pan with parchment paper.
- Once the dough has chilled (it won't grow much but should be a little puffy), unwrap it and tip it out onto a lightly floured work surface. Roll it out to a 10" x 20" rectangle. Try to keep the dough as right angled as possible while rolling it out and use flour as needed to keep the dough from sticking.
- Spread the chocolate filling over the entire surface of the dough.
- Roll the dough up, starting with one short side. Roll it up tightly but make sure not to squeeze out the filling.
- Once fully rolled, seal the edge of the dough to the roll by pinching the dough to the roll. Give the roll a few squeezes while also ever so slightly stretching it out.
- Use a long sharp knife to cut the roll in half lengthwise. Open the two halves so that the cut sides are face up. Cross the two halves over one another creating an X.
- Twist the two halves together keeping the cut sides face up. Pinch the ends of each half together to keep it from untwisting. Then twist the other half together and repeat pinching the ends.
- Tuck the ends under the twist and lower it into the pan, you will have to scrunch the twist together a little to make it fit which will make the twist fatter. Gently press the twist down so that it reaches the sides of the pan.
- Cover the pan with plastic and set aside for at 30-45 minutes to proof until puffy.
Bake
- Make an egg wash by whisking an egg, a 1/4 teaspoon of sugar and a tablespoon of water together. Brush the top of the twist with the egg wash.
- Bake for 30 minutes. Then, rotate the pan 180 degrees and bake for another 20 minutes. If the twist is getting too dark, tent a piece of foil over the top of the babka.
- Make the espresso simple syrup while the babka bakes. Combine water, espresso powder, and sugar in a microwave safe bowl or glass. Heat in 15-30 second intervals, carefully stirring in between until all of the sugar has dissolved.
- The twist should be a deep golden brown once done baking. Take the pan out of the oven and spoon the simple syrup over the top.
- Let the twist cool for ten minutes and then carefully loosen the twist from the sides of the pan with a wooden or rubber spatula.
- Carefully tip the twist out, and place it upright on a sheet of parchment.
- Allow the babka to cool fully before cutting into it (if you can).
Notes
- Make sure the egg and butter for the dough are both at room temperature and make sure the salt doesn’t directly touch the yeast.
- To cut down on time in the morning, I recommend making the dough the night before. Once the dough is fully kneaded and wrapped up on the quarter sized baking sheet, it can be kept in the fridge for anywhere from 1 hour to overnight. In the morning take the dough out of the fridge and continue with assembling!
- This dough takes a while to knead and it is quite soft. Don’t be scared to turn up the speed a little once it has come together but know that it will take a bit and it’s ok if it’s still a bit sticky once done kneading.
- When making yeasted dough, ensure that you allow your mixer to fully knead the dough, until it forms a smooth ball and the sides of the bowl are cleaned. This will happen twice while kneading the dough, once before the butter is added and once after.
- Keep an eye on the filling as it heats, you want everything to melt but not burn, it doesn’t really even need to bubble but it’s ok if it does.
- Chop the chocolate finely in order for it to melt as quickly as possible into the chocolate mixture.
- Try to make it as rectangular as possible. This will help when it comes shaping and cutting the twist. I use a bench scraper to keep reshaping into a rectangle as I roll it because it can be tricky to reshape at the end.
- Depending on where the heat in your oven comes from, make sure to bake the babka in the middle. If you have heat coming from the top and bottom make sure to place it just below the center rack.
- If you aren’t using this USA loaf pan, I recommend lining the loaf pan with parchment paper to prevent it from sticking.
Nutrition
This page may contain affiliate links. This means that if you click on one of the product links above and complete a purchase, I’ll receive a small commission at no extra cost to you. I will never place a link nor make a recommendation on a product or service that I don’t love or use personally. Read our privacy policy here. Thank you for supporting Red Currant Bakery.


I freakin’ LOVE this. The recipe is great and describes everything very nicely and clearly. I didn’t use all of the sirup and I also accidentally used a bit more salt, but I still adore the result. The mix between sweet and salty is honestly my favorite I didn’t know I had. Love ur recipes, thank you! 🫶🏻
Aww yay!!! Thank you so much Tereza!
Made this today with no regrets!! When I was assembling the dough I thought the filling was a bit much so I didn’t add it all…big mistake!! This is definitely a recipe I will come back to. Thank you Red Current Bakery!!!
Hi! Quick q – do you think there would be any issues baking this in a 10×5 loaf pan instead of 9×5? I have an 8 x 4 and a 10×5, but I’m not opposed to getting a 9×5 if it makes a huge difference!
Hi Jess! It should be totally fine, it just might not be as tall!
Sooo delicious! It turned out great I’m getting plenty of thumbs up from my taste testers. I did a double batch but I definitely should not have doubled the simple syrup! Single batch would have been plenty for both loaves. With the leftover filling that stuck in the sides of the dish, i added it to heavy whipping cream and some powdered sugar to create a delicious topping for the babka once sliced, as well as a sort of cold foam for my coffee the next couple days. Definitely recommend
Dear Audrey, omg! This recipe was unbelievably scrumptious and the scent while baking was out of this world. Thank you!
I have made this twice and both times it turned out great; however, the second time making the filling, I don’t know what happened, but the filling did not turned out fine like the first time. It was kind of glossy and greasy and the oil was separated. I don’t have the slightest clue as to what did I do wrong. I would appreciate if you could help me with that.
Thanks again ! 🫶