Two layers of puff pastry filled with Alden’s Vanilla Bean Ice cream, flaky sea salt, and whipped honey, this vanilla puff pastry ice cream cake is simple yet elegant and so versatile.

What types of Ice Cream should be used for an Ice Cream Cake?
Really any ice cream can be used but I love Alden’s Vanilla bean ice cream for this cake because it works perfectly with the flaky sea salt, whipped honey, and puff pastry.
Is Whipped Honey shelf stable?
Yes! Whipped honey is shelf stable in the same way that honey is shelf stable. That being said it will start to separate in the sense that some of it won’t be whipped anymore but you can always re-whip it.
Can you freeze whipped cream?
Yes! I usually top this cake with the whipped cream right before I plan to serve it because the cake needs to sit out for a few minutes before you can cut it but also I like the soft whipped cream with the crunchy pastry. However leftovers can be frozen with the whipped cream on top and it’s still delicious.
Can this cake be made in advance?
Yes! Ice Cream cakes, as long as they are wrapped in plastic wrap can be stored for a few days in the freezer. I recommend adding the whipped cream on the day of because it will look nicer but you can always store left overs with the whipped cream in the freezer. For long term storage, place in an airtight bag after wrapping with plastic.
What happens to honey when you freeze it?
Honey is magical because when you freeze it, whipped or not, it stays runny and smooth and delicious making it the perfect addition to this ice cream cake.
Additional Recipes to try!
Tips for making a Puff Pastry Ice Cream Cake
- The size of your cake will be determined based on the size of your puff pastry. When I used Pepperidge farms pastry, the sheets were only big enough for a 7″ cake pan but when I used Dufour puff pastry the sheets were big enough for a 9″ pan.
- If you go with a 7″ pan, you can still use the same amount of ice cream, the ratios will simply be different. If you want it to look the same, simply don’t use all of the ice cream.
- All frozen puff pastry thawing instructions are different so make sure to read the packaging.
- If you don’t have a 9″ springform pan you can also use any other 9″ metal cake pan for the cake. Just make sure to fully line it with plastic wrap so you can easily pull the cake out.
- Spritzing the cake pan with a little water will make it easier to line the pan with plastic as the plastic wrap sticks to the wet surface.
- Make sure the pastry has cooled fully before assembling.
- If you aren’t a big salt person, I recommend adding 1 teaspoon of flaky salt at a time. Do not substitute regular fine salt as it will become WAY TOO SALTY.
- While assembling, don’t be afraid to refreeze as necessary. If you think the ice cream is getting too soft while you’re layering, put the cake back in the freezer to firm up before adding the next layer.
- Be sure you have a level place cleared in your freezer for the cake before you start assembling so that it has a place to go!
- Once assembled, let the cake chill for at least 6 hours or up to overnight but it will need to thaw slightly before slicing. I usually find that if you take it out just before whipping the cream for the top, it will still be just frozen enough but soft enough to cut.

Ingredients
- Puff Pastry: I use store bought frozen puff pastry but you can make your own if you prefer. If I’m on a budget, Pepperidge farms has my favorite and if I’m not, Dufour is the best!
- Honey: To make whipped honey, you have to have honey. Any regular honey (light or dark) will work – you can also buy honey already whipped.
- Alden’s Vanilla Bean Ice Cream: This is my go to ice cream, always. It’s always in my freezer and works perfectly for this recipe. It’s creamy with vanilla bean flecks but doesn’t break the bank and one container is the perfect amount for this cake.
- Flaky Sea Salt: The salt is semi optional, think of it like a salted caramel situation but salted honey and vanilla ice cream. Start with 2 teaspoons if you like yours less salty.
- Powdered Sugar: I like to dust the top of the cake with powdered sugar as one of the final touches but I also use a touch of it in the whipped cream.
- Vanilla Bean Paste: thicker with actual vanilla beans in it, vanilla bean paste gives a stronger vanilla flavor and sweetness and tastes delicious in the whipped cream. That being said it can definitely be replaced with vanilla extract in this instance.
- *NOT PICTURED* Honey Comb: Honey comb on top of this cake gives it a bit of drama and beauty and can be quite fun to eat. Just make sure not to freeze it or it will turn into rock hard candy so only serve it on the slices your plan to eat. The honey comb is very optional, you could also sprinkle the top with bee pollen or just leave it as is with the honey and whipped cream.

How to make a Puff Pastry Ice Cream Cake
Puff Pastry
- Preheat the oven to 425 F and place a rack in the center of the oven.
- Line a baking sheet with a piece of parchment paper.
- Roll out one sheet of pastry so that it is at least 1″ larger than the cake pan. If your pastry sheets are smaller, you will need to use a smaller pan. The amount of ice cream can stay the same it will just be taller!
- Roughly trim the pastry so that it’s at least 1″ larger than the pan all the way around.
- Place the pastry on the lined baking sheet and bake for 15 minutes, then rotate the pan 180 degrees and bake for another 5 minutes.
- Place the pastry on a wire rack to cool and repeat with the second sheet of pastry.
- Once both have cooled, place the metal cake pan or springform pan onto the baked pastry and press down to create an imprint.
- Use a serrated knife to trim off the extra pastry so that it fits in the pan.

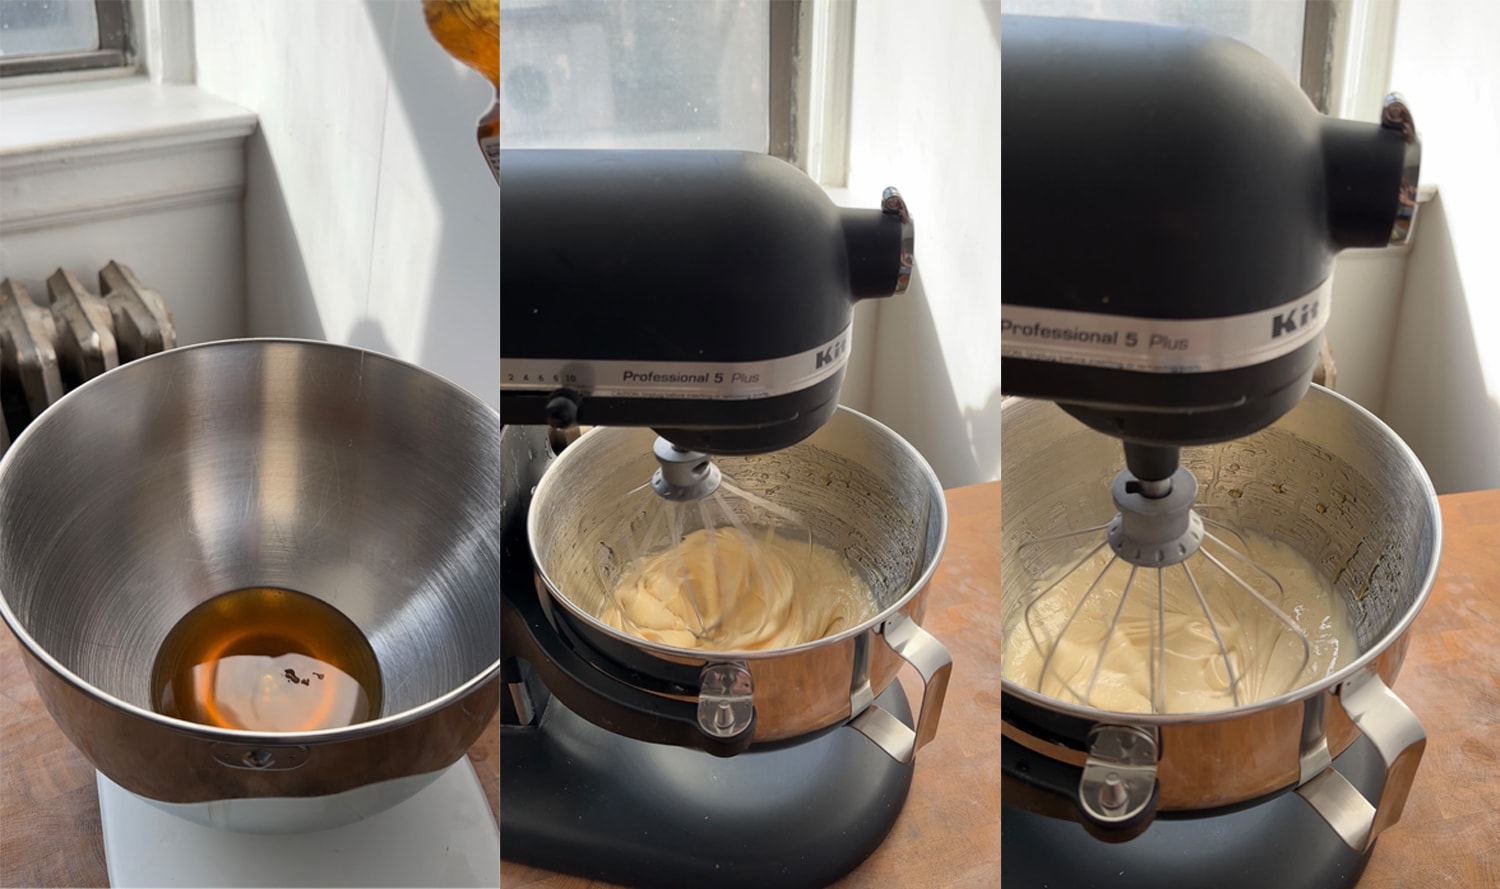
Whip the Honey
- Pour the honey into a mixing bowl and use the whisk attachment to whip on high speed for 10 minutes or until very pale in color.
Assembling Ice Cream Cake
- Sprinkle the springform pan with a few drops of water and then line fully with plastic wrap. The plastic should go across the bottom and fully up the sides of the pan. You also want to clear a level surface in your freezer, big enough for the pan.
- Place the bottom layer of pastry into the lined springform pan.
- Take the ice cream out of the freezer and dump it into a big mixing bowl. Use a spatula or spoon or mixer to break up the ice cream. Stir it until it becomes smooth and looks like soft serve.
- Sprinkle in the flaky salt and stir to combine. Add more to taste if you start with less than recommended.
- Scoop half of the vanilla salted ice cream onto the pastry layer. Use the back of a spoon to smoosh the ice cream into a relatively flat layer, definitely does not need to be perfect.
- Drizzle with about 1/3 of the whipped honey. Scoop the remaining ice cream over the honey layer and press again into a flat layer. Finish with another 1/3 of the whipped honey.
- Place the second layer of pastry over the ice cream layer and press down slightly.
- Put the assembled cake into the freezer and leave to set for at least 6 hours, ideally overnight.

Finishing Touches
- In the bowl of a stand mixer, pour in the cold heavy cream, vanilla extract, and sift in the powdered sugar.
- Use the balloon attachment to whip the cream, first on medium, then medium until soft peaks form. You can also whip it by hand.
- Take the ice cream cake out of the freezer. Remove the springform collar and peel away the plastic wrap. Transfer the cake to whatever plate or cake stand you plan to serve it from.
- Dust the top of the cake with puff pastry and spoon the whipped cream onto the top of the cake.
- Drizzle with more whipped honey and optionally top with honey comb. Don’t add the honey comb until you plan to serve it. You can also serve one piece on each slice rather than on the cake as a whole.
- Enjoy immediately or place back in the freezer.
- Wrap leftovers in plastic and store in an airtight bag in the freezer for up to 1 month.


Vanilla Honey Puff Pastry Ice Cream Cake
Equipment
Ingredients
Pastry
- 2 sheets frozen puff pastry thawed
Ice Cream filling
- 1.5 quarts alden's vanilla bean ice cream
- 1 tablespoon flaky sea salt *start with 2 teaspoons if you are hesitant
- 220 grams honey
Whipped Cream
- 250 milliliters heavy whipping cream cold (approximately 1 cup)
- 50 grams powdered sugar
- 1 teaspoon vanilla bean paste
Instructions
Pastry Layers
- Preheat the oven to 425 F and place a rack in the center of the oven.
- Line a baking sheet with a piece of parchment paper.
- Roll out one sheet of pastry so that it is at least 1" larger than the cake pan. If your pastry sheets are smaller, you will need to use a smaller pan. The amount of ice cream can stay the same it will just be taller!
- Roughly trim the pastry so that it's at least 1" larger than the pan all the way around.
- Place the pastry on the lined baking sheet and bake for 15 minutes, then rotate the pan 180 degrees and bake for another 5 minutes.
- Place the pastry on a wire rack to cool and repeat with the second sheet of pastry.
- Once both have cooled, place the metal cake pan or springform pan onto the baked pastry and press down to create an imprint.
- Use a serrated knife to trim off the extra pastry so that it fits in the pan.
Whipped Honey
- Pour the honey into a mixing bowl and use the whisk attachment to whip on high speed for 10 minutes or until very pale in color.
Assembling
- Sprinkle the springform pan with a few drops of water and then line fully with plastic wrap. The plastic should go across the bottom and fully up the sides of the pan. You also want to clear a level surface in your freezer, big enough for the pan.
- Place the bottom layer of pastry into the lined springform pan.
- Take the ice cream out of the freezer and dump it into a big mixing bowl. Use a spatula or spoon or mixer to break up the ice cream and stir it until it becomes smooth and looks like soft serve.
- Sprinkle in the flaky salt and stir to combine. Add more to taste if you start with less than recommended.
- Scoop half of the vanilla salted ice cream onto the pastry layer. Use the back of a spoon to smoosh the ice cream into a relatively flat layer, definitely does not need to be perfect.
- Drizzle with about 1/3 of the whipped honey. Scoop the remaining ice cream over the honey layer and press again into a flat layer. Finish with another 1/3 of the whipped honey.
- Place the second layer of pastry over the ice cream layer and press down slightly.
- Put the assembled cake into the freezer and leave to set for at least 6 hours, ideally overnight.
Finishing touches
- In the bowl of a stand mixer, pour in the cold heavy cream, vanilla bean paste, and sift in the powdered sugar.
- Use the balloon attachment to whip the cream, first on medium, then medium until soft peaks form. You can also whip it by hand.
- Take the ice cream cake out of the freezer. Remove the springform collar and peel away the plastic wrap. Transfer the cake to whatever plate or cake stand you plan to serve it from.
- Dust the top of the cake with puff pastry and spoon the whipped cream onto the top of the cake.
- Drizzle with more whipped honey and optionally top with honey comb. Don't add the honey comb until you plan to serve it, you can also serve one piece on each slice rather than on the cake as a whole.
- Enjoy immediately or place back in the freezer.
- Wrap leftovers in plastic and store in an airtight bag in the freezer for up to 1 month.
Notes
Tips for making a Puff Pastry Ice Cream Cake
- The size of your cake will be determined based on the size of your puff pastry. When I used Pepperidge farms pastry, the sheets were only big enough for a 7″ cake pan but when I used Dufour puff pastry the sheets were big enough for a 9″ pan.
- If you go with a 7″ pan, you can still use the same amount of ice cream, the ratios will simply be different. If you want it to look the same, simply don’t use all of the ice cream.
- All frozen puff pastry thawing instructions are different so make sure to read the packaging.
- If you don’t have a 9″ springform pan you can also use any other 9″ metal cake pan for the cake. Just make sure to fully line it with plastic wrap so you can easily pull the cake out.
- Spritzing the cake pan with a little water will make it easier to line the pan with plastic as the plastic wrap sticks to the wet surface.
- Make sure the pastry has cooled fully before assembling.
- If you aren’t a big salt person, I recommend adding 1 teaspoon of flaky salt at a time. Do not substitute regular fine salt as it will become WAY TOO SALTY.
- While assembling, don’t be afraid to refreeze as necessary. If you think the ice cream is getting too soft while you’re layering, put the cake back in the freezer to firm up before adding the next layer.
- Be sure you have a level place cleared in your freezer for the cake before you start assembling so that it has a place to go!
- Once assembled, let the cake chill for at least 6 hours or up to overnight but it will need to thaw slightly before slicing. I usually find that if you take it out just before whipping the cream for the top, it will still be just frozen enough but soft enough to cut.
Nutrition
This post may contain affiliate links. This means that if you click on one of the product links above and complete a purchase, I’ll receive a small commission at no extra cost to you. I will never place a link nor make a recommendation on a product or service that I don’t love or use personally. Read our privacy policy here. Thank you for supporting Red Currant Bakery.