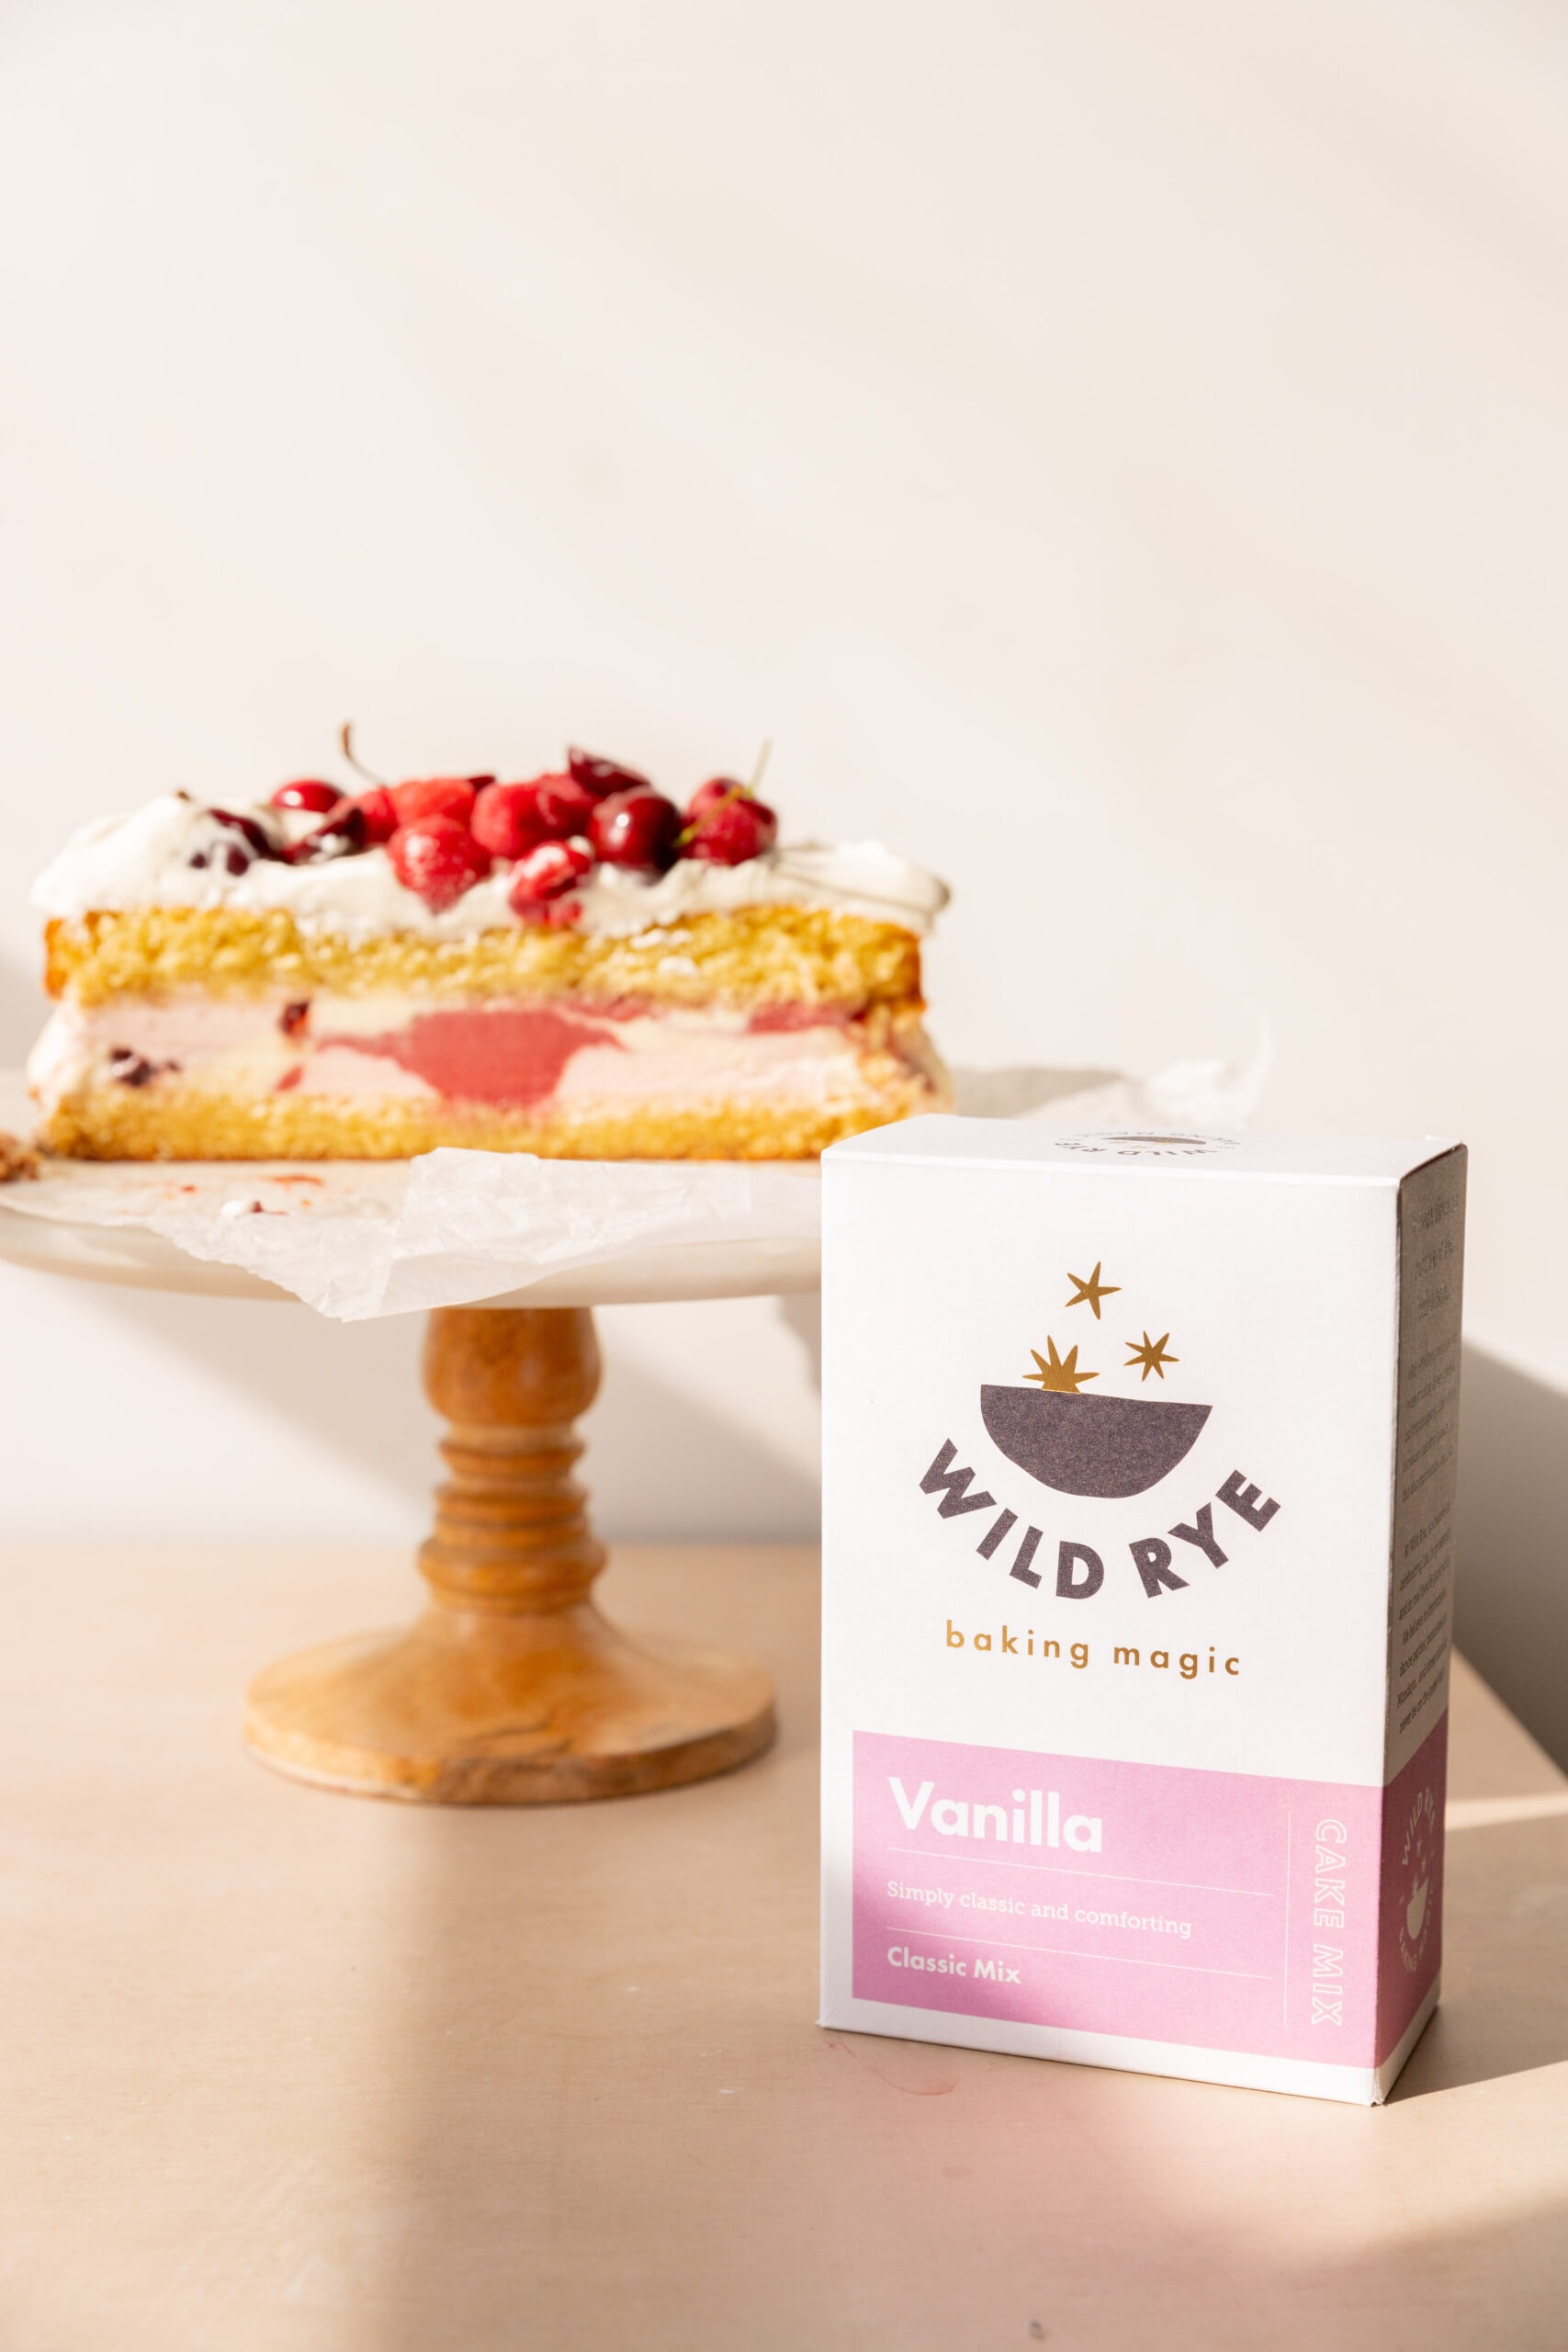
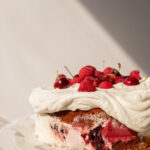
2 layers of soft and spongey Vanilla Cake, filled with 3 types of ice cream and cherry jam all marbled together, topped with vanilla whipped cream and more fresh berries, this Berry Ice Cream Cake is so simple and the unofficial cake of the summer! I love how simple this cake is with the help of my favorite Wild Rye Vanilla Cake Mix, it’s so simple and yet creates one of the best tasting vanilla cakes!
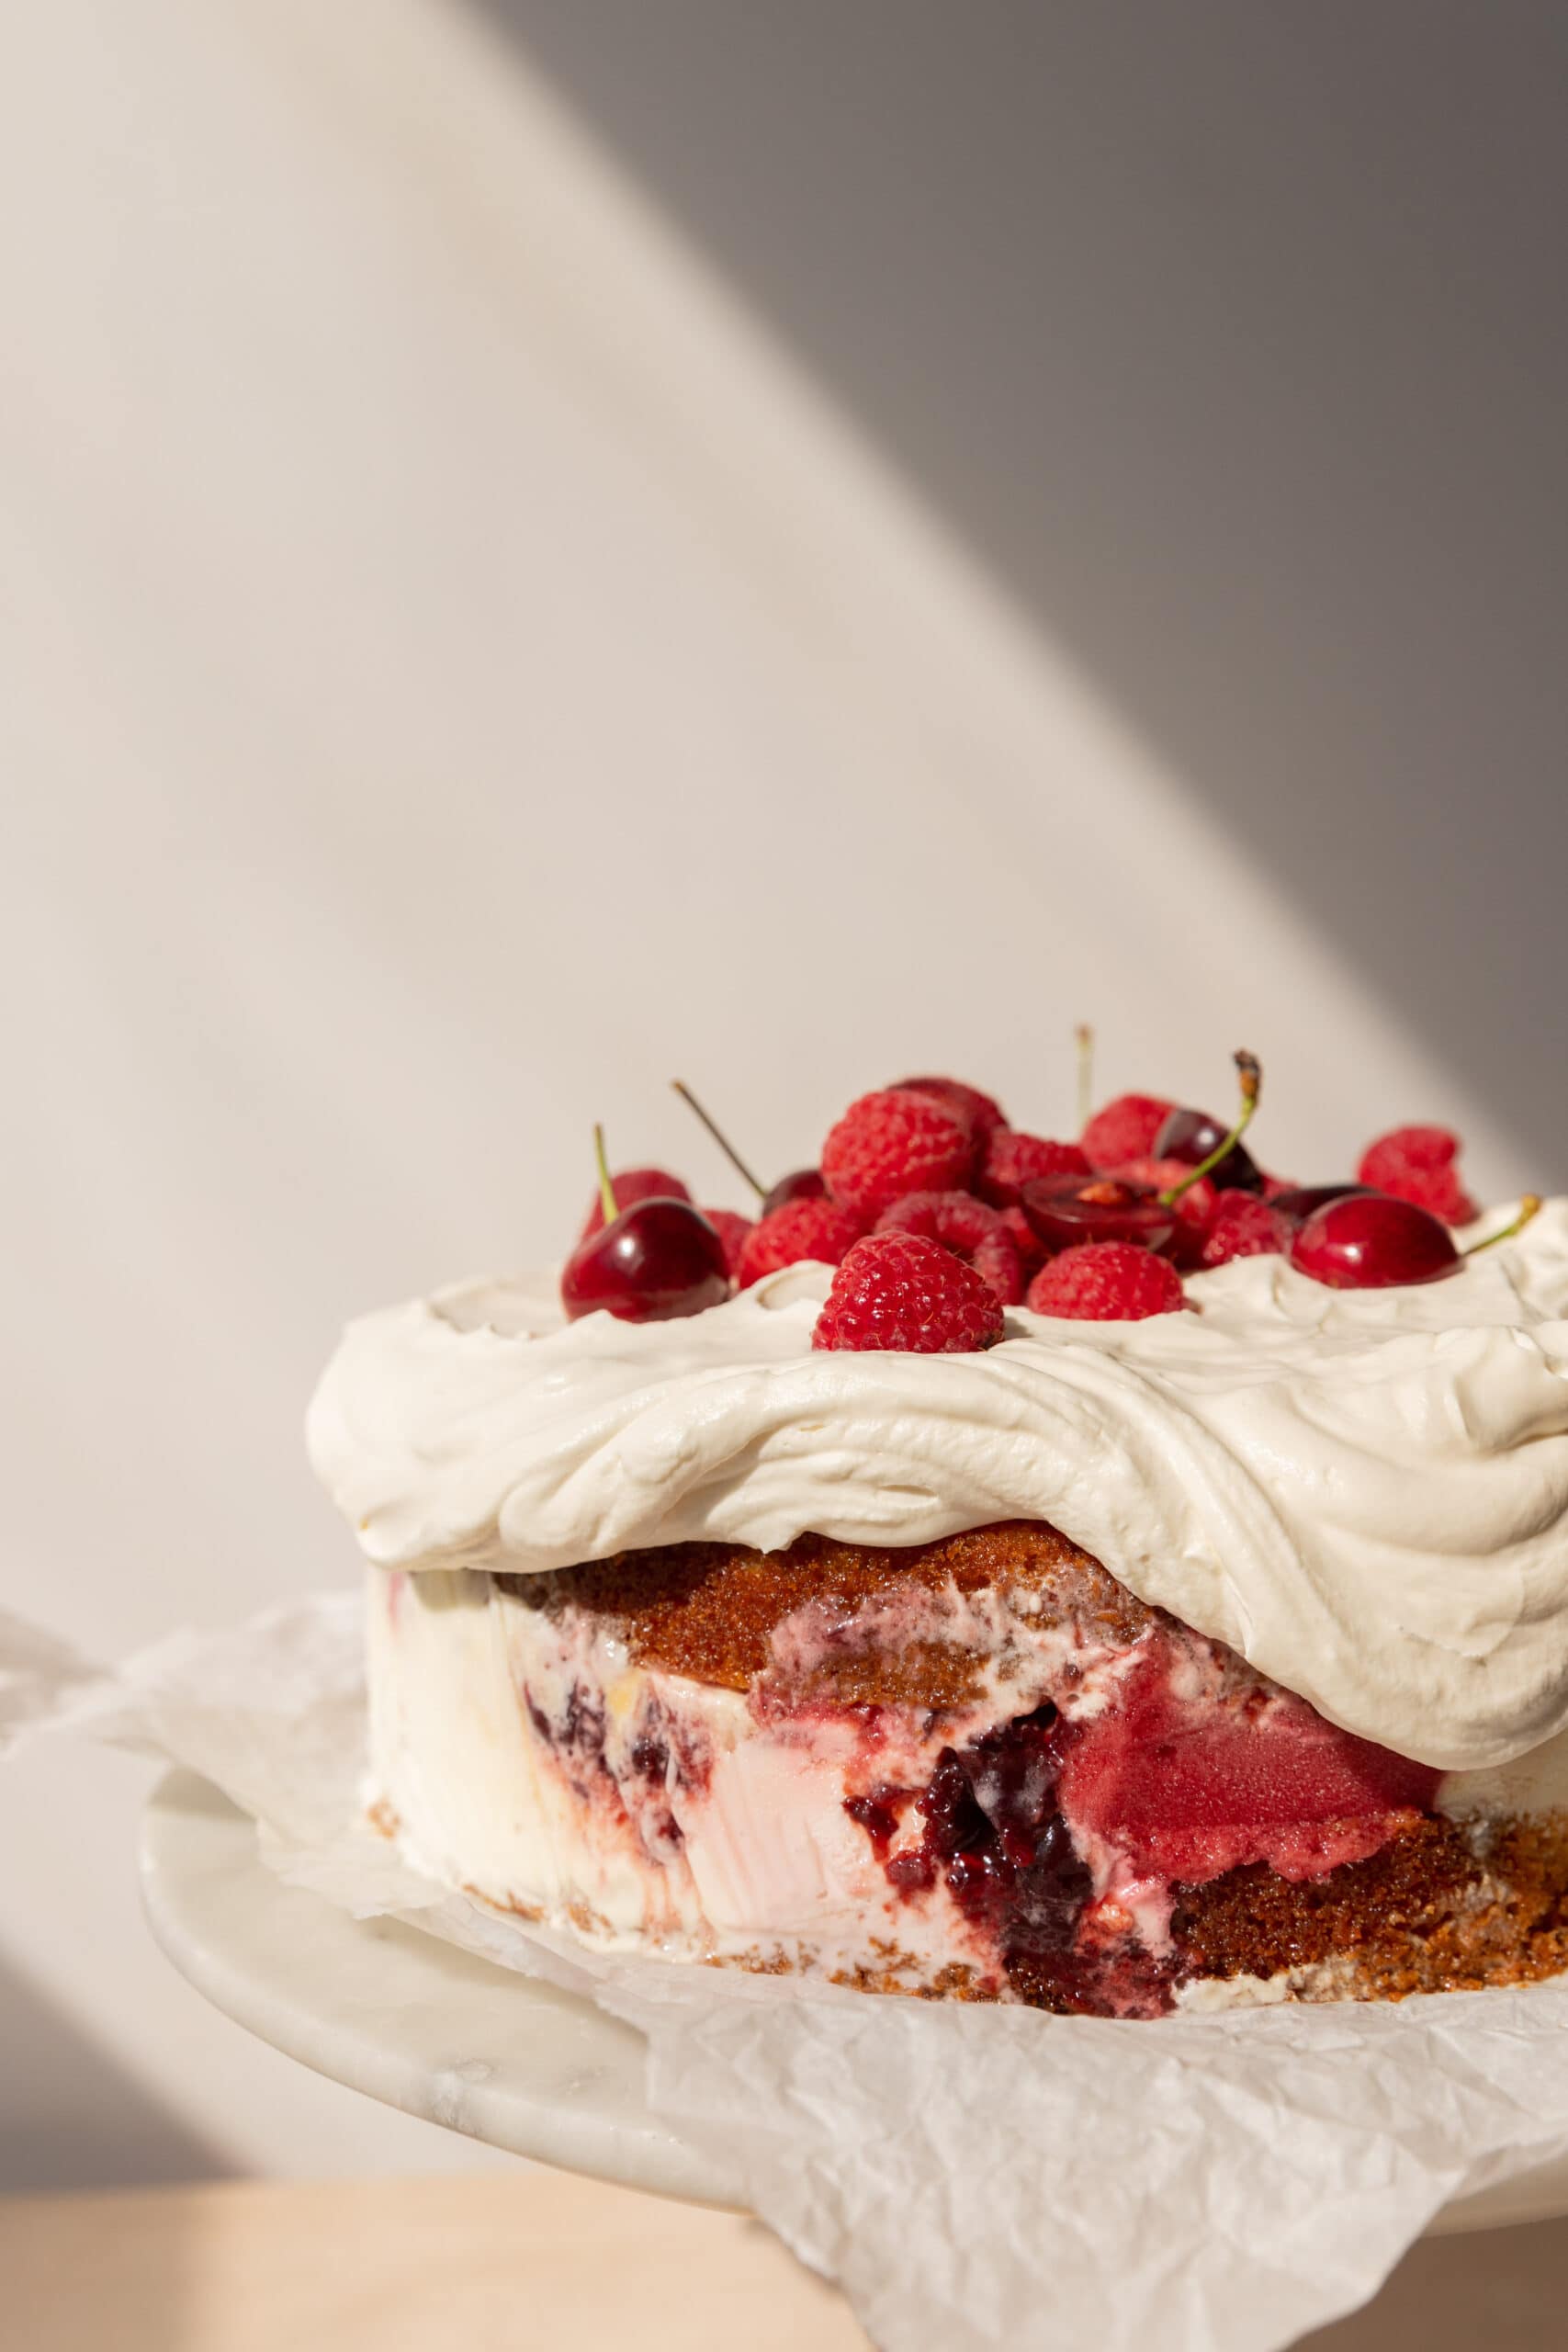
This cake is based on a German Eistorte which has one thick layer of ice cream in between two layers of cake. While American ice cream cakes often have brownie or cookie layers and multiple layers of ice cream. This keeps the cake feeling light and perfect for spring and summer!
What types of Ice Cream should be used for an Ice Cream Cake?
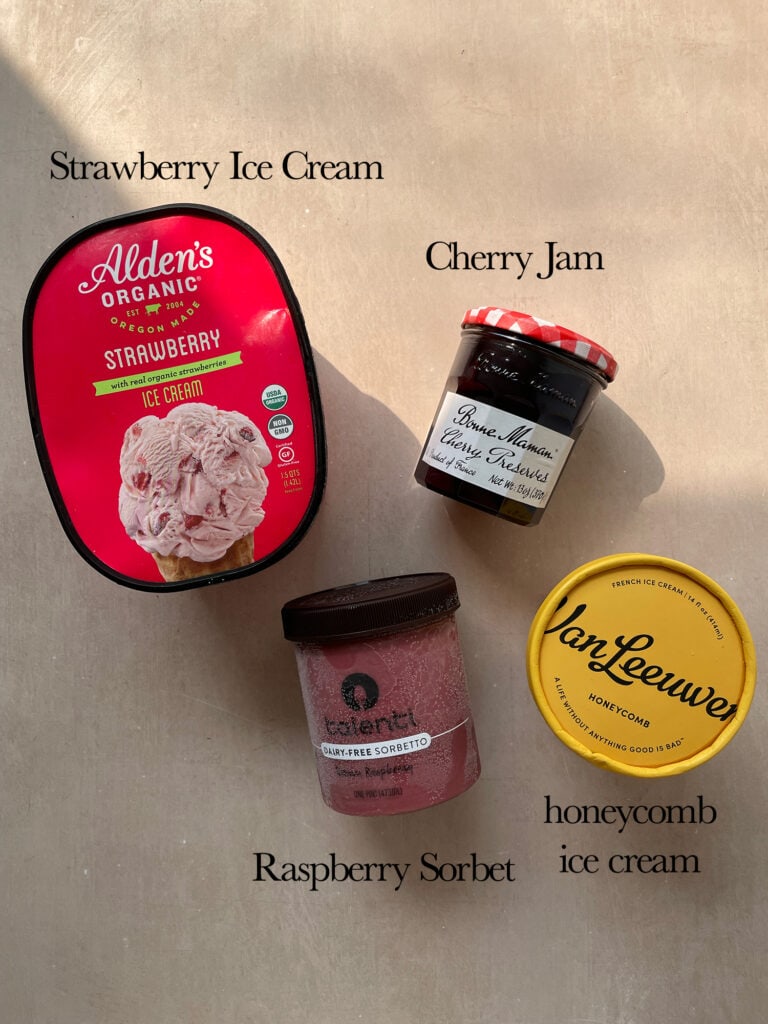
The best part of this cake is how creative you can be with it! The ice cream filling can be any ice cream or combination of ice creams you want! I have used a combo of honeycomb ice cream, raspberry sorbet, strawberry ice cream, and tart cherry jam. But the options are endless!
What is ice cream cake frosting?
Most traditionally, ice cream cakes are topped, and sometimes coated in whipped cream. This is because when frozen, while firm, it stays soft – unlike buttercream.
Why Wild Rye Cake Mix?
I didn’t grow up with ever having boxed cake mix in my house, and to be honest, I still make most cakes from scratch. BUT, life gets busy and sometimes you need to cut down the overall process time and I’m so glad I found Wild Rye because their cake mixes are DELICIOUS and filled with only the best ingredients! You can use the code AUDREY20 for 20% off your order!
Can this cake be made in advance?
Yes! Ice Cream cakes, as long as they are wrapped in plastic wrap can be stored for a few days in the freezer. I recommend adding the whipped cream and berries on the day of because it will look nicer but you can always store left overs with the berries and whipped cream in the freezer. For long term storage, place in an airtight bag after wrapping with plastic.
Can I make Vanilla Cake from Scratch?
Definitely! However, I recommend an oil based cake as it keeps a better texture when frozen. The vanilla cake from this Rhubarb Meringue cake would be a perfect alternative!
Additional Recipes to try!
Tips for making a Berry Ice Cream Cake
- Make sure the cake has cooled fully before cutting into two layers and assembling. Many people like to refrigerate or freeze cakes before cutting into layers but I find that it’s easier to cut through at room temperature.
- If you are marbling multiple ice creams, I recommend letting them all soften somewhat so that they are spreadable and you aren‘t left with air bubbles. However, you then have to work quickly so they don’t become a soupy mess.
- Once assembled, let the cake chill for at least 6 hours or up to overnight but it will need to thaw slightly before slicing. I usually find that if you take it out just before whipping the cream for the top, it will still be just frozen enough but soft enough to cut.
Ingredients
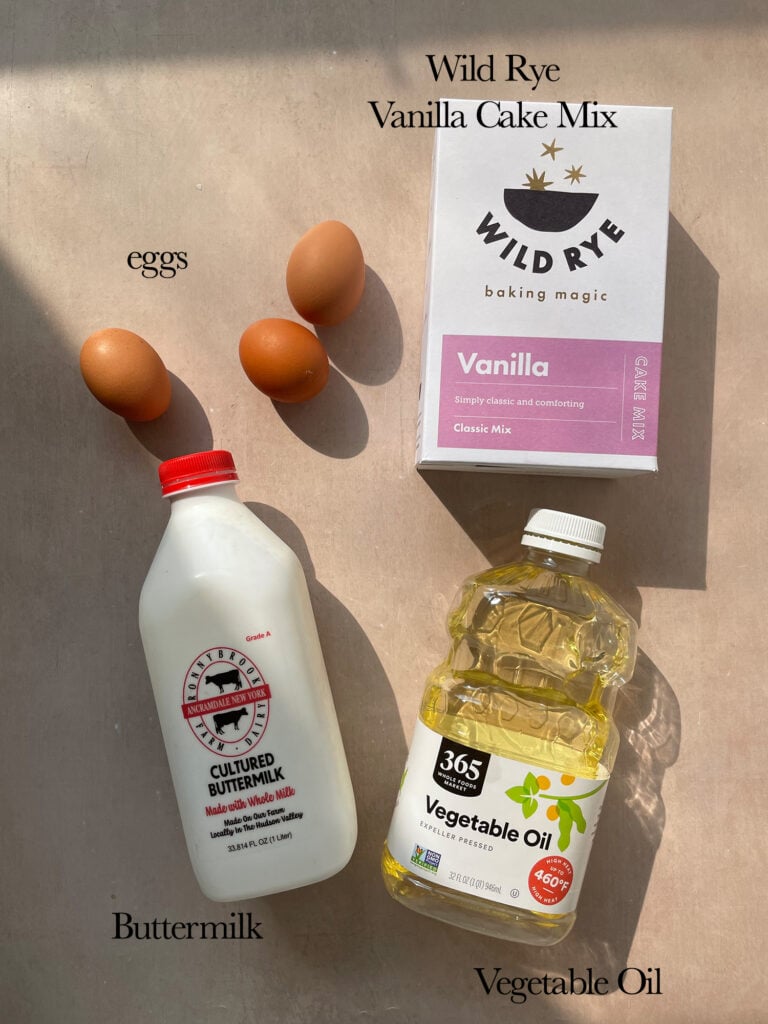
Vanilla Cake Layer
- Wild Rye Vanilla Cake Mix: As mentioned in the FAQ section, I love this cake mix and have linked it so you can order it online! You can use the code AUDREY20 for 20% off your order!
- Eggs: I use standard large eggs from the store. There are three whole eggs in the cake.
- Buttermilk: The cake mix packaging calls for buttermilk and I find it works great in this cake. Skim milk creates a very runny cake batter which doesn’t rise as well.
- Vegetable Oil: Vegetable oil or any neutral oil such as canola or avocado will work great for this cake.
Filling
- Ice Cream: Any combo of ice creams can be used for the filling. I used honeycomb ice cream, raspberry sorbet, and strawberry ice cream. But any flavors or even gelato can be used!
- Jam: I love to swirl a bit of jam into the filling as the sugar and pectin keep it soft even when frozen. However, the jam can be left out if you prefer.
Whipped Cream Topping
- Heavy Cream: Heavy Cream or heavy whipping cream works for the topping of this cake, just make sure it is cold when you whip it.
- Powdered Sugar: Powdered sugar dissolves well into the cream and sweetens it.
- Vanilla Extract: Vanilla adds a little flavor and enhances the sweetness of the cake.
How to make an Eistorte
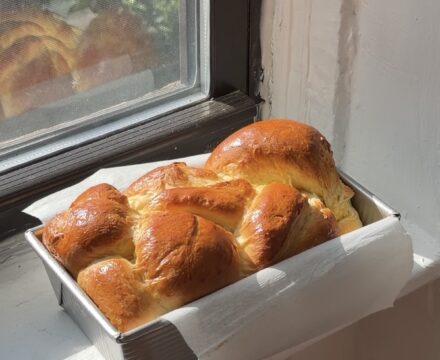
Vanilla Cake
- Preheat the oven to 325 F and place a rack in the center of the oven.
- Line a 9″ springform pan with a piece of parchment paper or with baking spray that includes flour.
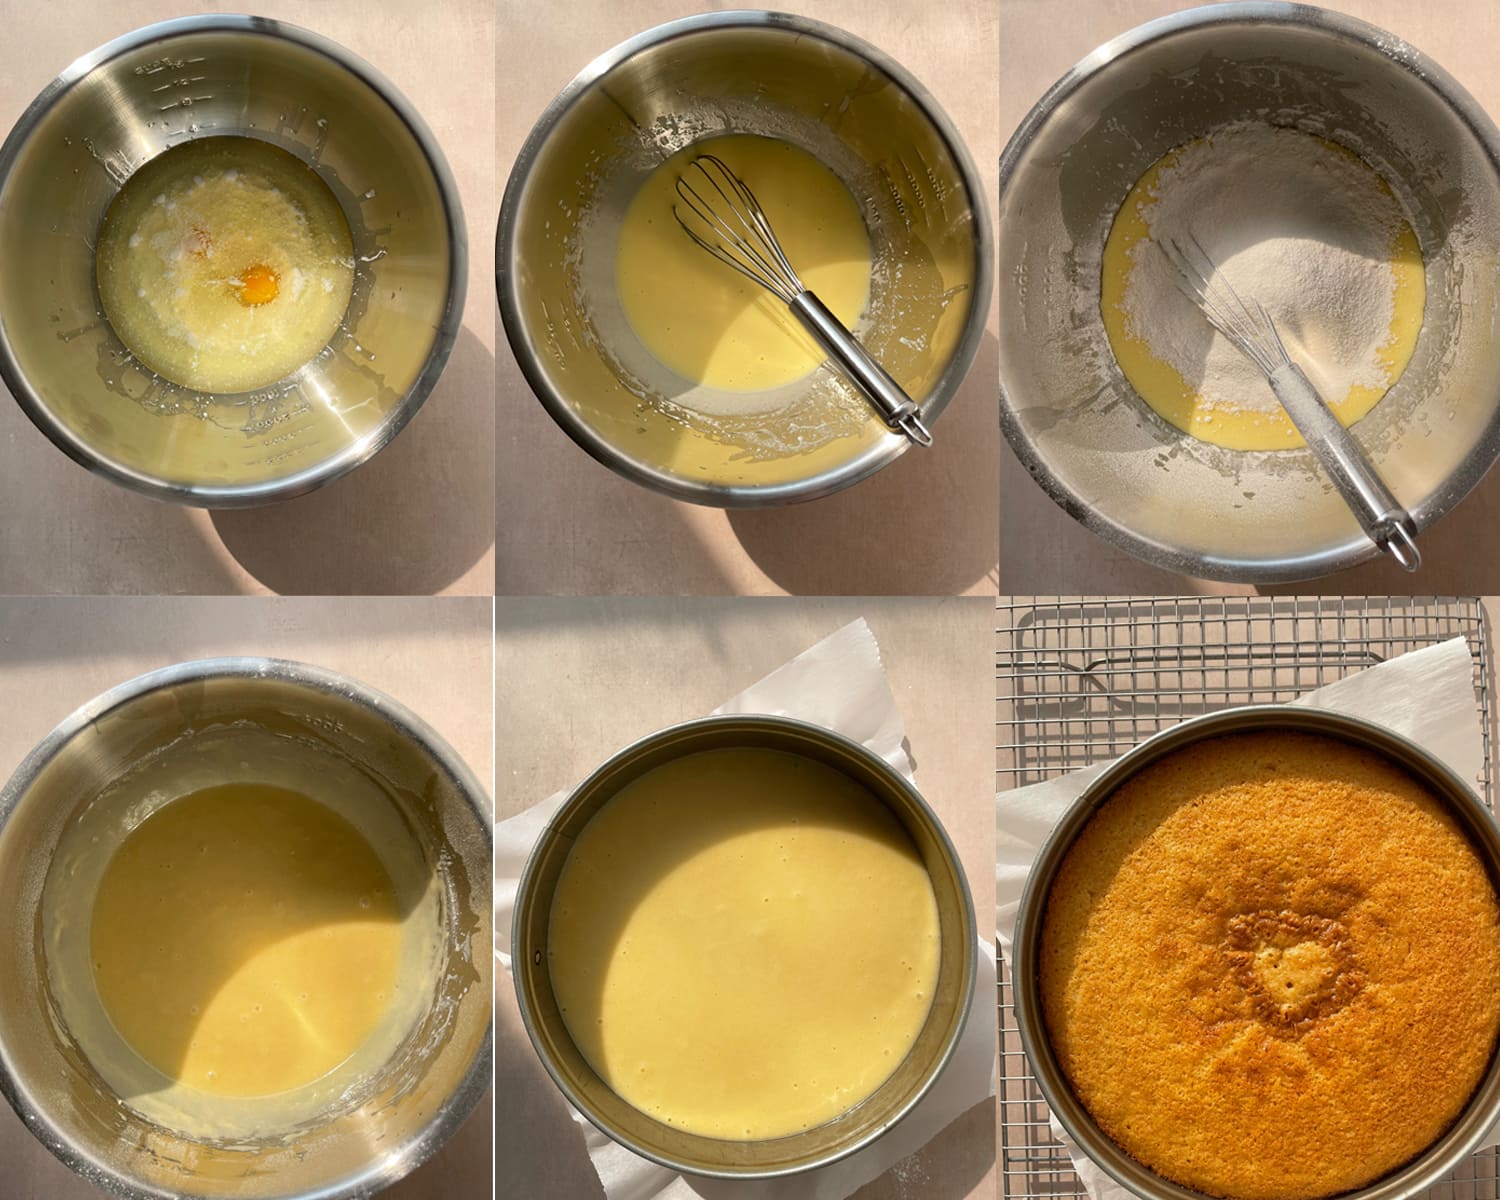
- In a large bowl, whisk the eggs, buttermilk, and oil together until smooth. Add in the vanilla cake mix and whisk to combine.
- Pour the batter into the lined pan and bake for 30 minutes. Rotate the cake and bake for another 20-25 minutes until the cake tester that comes with the box, is inserted in the center of the cake and comes out clean.
- Once baked, remove the cake from the oven and place on a wire rack to cool to room temperature. Store in an airtight container until ready to use.
Assembling Ice Cream Cake
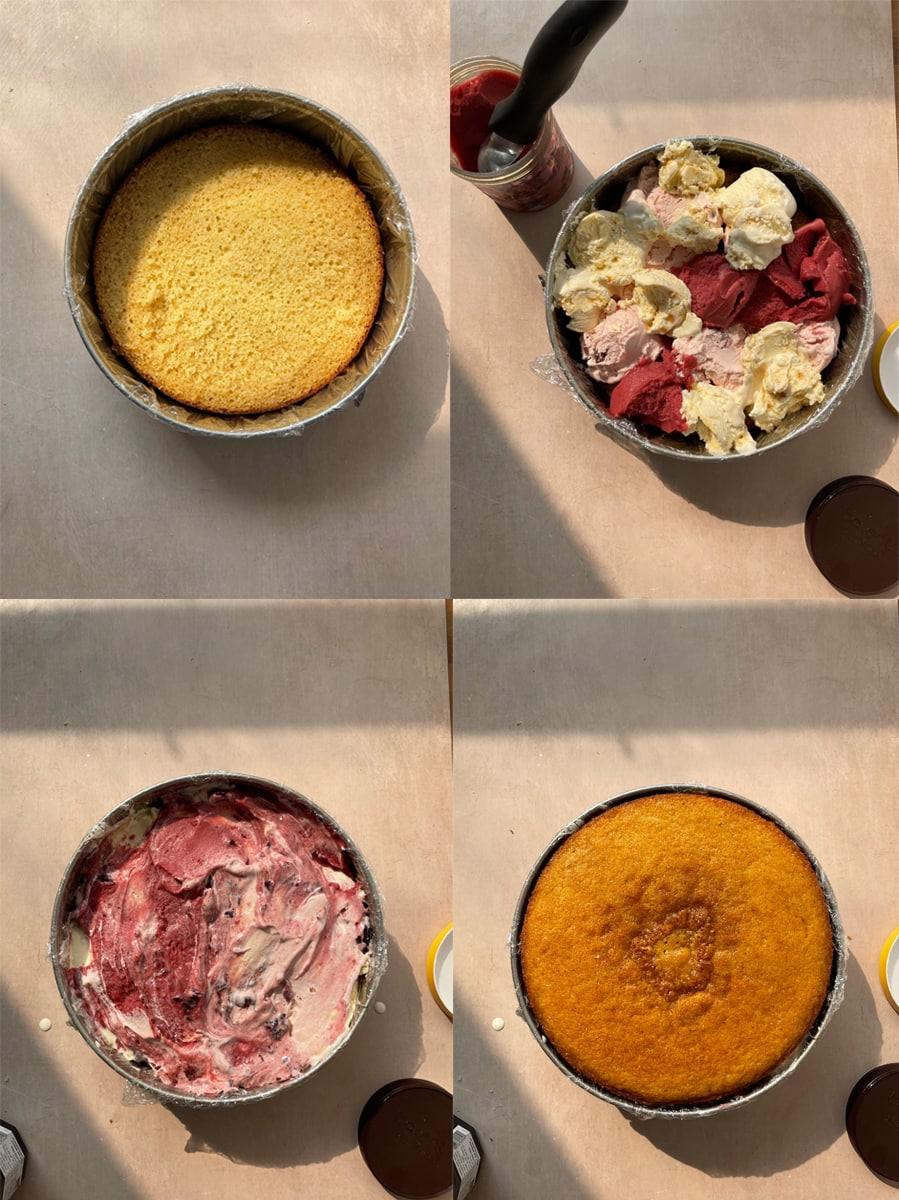
- Clean the springform pan, then line fully with plastic wrap. The plastic should go across the bottom and fully up the sides of the pan. You also want to clear a level surface in your freezer, big enough for the pan.
- Use a serrated knife to cut the cooled vanilla cake into two even layers. Place the bottom layer into the lined springform pan.
- Take the ice cream(s) out of the freezer and allow them to thaw until easily scoopable.
- Once softened, scoop the ice creams in a random pattern over the bottom layer of cake, continue until all the ice cream has been used.
- If wanted, spoon tablespoons scoops of jam into the ice cream layer. Use the back of a spoon to smoosh the ice cream and jam down into a flat layer.
- Place the top layer of cake over the ice cream layer.
- Put the assembled cake into the freezer and leave to set for at least 6 hours, ideally overnight.
Whipped Cream Topping
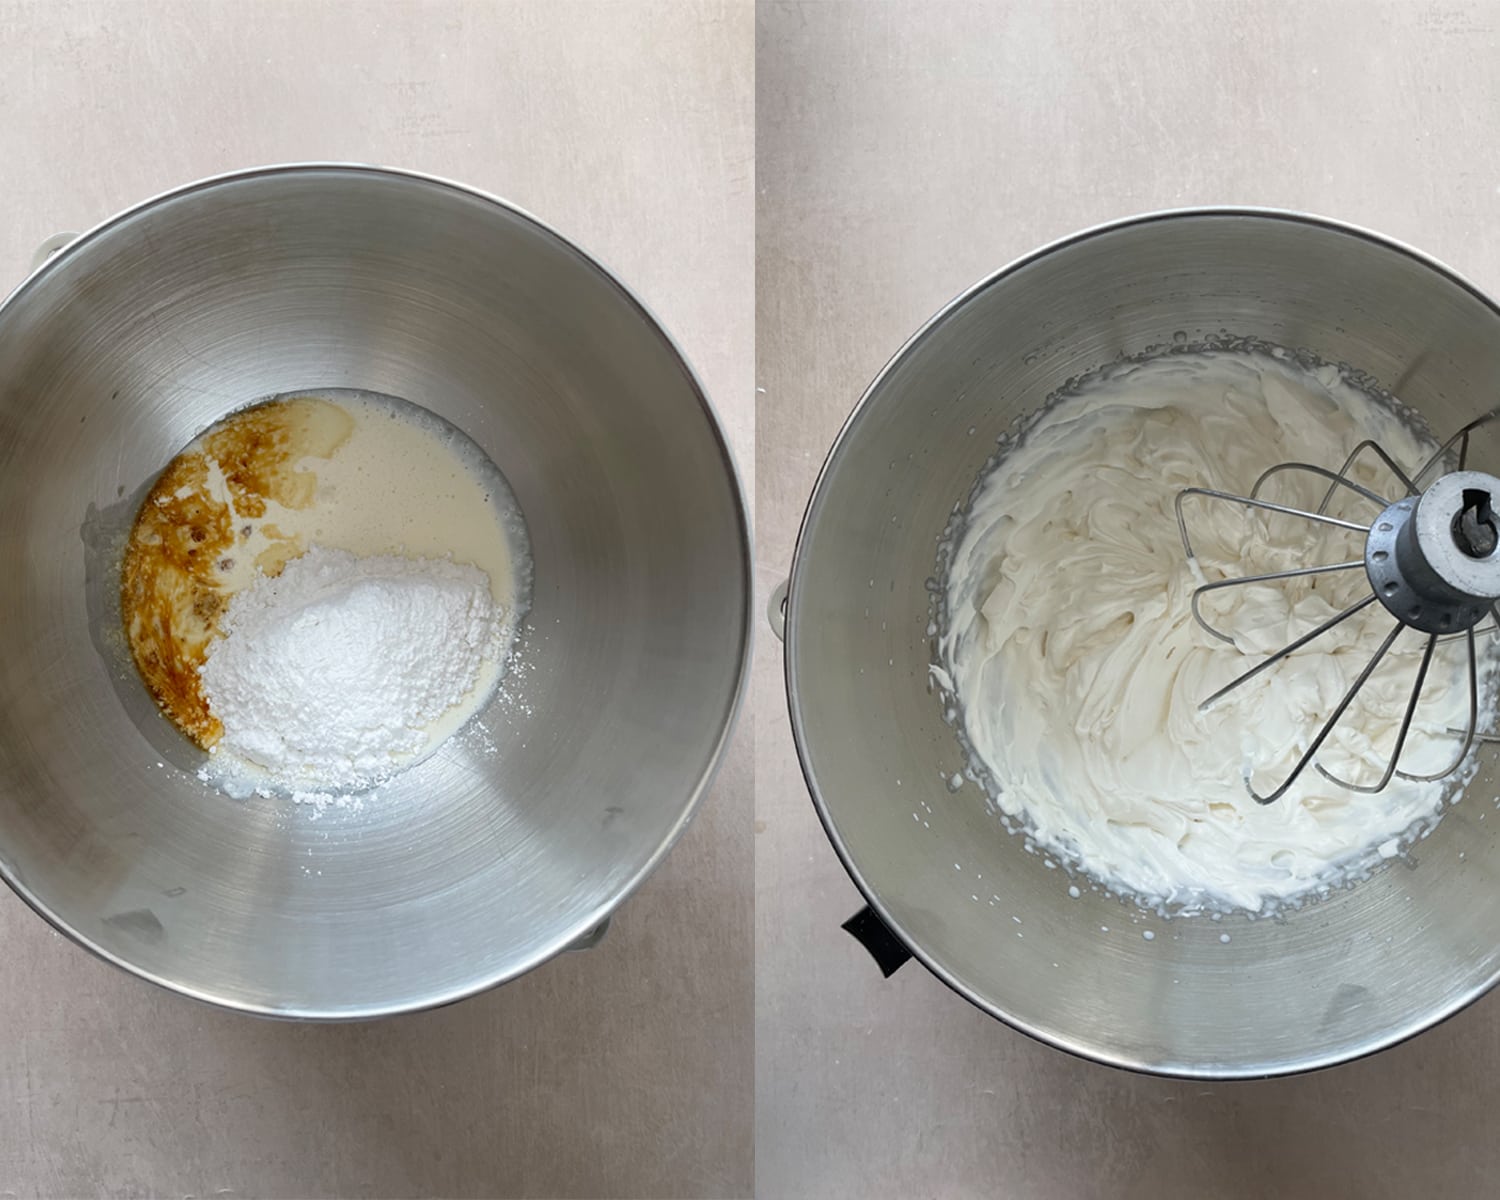
- In the bowl of a stand mixer, pour in the cold heavy cream, vanilla extract, and sift in the powdered sugar.
- Use the balloon attachment to whip the cream, first on medium, then medium high, until stiff peaks form.
- Take the ice cream cake out of the freezer. Remove the springform collar and peel away the plastic wrap. Transfer the cake to whatever dish you plan to serve it from.
- Spoon the whipped cream onto the top of the cake and roughly spread it out across the top.
- Optionally top with fresh fruit such as raspberries, cherries, or strawberries.
- Enjoy immediately or place back in the freezer.
- Wrap leftovers in plastic and store in an airtight bag in the freezer for up to 1 month.

Berry Ice Cream Cake (Eistorte)
Equipment
Ingredients
- 1 cup vegetable oil or neutral oil
- 1 cup buttermilk full fat is best
- 3 eggs large
- 1 box Wild Rye Vanilla Cake Mix
Ice Cream filling
- 1200 milliliters ice cream can be a combination of multiple, up to 1500 milliliters
- 6 tablespoons cherry jam
Whipped Cream
- 250 milliliters heavy whipping cream cold (approximately 1 cup)
- 75 grams powdered sugar
- 1 teaspoon vanilla extract
Instructions
Vanilla Cake
- Preheat the oven to 325 F and place a rack in the center of the oven.
- Line a 9" springform pan with a piece of parchment paper or with baking spray that includes flour.
- In a large bowl, whisk the eggs, buttermilk, and oil together until smooth. Add in the vanilla cake mix and whisk to combine.
- Pour the batter into the lined pan and bake for 30 minutes. Rotate the cake and bake for another 20-25 minutes until the cake tester that comes with the box, is inserted in the center of the cake and comes out clean.
- Once baked, remove the cake from the oven and place on a wire rack to cool to room temperature. Store in an airtight container until ready to use.
Assembling
- Clean the springform pan, then line fully with plastic wrap. The plastic should go across the bottom and fully up the sides of the pan. You also want to clear a level surface in your freezer, big enough for the pan.
- Use a serrated knife to cut the cooled vanilla cake into two even layers. Place the bottom layer into the lined springform pan.
- Take the ice cream(s) out of the freezer and allow them to thaw until easily scoopable.
- Once softened, scoop the ice creams in a random pattern over the bottom layer of cake, continue until all the ice cream has been used.
- If wanted, spoon tablespoons scoops of jam into the ice cream layer. Use the back of a spoon to smoosh the ice cream and jam down into a flat layer.
- Place the top layer of cake over the ice cream layer.
- Put the assembled cake into the freezer and leave to set for at least 6 hours, ideally overnight.
Whipped Cream
- In the bowl of a stand mixer, pour in the cold heavy cream, vanilla extract, and sift in the powdered sugar.
- Use the balloon attachment to whip the cream, first on medium, then medium high, until stiff peaks form.
- Take the ice cream cake out of the freezer. Remove the springform collar and peel away the plastic wrap. Transfer the cake to whatever dish you plan to serve it from.
- Spoon the whipped cream onto the top of the cake and roughly spread it out across the top.
- Optionally top with fresh fruit such as raspberries, cherries, or strawberries.
- Enjoy immediately or place back in the freezer.
- Wrap leftovers in plastic and store in an airtight bag in the freezer for up to 1 month.
Notes
- Make sure the cake has cooled fully before cutting into two layers and assembling. Many people like to refrigerate or freeze cakes before cutting into layers but I find that it’s easier to cut through at room temperature.
- If you are marbling multiple ice creams, I recommend letting them all soften somewhat so that they are spreadable and you aren’t left with air bubbles. However, you then have to work quickly so they don’t become a soupy mess.
- Once assembled, let the cake chill for at least 6 hours or up to overnight but it will need to thaw slightly before slicing. I usually find that if you take it out just before whipping the cream for the top, it will still be just frozen enough but soft enough to cut.
- This cake can be stored long term for at least 1 month as long as it is wrapped up and in an airtight bag.
This post may contain affiliate links. This means that if you click on one of the product links above and complete a purchase, I’ll receive a small commission at no extra cost to you. I will never place a link nor make a recommendation on a product or service that I don’t love or use personally. Read our privacy policy here. Thank you for supporting Red Currant Bakery.