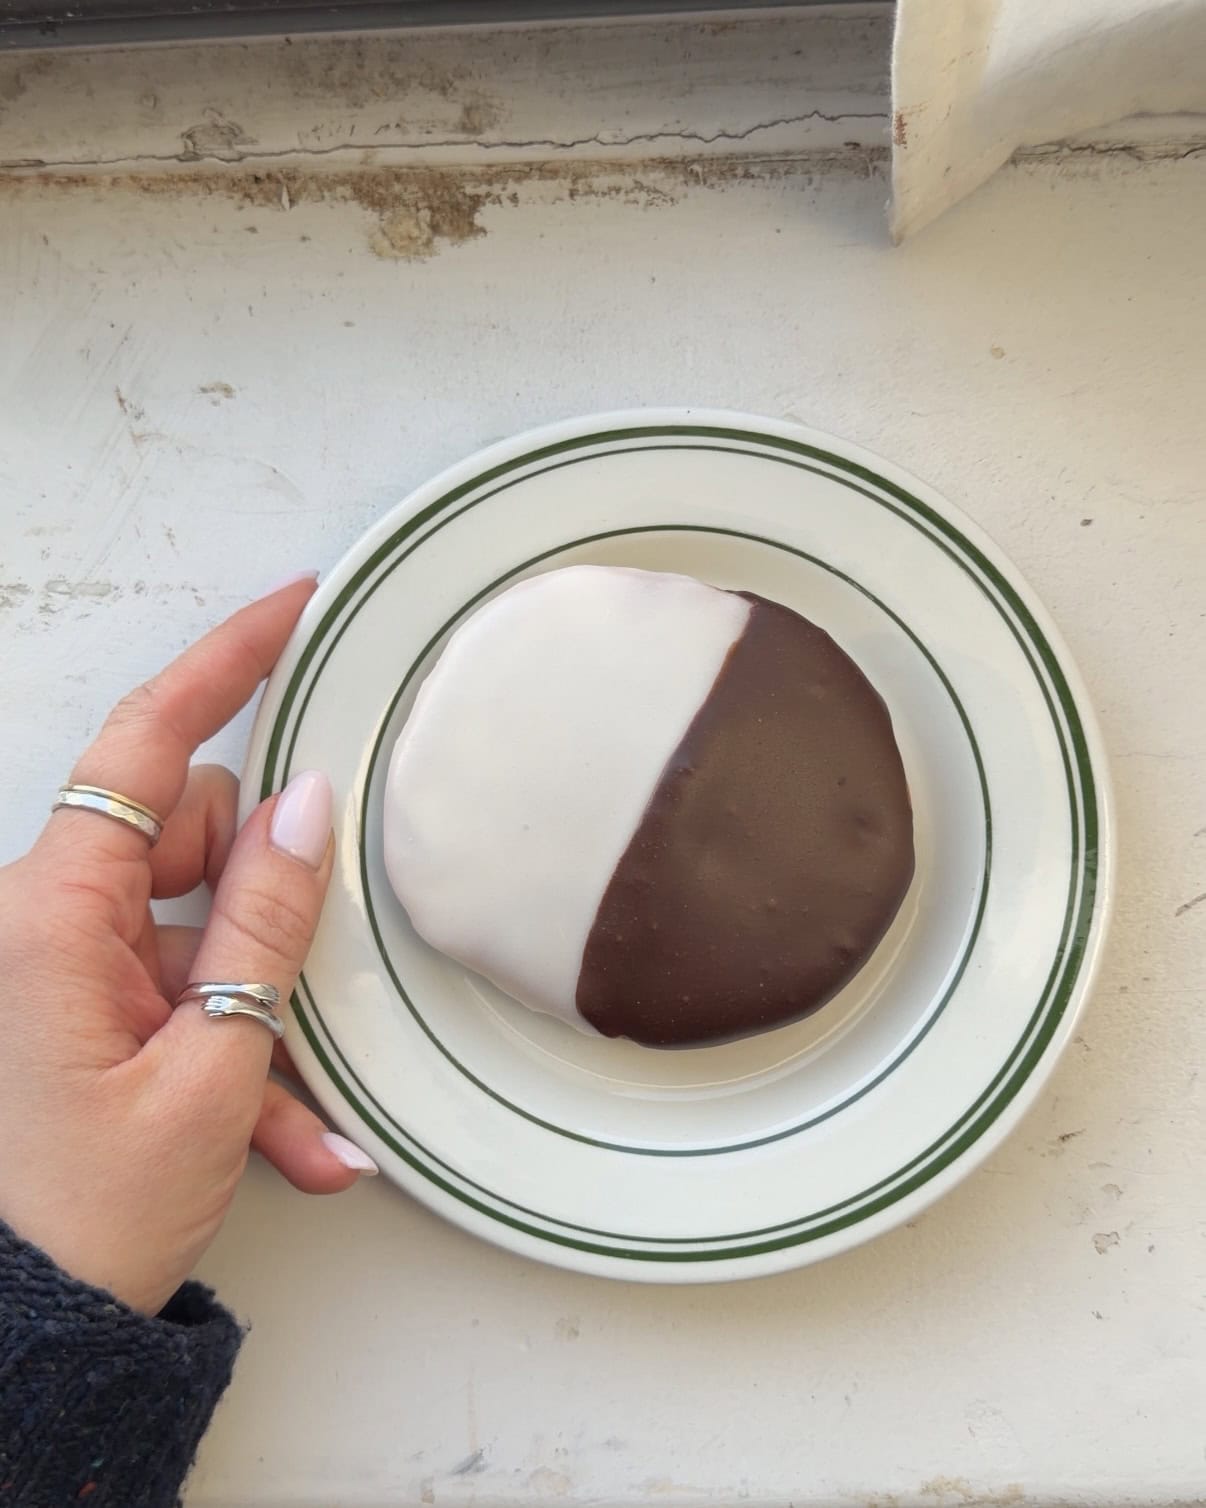
Classic cakey and soft, topped with half vanilla and half chocolate frosting, these Black and White cookies are just like the classic.
What is so special about black and white cookies?
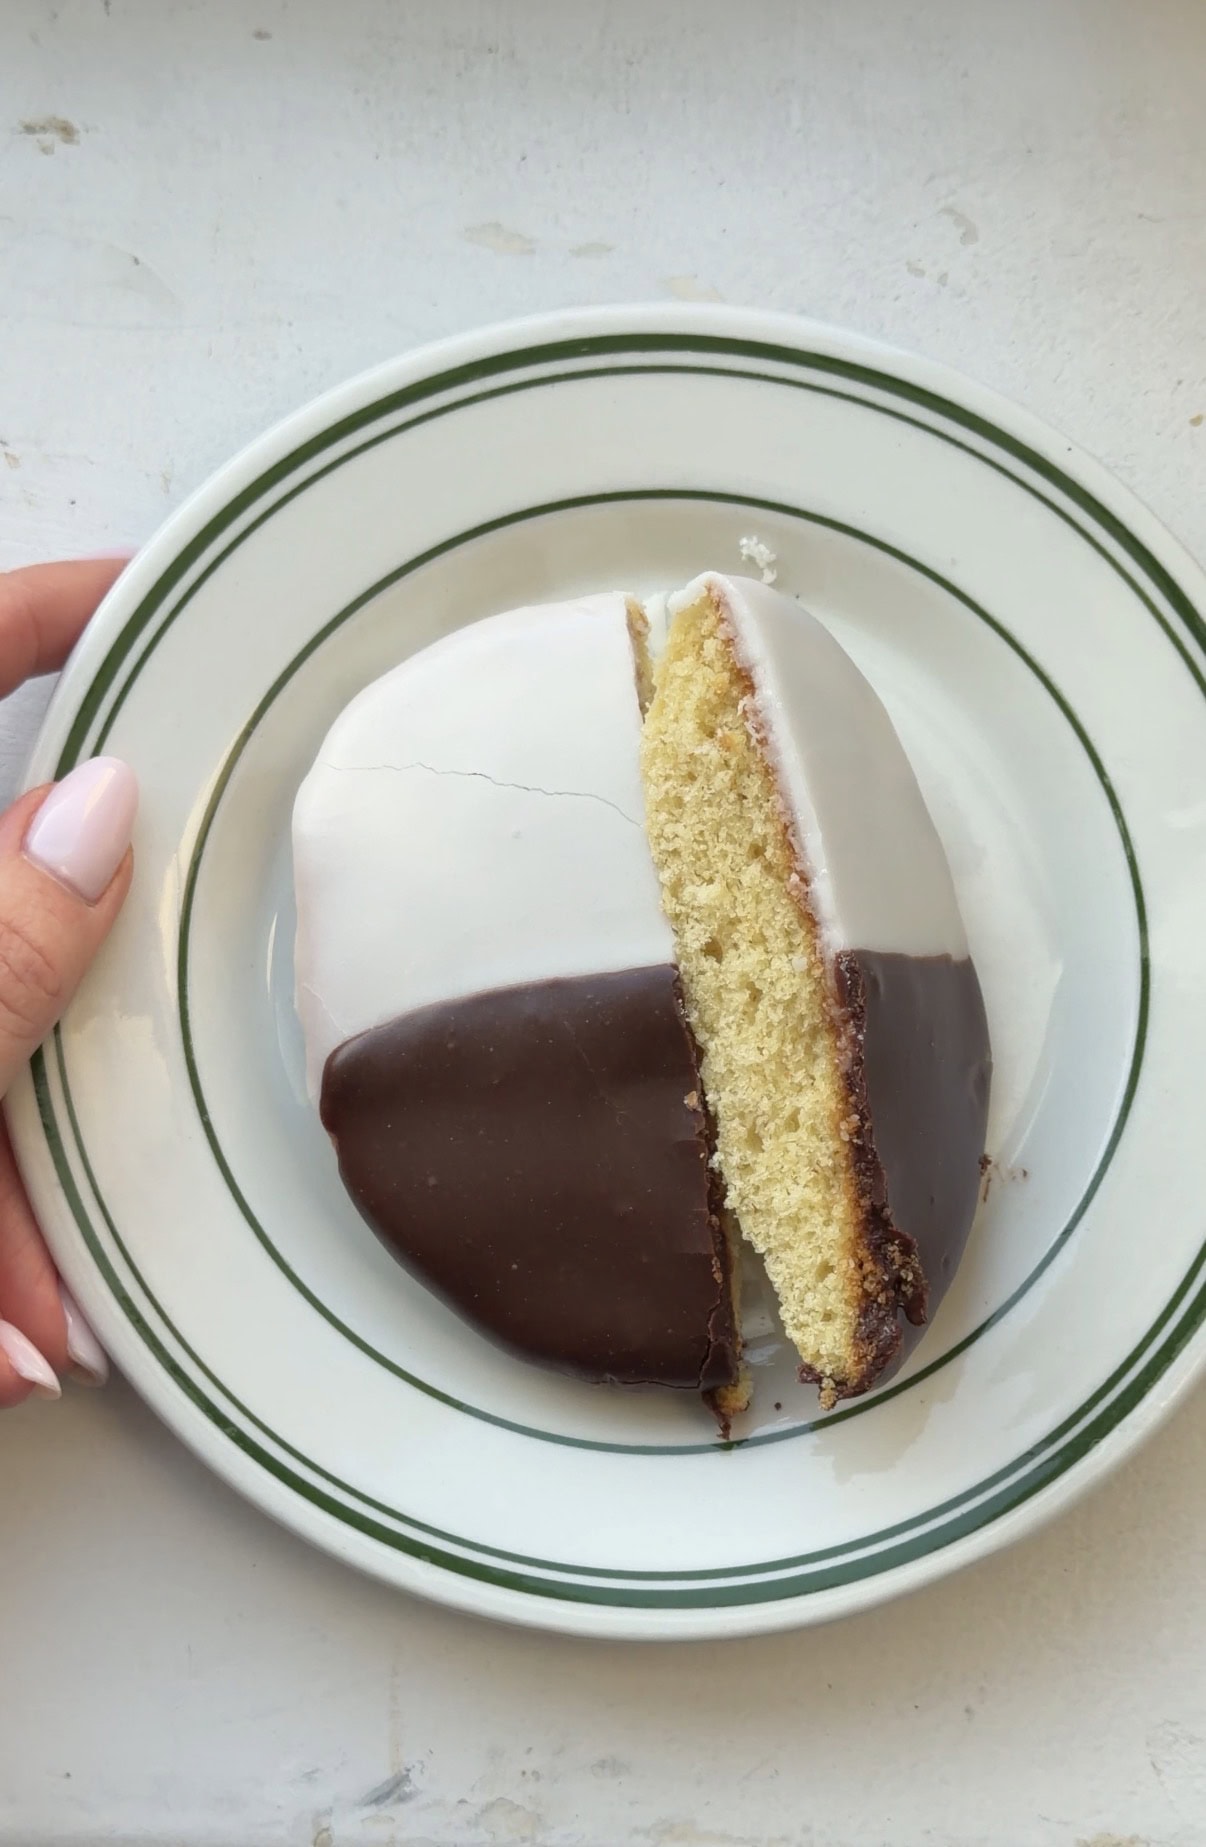
Unlike normal cookies, black and white cookies are soft and almost like a bit of a sour cream vanilla cake in the form of a cookie. They also have both vanilla and chocolate icing so it’s perfect for when you can’t decide.
What is the base of a black and white cookie?
The base of a black and white cookie is a sour cream or buttermilk vanilla cake in the form of a cookie.
Additional Recipes to try!
Tips for making Black and White Cookies
- Make sure your eggs and butter are at room temperature, this will help get a fluffy cakey cookie.
- Usually I’m not too bothered if your flour amount is off by 10 grams but with this recipe, you really want to be as precise as possible.
- If you don’t have a big cookie scoop you can always use a smaller one and either make smaller cookies or scoop two together. This will help keep the portions similar.
- Make sure to fully whip the sugar into the butter, this will help create a fluffy cookie!
- Give these cookies space to grow and bake! You don’t want more than 6 cookies on a standard half baking sheet.
- Allow the cookies to cool completely before icing them.
- When making the icing, I’ve listed all amounts but you may need a touch more milk or a touch more powdered sugar. If you feel like the icing is too thick to spread smoothly add more milk but just a teaspoon at a time. Ideally you never want it to be too runny because you’ll throw off the proportions with the meringue powder but if it is, just add a bit more powdered sugar.
- The icing on these cookies needs to set completely before you store them.
- I know it’s a bit wasteful but I think the best way to store extras is to wrap them individually in plastic wrap. This way they stay nice and soft and the icing doesn’t soften and end up on the other cookies.
Ingredients
- Butter: Salted butter is the main source of fat for these cookies, it should be soft but not melted. You can also use unsalted butter just add an extra pinch.
- Sugar: This recipe uses white granulated sugar in the cookies and powdered sugar in the icing.
- Vanilla & Almond Extract: Vanilla and almond extract add a little extra flavor to these simple cookies. The almond doesn’t make them super almondy it just adds another layer so if you’re allergic feel free to leave it out!
- Nutmeg: Ok this is not traditional but I always add grated nutmeg into my old fashioned cake donuts and tried it out in these and it’s absolutely delicious. If you do add it, I recommend buying whole nutmeg and using a microplane to grate it in yourself.
- Salt: Salt balances out the sweetness and enhances all of the flavors!
- Eggs: I use standard large eggs from the store. There is one whole egg in the cookie dough and it needs to be at room temperature.
- Sour Cream: Sour cream makes these cookies extra soft and tender, don’t worry about it being at room temperature. I haven’t tried substituting full fat greek yogurt but I think it would work in a pinch.
- All Purpose Flour: Any all purpose flour should work for these cookies!
- Baking Soda & Baking powder: Both of these help the cookies rise and give them their classic puff so make sure they aren’t expired.
- Meringue Powder: Some recipes use corn syrup but I’ve always used meringue powder for the icing. It creates that classic smooth hard top on the icing that firms up without making it hard all the way through. It can be hard to find at a normal grocery store so I recommend ordering it, or going to a local cake supply/decorating store.
- Cocoa Powder: I recommend using 100% natural cocoa powder for these chocolate icing for the best flavor!
- Milk: A little bit of milk is the liquid in the icing, any milk should work but I wouldn’t substitute water as it just won’t have much flavor.
How to make Black & White Cookies
Cookies
- Preheat the oven to 350 F and place a rack in the center of the oven.
- In a medium mixing bowl, add in the butter, sugar, salt, vanilla and almond extracts, and grated nutmeg. Beat with a mixer until light and fluffy.
- Add in the egg and beat again until smooth and thick. Last but not least add in the sour cream and beat once more.
- Pour in the flour, baking soda, and baking powder beat until just combined. Use a rubber spatula to scrape the sides and bottom of the bowl to make sure the cookie dough is completely mixed.
- Line a half size baking sheet (18″ x 13″) with a silicone baking mat or parchment paper.
- Use a large 1/4 cup cookie/muffin scoop to scoop 6 cookies onto the baking sheet. Be sure to stagger them and space them evenly so they have room to spread. Leave the remaining dough in the bowl.
- Bake the cookies in the hot oven for 8 minutes. After 8 minutes, rotate the pan and bake for another 6-8 minutes until the tops are still pale but look set.
- Take the baking sheet out of the oven and leave the cookies on the sheet to cool for 5 minutes before transferring them to a cooling rack.
- Bake the remaining 3 cookies the same way and then allow the cookies to cool completely before moving on to ice them.
Glaze & Top
- In a medium bowl, whisk together the powdered sugar and meringue powder.
- Carefully add in the milk (it’s less than you think) and whisk until smooth. It should be stiff but spreadable. If needed add a teaspoon more milk.
- Pour 115 grams of the glaze into a second bowl. Add in 2.5 tablespoons of cocoa powder and 1-2 teaspoons of milk. Whisk to combine, it should be the same consistency as the plain icing. Cover the chocolate icing bowl with plastic or a lid so it doesn’t dry out.
- For either icing, add more powdered sugar if needed to thicken. Be careful not to keep adding powdered sugar and milk as it will throw off the meringue powder ratio.
- Working with one cookie at a time, flip the cookie over so the flat side is facing you and hold it in your hand. Use a spoon to frost half of the cookie with the plain icing. Do your best to make a straight line down the middle of the cookie.
- Place the cookie back onto the cooling rack, with the iced, flat side, face up. Repeat icing with the plain icing for the rest of the cookies. Let the icing set for 5 minutes.
- Now repeat with the chocolate icing but on the other side of the cookies. If needed add a bit more milk to re-loosen the chocolate icing.
- Allow the cookies to set up for at least 10 minutes if eating immediately. And completely before wrapping them individually and storing at room temperature if saving for later.


Black and White Cookies
Ingredients
Cookie Dough
- 100 grams salted butter soft
- 120 grams granulated sugar
- 1 teaspoon vanilla extract
- 1/4 teaspoon almond extract
- 1/4 teaspoon fine sea salt
- 1/3 pod grated nutmeg
- 1 egg large, room temperature
- 100 grams sour cream
- 165 grams all purpose flour
- 1/2 teaspoon baking soda
- 1/4 teaspoon baking powder
Icing
- 250 grams powdered sugar
- 25 grams meringue powder
- 50 grams milk more as needed
- 2.5 tablespoons cocoa powder 100% natural
Instructions
Cookies
- Preheat the oven to 350 F and place a rack in the center of the oven.
- In a medium mixing bowl, add in the butter, sugar, salt, vanilla and almond extracts, and grated nutmeg. Beat with a mixer until light and fluffy.
- Add in the egg and beat again until smooth and thick. Last but not least add in the sour cream and beat once more.
- Pour in the flour, baking soda, and baking powder beat until just combined. Use a rubber spatula to scrape the sides and bottom of the bowl to make sure the cookie dough is completely mixed.
- Line a half size baking sheet (18" x 13") with a silicone baking mat or parchment paper.
- Use a large 1/4 cup cookie/muffin scoop to scoop 6 cookies onto the baking sheet. Be sure to stagger them and space them evenly so they have room to spread. Leave the remaining dough in the bowl.
- Bake the cookies in the hot oven for 8 minutes. After 8 minutes, rotate the pan and bake for another 6-8 minutes until the tops are still pale but look set.
- Take the baking sheet out of the oven and leave the cookies on the sheet to cool for 5 minutes before transferring them to a cooling rack.
- Bake the remaining 3 cookies the same way and then allow the cookies to cool completely before moving on to ice them.
Glaze
- In a medium bowl, whisk together the powdered sugar and meringue powder.
- Carefully add in the milk (it's less than you think) and whisk until smooth. It should be stiff but spreadable. If needed add a teaspoon more milk.
- Pour 115 grams of the glaze into a second bowl. Add in 2.5 tablespoons of cocoa powder and 1-2 teaspoons of milk. Whisk to combine, it should be the same consistency as the plain icing. Cover the chocolate icing bowl with plastic or a lid so it doesn't dry out.
- For either icing, add more powdered sugar if needed to thicken. Be careful not to keep adding powdered sugar and milk as it will throw off the meringue powder ratio.
- Working with one cookie at a time, flip the cookie over so the flat side is facing you and hold it in your hand. Use a spoon to frost half of the cookie with the plain icing. Do your best to make a straight line down the middle of the cookie.
- Place the cookie back onto the cooling rack, with the iced, flat side, face up. Repeat icing with the plain icing for the rest of the cookies. Let the icing set for 5 minutes.
- Now repeat with the chocolate icing but on the other side of the cookies. If needed add a bit more milk to re-loosen the chocolate icing.
- Allow the cookies to set up for at least 10 minutes if eating immediately. And completely before wrapping them individually and storing at room temperature if saving for later.
Notes
- Make sure your eggs and butter are at room temperature, this will help get a fluffy cakey cookie.
- Usually I’m not too bothered if your flour amount is off by 10 grams but with this recipe, you really want to be as precise as possible.
- If you don’t have a big cookie scoop you can always use a smaller one and either make smaller cookies or scoop two together. This will help keep the portions similar.
- Make sure to fully whip the sugar into the butter, this will help create a fluffy cookie!
- Give these cookies space to grow and bake! You don’t want more than 6 cookies on a standard half baking sheet.
- Allow the cookies to cool completely before icing them.
- When making the icing, I’ve listed all amounts but you may need a touch more milk or a touch more powdered sugar. If you feel like the icing is too thick to spread smoothly add more milk but just a teaspoon at a time. Ideally you never want it to be too runny because you’ll throw off the proportions with the meringue powder but if it is, just add a bit more powdered sugar.
- The icing on these cookies needs to set completely before you store them.
- I know it’s a bit wasteful but I think the best way to store extras is to wrap them individually in plastic wrap. This way they stay nice and soft and the icing doesn’t soften and end up on the other cookies.
Nutrition
This page may contain affiliate links. This means that if you click on one of the product links above and complete a purchase, I’ll receive a small commission at no extra cost to you. I will never place a link nor make a recommendation on a product or service that I don’t love or use personally. Read our privacy policy here. Thank you for supporting Red Currant Bakery.