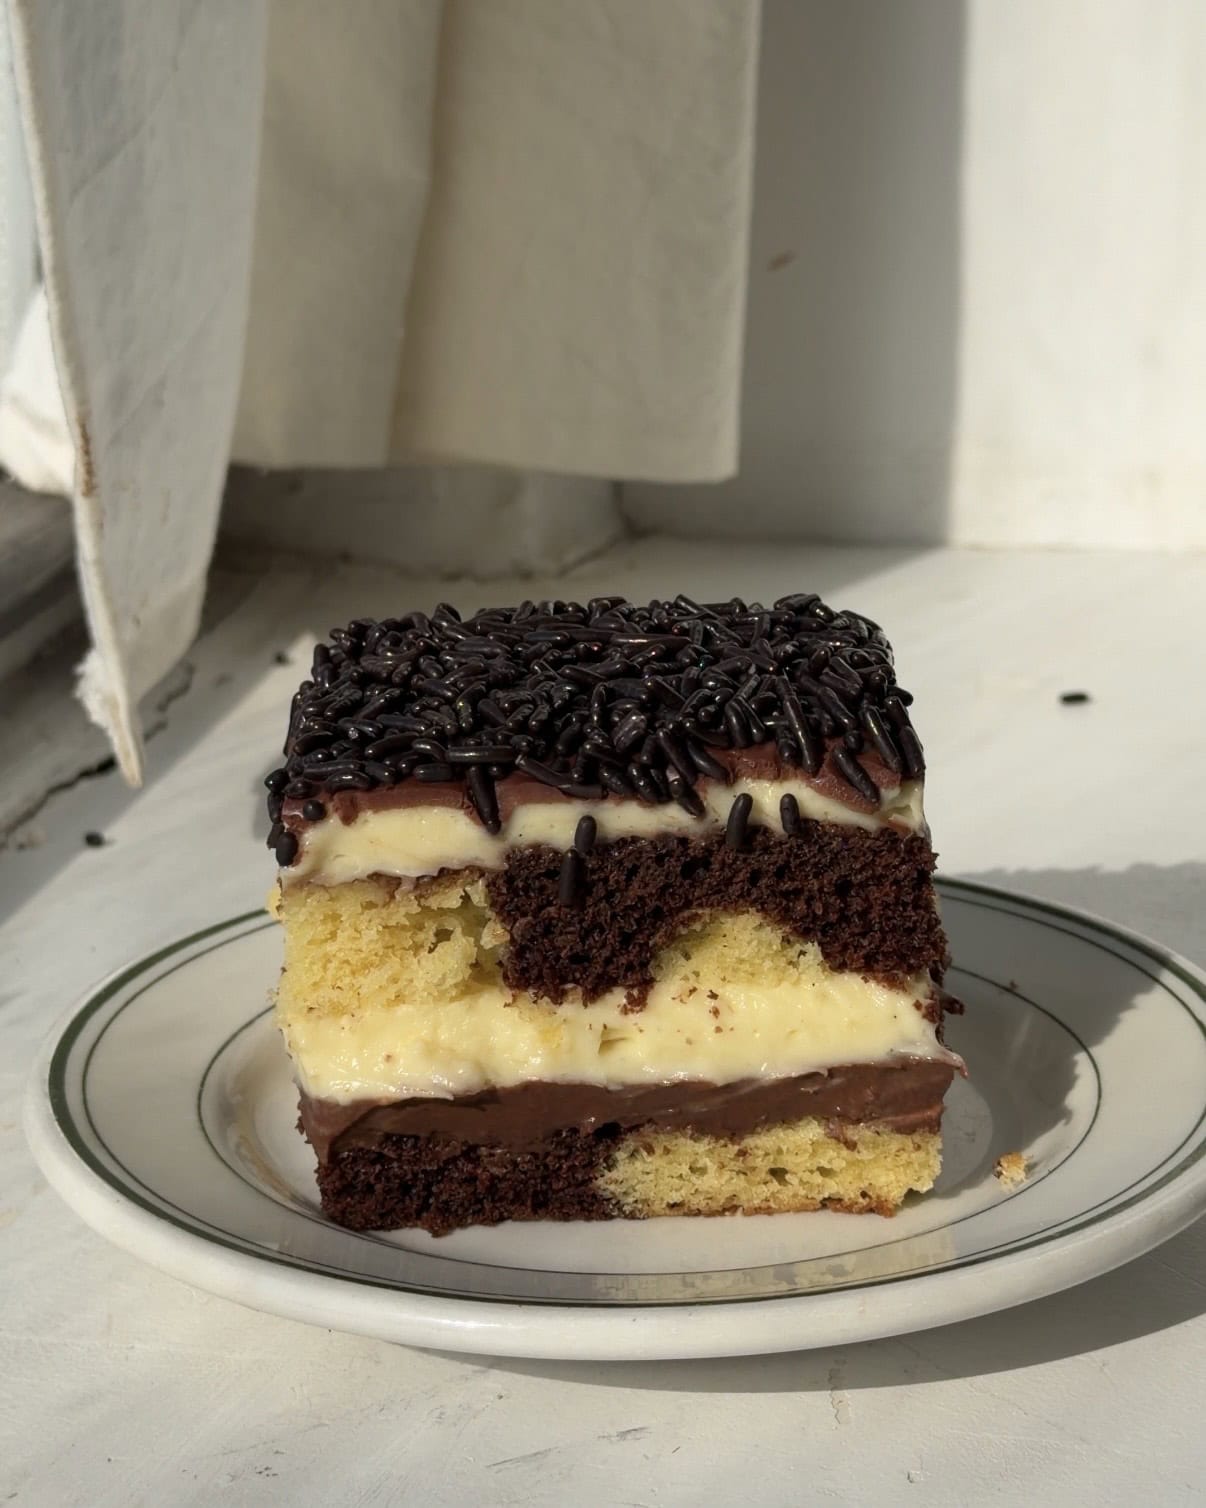
Two layers of marble cake, two layers of vanilla pastry cream, chocolate pudding, and chocolate ganache, this Marble Layer Cake is simple and delicious. This cake is also what I would make if my birthday was in March!
How to make Marble Cake moist?
To make a moist marble cake, it comes down to two things. The first is to use sour cream in the batter, this helps to add richness and moisture to the batter. The second is to not over bake it, because this cake bakes quickly it doesn’t brown much so be sure to check it with a toothpick.
What if I want to make a larger cake?
Originally this cake is baked in a 9″ x 9″ pan but it can easily be scaled up to a 9″ x 13″ pan to feed more people. The bake time of the cake will be approximately the same and to increase the batter simply multiply the amounts by 1.5. For the fillings and ganache you’ll also need to multiply them by 1.5.
Can this cake be made in advance?
Yes! I actually love to bake and assemble this cake the day before to it can firm up but you could also make it in the morning and serve in the evening. If you really want to plan ahead, the fillings can be made days in advance and stored in the fridge and the cake can also be made in advance but I would just wrap it up and store it at room temperature for no longer than 2 days.
Tips for making a Marble Layer Cake
- I prefer to let this cake sit in the fridge, overnight but you can make it same day.
- Make sure all the ingredients are at room temperature – this will help get a smooth and fluffy cake batter.
- To get the best bake on this cake, you’ll want to use a metal 9″ x 9″ pan, I like this one! And in order to get the cake to come out cleanly I recommend using a strip of parchment paper from one side to the other that acts as a bit of a sling.
- Let the cake cool for 10-15 minutes before using the parchment paper to lift it out. Then allow it to cool fully on a wire rack.
- Allow the pastry cream to cool completely in the fridge before stacking this cake otherwise it will mix in with the chocolate pastry cream.
- Use high quality dark chocolate for the chocolate filling and ganache; think ghirardelli or tony’s chocolonely 70%, chocolate chips won’t melt properly.
- To get clean cuts and slices, warm the knife under hot water and clean it off between each slice.
Additional Cake Recipes to try!
Ingredients
- All Purpose Flour: Any all purpose flour will work for this cake! I have not yet tried any other flours with this recipe.
- Baking Soda & Baking Powder: These both help make the cake rise – make sure to check the expiration date! If they are expired, they won’t be very effective.
- Cocoa Powder: I like to use 100% natural cocoa powder for this cake. My favorite is Ghirardelli brand but Hershey’s or any other you can find works too!
- Vanilla Extract: Vanilla extract is used in the cake and vanilla bean paste is in the pastry cream.
- Eggs: I use large eggs from the store. There are two whole eggs in the cake and 4 egg yolks in the pastry cream.
- Sugar: This cake uses white granulated sugar in the cake batter, pastry cream, and chocolate cream filling.
- Sour Cream: Sour cream adds richness and moisture to the cake. You can also use full fat greek yogurt.
- Butter: Butter adds moisture and richness to this cake. I like to use salted but unsalted will work too, just add an extra pinch of salt to the cake batter.
- Espresso: A double shot of espresso is added to the chocolate half of the cake batter. But any strongly brewed coffee or instant espresso will work.
- Milk: Whole milk is used for both the pastry cream and the chocolate cream filling but any milk will work!
- Heavy Cream: There is heavy cream in both of the fillings and the ganache topping. Because we aren’t whipping it, any heavy cream will work!
- Chocolate Sprinkles: Ok these are totally optional, I just think chocolate sprinkles are so fun on top. If you do choose to use them, try to find chocolate sprinkles that have cocoa powder, not just the sprinkles that are brown.

How to make a Marble Layer Cake?
Chocolate and Vanilla cake batter
- Preheat the oven to 350 F and place a rack in the center of the oven.
- In a medium mixing bowl, whisk together the flour, salt, sugar, baking soda and baking powder.
- Add in the eggs, soft butter, vanilla extract, and sour cream. On high speed, beat together all the ingredients for 2 minutes – until light and fluffy.
- Scrape down the sides of the bowl as needed.
- Pour 300 grams of the batter into a medium bowl. Add in the cocoa powder and espresso.
- Beat first on low, and then on high once more to combine all the ingredients. Scrape the sides and bottom of the bowl to make sure everything is combined.
Bake the Marble Cake
- Line the 9″ x 9″ metal pan with a rectangle of parchment paper that goes from one side, across the bottom and then back up the other side.
- Using a scoop, ladle, or just a rubber spatula, evenly dollop the vanilla cake batter on the bottom of the pan. Think of making a checkerboard, so a dollop of vanilla and then a space and then another dollop of vanilla and then a space.
- Then scoop the chocolate batter and place them in between the vanilla scoops.
- Use an offset spatula or the back of a spoon to smooth out the top of the cake batter. It will look like the chocolate is covering the vanilla, it’s ok. Try not to swirl or really over mix the batter, just spread until the batter is even.
- Bake in the preheated oven for 12 minutes. After 12 minutes, rotate the cake 180 degrees to ensure even browning and bake for another 10 minutes.
- Once the cake is finished baking, let it cool for 10 minutes before using the parchment paper to carefully lift it out of the pan and place on a wire rack to cool fully.
Vanilla Pastry Cream
- In a large pot, whisk together the corn starch, salt, and sugar.
- Pour in the milk and heavy cream and whisk to combine. Add in the egg yolks and vanilla bean paste, and whisk once more.
- Place the pot over medium low heat and whisk constantly scraping the bottom and edges of the pot. It will feel like it’s taking a while but all of a sudden it’ll get really thick so don’t stop whisking.
- Once thick, remove the pot from the heat and pour through a fine mesh sieve into a heat safe mixing bowl.
- Cover the surface with a layer of plastic wrap to prevent a skin from forming.
- To cool it down faster you can always spread it on a quarter sized baking sheet and cover the surface with plastic wrap.
- Once cooled to room temperature, transfer the cream to the fridge and let it chill completely – this one needs to be fridge cold!
Chocolate Cream
- In a heat safe mixing bowl, add in the chopped up chocolate and set aside.
- In a medium sauce pot whisk together the sugar, salt, and starch. Pour in the milk and heavy cream and whisk to combine.
- Place the pot over medium heat and whisk while cooking until softly bubbling. Continue to cook for about 1 minute once it has started bubbling.
- Turn off the heat and pour it into the bowl with the chocolate.
- Let it sit for 1 minute, then whisk the chocolate into the cream until fully melted and smooth.
- Cover the surface with a sheet of plastic wrap and leave it to cool completely.
Assemble
- Once the cake and both fillings have cooled completely, it’s time to assemble.
- Flip the cooled cake over and peel away the parchment paper, flip the cake back over on a cutting board. Use a serrated knife to cut the cake in half to make two thinner layers that are both 9″ x 9″.
- Line the original 9″ x 9″ cake pan with two slings of parchment paper this time. Lay the bottom half of the cake into the lined cake pan. The cake is VERY SOFT so move quickly and confidently when transferring the cake layers. Also know that it’s ok if it breaks a little, just piece it back together in the pan.
- Pour the chocolate cream over the base cake layer. Use a mini offset spatula to smooth it out into an even layer that fully reaches the edges.
- Use a hand mixer to whip the chilled vanilla pastry cream until smooth. Scoop half of the cream over the chocolate layer and smooth it out, being careful not to mix it into the chocolate. It should also completely reach the edges of the pan.
- Lay the second layer of cake over the fillings (this is the hardest one at least for me) again if it breaks, just piece it back together.
- Scoop the second half of the pastry cream over the cake and once again spread it into an even layer. Cover the surface with a sheet of plastic wrap and place it in the fridge for at least an hour or up to overnight. *I prefer overnight!
Chocolate Ganache
- Add the chopped chocolate into a medium heat safe bowl. Heat the cream either in a pot or in the microwave until steaming and then pour it over the chocolate.
- Let it sit for 2 minutes and then whisk gently until smooth. Allow it to cool for about 10 minutes.
- Remove the cake from the fridge and then peel away the plastic wrap. Pour the chocolate ganache over the pastry cream and use the back of a spoon or an offset spatula to spread it to the edges of the cake.
- Place the cake back in the fridge. Let it chill for at least another 30 minutes or hour.
Serve
- This cake needs to sit for at least 3-4 hours in total in the fridge before slicing. I prefer to let it sit overnight but you can make it same day. It doesn’t matter how you split it before and after the chocolate ganache layer. However, make sure to let the cake sit in the fridge for 1 hour before topping with the ganache so it doesn’t mix into the pastry cream.
- Before serving, optionally cover the top with chocolate sprinkles. I can’t tell you why I just feel like this cake is meant to have sprinkles on top.
- With the tip of a sharp knife, cut through where the chocolate ganache is stuck to the parchment on all the edges. If you don’t cut through and use the parchment to lift the cake out, it is likely to pull on the ganache and rip some off of the cake.
- Then use to ends of the parchment opposite from each other to lift the cake out.
- If you want clean edges, use a sharp clean knife to cut 1/2″ strips of off each edge. Then transfer the cake if you want onto a serving platter or cake stand.
- Cleaning the knife between each cut, cut the cake into 9 or 12 squares depending on how big you want the pieces.


Marble Layer Cake
Equipment
Ingredients
Marble Cake
- 150 grams all purpose flour
- 150 grams granulated sugar
- 1/4 teaspoon fine sea salt
- 3/4 teaspoon baking soda
- 3/4 teaspoon baking powder
- 125 grams salted butter soft
- 100 grams sour cream
- 2 eggs large, room temperature
- 1 teaspoon vanilla extract
- 18 grams cocoa powder 100% natural
- 35 grams espresso or strongly brewed coffee
Vanilla Pastry Cream
- 100 grams granulated sugar
- 60 grams corn starch
- 1/4 teaspoon fine sea salt
- 520 grams whole milk
- 325 grams heavy cream
- 4 egg yolks large
- 1 teaspoon vanilla bean paste or vanilla extract
Chocolate Cream Filling
- 180 grams 70% chocolate chopped
- 75 grams granulated sugar
- 15 grams corn starch
- 1/4 teaspoon fine sea salt
- 375 grams whole milk
- 75 grams heavy cream
Chocolate Ganache
- 114 grams 70% chocolate chopped
- 150 grams heavy cream
Instructions
Cake Batter
- Preheat the oven to 350 F and place a rack in the center of the oven.
- In a medium mixing bowl, whisk together the flour, salt, sugar, baking soda and baking powder.
- Add in the eggs, soft butter, vanilla extract, and sour cream. On high speed, beat together all the ingredients for 2 minutes – until light and fluffy.
- Scrape down the sides of the bowl as needed.
- Pour 300 grams of the batter into a medium bowl. Add in the cocoa powder and espresso.
- Beat first on low, and then on high once more to combine all the ingredients. Scrape the sides and bottom of the bowl to make sure everything is combined.
Bake the Marble Cake
- Line the 9" x 9" metal pan with a rectangle of parchment paper that goes from one side, across the bottom and then back up the other side.
- Using a scoop, ladle, or just a rubber spatula, evenly dollop the vanilla cake batter on the bottom of the pan. Think of making a checkerboard, so a dollop of vanilla and then a space and then another dollop of vanilla and then a space.
- Then scoop the chocolate batter and place them in between the vanilla scoops.
- Use an offset spatula or the back of a spoon to smooth out the top of the cake batter. It will look like the chocolate is covering the vanilla, it's ok. Try not to swirl or really over mix the batter, just spread until the batter is even.
- Bake in the preheated oven for 12 minutes. After 12 minutes, rotate the cake 180 degrees to ensure even browning and bake for another 10 minutes.
- Once the cake is finished baking, let it cool for 10 minutes before using the parchment paper to carefully lift it out of the pan and place on a wire rack to cool fully.
Vanilla Pastry Cream
- In a large pot, whisk together the corn starch, salt, and sugar.
- Pour in the milk and heavy cream and whisk to combine. Add in the egg yolks and vanilla bean paste, and whisk once more.
- Place the pot over medium low heat and whisk constantly scraping the bottom and edges of the pot. It will feel like it’s taking a while but all of a sudden it’ll get really thick so don’t stop whisking.
- Once thick, remove the pot from the heat and pour through a fine mesh sieve into a heat safe mixing bowl.
- Cover the surface with a layer of plastic wrap to prevent a skin from forming.
- To cool it down faster you can always spread it on a quarter sized baking sheet and cover the surface with plastic wrap.
- Once cooled to room temperature, transfer the cream to the fridge and let it chill completely – this one needs to be fridge cold!
Chocolate Cream
- In a heat safe mixing bowl, add in the chopped up chocolate and set aside.
- In a medium sauce pot whisk together the sugar, salt, and starch. Pour in the milk and heavy cream and whisk to combine.
- Place the pot over medium heat and whisk while cooking until softly bubbling. Continue to cook for about 1 minute once it has started bubbling.
- Turn off the heat and pour it into the bowl with the chocolate.
- Let it sit for 1 minute, then whisk the chocolate into the cream until fully melted and smooth.
- Cover the surface with a sheet of plastic wrap and leave it to cool completely.
Assemble
- Once the cake and both fillings have cooled completely, it's time to assemble.
- Flip the cooled cake over and peel away the parchment paper, flip the cake back over on a cutting board. Use a serrated knife to cut the cake in half to make two thinner layers that are both 9" x 9".
- Line the original 9" x 9" cake pan with two slings of parchment paper this time. Lay the bottom half of the cake into the lined cake pan. The cake is VERY SOFT so move quickly and confidently when transferring the cake layers. Also know that it's ok if it breaks a little, just piece it back together in the pan.
- Pour the chocolate cream over the base cake layer. Use a mini offset spatula to smooth it out into an even layer that fully reaches the edges.
- Use a hand mixer to whip the chilled vanilla pastry cream until smooth. Scoop half of the cream over the chocolate layer and smooth it out, being careful not to mix it into the chocolate. It should also completely reach the edges of the pan.
- Lay the second layer of cake over the fillings (this is the hardest one at least for me) again if it breaks, just piece it back together.
- Scoop the second half of the pastry cream over the cake and once again spread it into an even layer. Cover the surface with a sheet of plastic wrap and place it in the fridge for at least an hour or up to overnight.
Chocolate Ganache
- Add the chopped chocolate into a medium heat safe bowl. Heat the cream either in a pot or in the microwave until steaming and then pour it over the chocolate.
- Let it sit for 2 minutes and then whisk gently until smooth. Allow it to cool for about 10 minutes.
- Remove the cake from the fridge and then peel away the plastic wrap. Pour the chocolate ganache over the pastry cream and use the back of a spoon or an offset spatula to spread it to the edges of the cake.
- Place the cake back in the fridge. Let it chill for at least another 30 minutes or hour.
Serve
- This cake needs to sit for at least 3-4 hours in total in the fridge before slicing. I prefer to let it sit overnight but you can make it same day. It doesn't matter how you split it before and after the chocolate ganache layer. However, make sure to let the cake sit in the fridge for 1 hour before topping with the ganache so it doesn't mix into the pastry cream.
- Before serving, optionally cover the top with chocolate sprinkles. I can't tell you why I just feel like this cake is meant to have sprinkles on top.
- With the tip of a sharp knife, cut through where the chocolate ganache is stuck to the parchment on all the edges. If you don't cut through and use the parchment to lift the cake out, it is likely to pull on the ganache and rip some off of the cake.
- Then use to ends of the parchment opposite from each other to lift the cake out.
- If you want clean edges, use a sharp clean knife to cut 1/2" strips of off each edge. Then transfer the cake if you want onto a serving platter or cake stand.
- Cleaning the knife between each cut, cut the cake into 9 or 12 squares depending on how big you want the pieces.
Notes
- I prefer to let this cake sit in the fridge overnight but you can make it same day.
- Make sure all the ingredients are at room temperature – this will help get a smooth and fluffy cake batter.
- To get the best bake on this cake, you’ll want to use a metal 9″ x 9″ pan, I like this one! And in order to get the cake to come out cleanly I recommend using a strip of parchment paper from one side to the other that acts as a bit of a sling.
- Let the cake cool for 10-15 minutes before using the parchment paper to lift it out. Then allow it to cool fully on a wire rack.
- Allow the pastry cream to cool completely in the fridge before stacking this cake otherwise it will mix in with the chocolate pastry cream.
- Use high quality dark chocolate for the chocolate filling and ganache; think ghirardelli or tony’s chocolonely 70%, chocolate chips won’t melt properly.
- To get clean cuts and slices, warm the knife under hot water and clean it off between each slice.


This recipe is so delicious & came together beautifully! Since I was old enough to request it, I’ve asked for a Boston Cream Pie for my birthday. My birthday was last week – and this recipe felt too serendipitous for me to pass up. I followed your recipe as written – sprinkles included! It is well written and easy to follow, and a very celebratory treat! Thank you for sharing!
Absolutely loved making this cake and the ingredients and method is spot on. Easier to make than it seemed and it was so delicious!
This was amazing! Rich and decadent – whilst not being too sweet at all. It surprised my family how well balanced everything is. The chocolate taste in between the pastry cream is wonderful.
Would definitely NOT skip the sprinkles.