Layers of soft almond cake, hazelnut Swiss meringue buttercream, chocolate ganache and raspberries, this Hazelnut Raspberry cake is the perfect balance of all things rich and fruity. This also happens to be the cake I would make if my birthday was in February.

Can this cake be made gluten free?
If you have a gluten free vanilla or almond cake base that you love then absolutely you can use that! That being said this cake uses both almond flour and regular all purpose flour and the all purpose flour cannot simply be replaced with more almond flour. If you’re looking for a great gluten free mix, King Arthur’s Vanilla gluten free cake mix is phenomenal!
What can I use instead of hazelnuts?
If hazelnuts aren’t your thing, any nut butter will work in this swiss meringue buttercream! That being said the flavors of the hazelnut with the chocolate and raspberry is truly delicious. I made my own hazelnut butter by blending whole roasted hazelnuts but you can use store bought nut butter too just make sure there’s no added sugar.
Can this cake be made in advance?
Yes! This cake is actually perfect to make a day or two in advance and stored in the fridge so all the layers really stick together and become stable. I recommend serving this cake at room temperature so the butter cream and the chocolate ganache have a chance to soften!
Additional Recipes to try!
Tips for making a Hazelnut Raspberry Cake
- Making your own hazelnut butter can seem like a lot of work but I promise it’s actually so easy. The key is to use a small blender or food processor and a decent amount of hazelnuts. If you use too small of an amount, you’ll be stuck scraping the sides of the blender over and over again.
- I decided to make this cake rectangular but if you’re more into round cakes, you can absolutely do that too! I recommend baking it in two 6″ or 7″ metal round cake pans and then splitting each cake into two layers.
- Fresh or frozen raspberries can be used for this cake. I’ve used frozen because it’s February and raspberries aren’t in season making them very expensive. That being said if you’re making this cake in the summer, mashed fresh raspberries are 100% worth it! For frozen just be sure to strain off some of the extra liquid with a fork.
- I recommend using dark chocolate aka something around 60%-75% chocolate to balance out the sweetness in the cake.
- Make sure the bowl and whip for your meringue are completely clean, any streak of fat will keep the meringue from whipping up.
- While meringue is possible with a hand mixer, it will in fact take forever so settle in for the long haul. Ideally use a stand mixer if you have it.
- Make sure to use fresh egg whites for the meringue and not bottled egg whites for best results.
- Swiss Meringue Buttercream can be intimidating but don’t stress. When in doubt cool it down and keep whipping. It’s important that the sugar fully dissolves into the egg whites, the butter should be soft but not melted and the meringue needs to have cooled off before adding the butter.
- If your buttercream starts to look split or soupy, it just needs to chill so either put an ice pack or ice bath under the bowl. Or place the bowl in the fridge for 5-10 minutes.
- Allow the cake to cool fully before moving on to layering and stacking it.
- The chocolate ganache should be thick but still spreadable. If it has cooled down too much it will be impossible to spread. Don’t worry, just place the bowl somewhere warm for a little or over a bowl of warm water until it has softened. I don’t recommend microwaving the ganache as it will melt parts and keep other parts stiff.
- Allow the cake to sit in the fridge for at least an hour to set before slicing.
Ingredients
- Hazelnuts: Roasted hazelnuts are used to make hazelnut butter for the buttercream. Store bought nut butter works too just make sure there’s no additives in it.
- Butter: Unsalted butter is the base of the cake and keeps it moist and rich. Make sure the butter is soft but not melted. There is also butter in the buttercream.
- Sugar: White granulated sugar gives this cake its slight sweetness as well as helps with the structure. There is also sugar in the Swiss Meringue buttercream.
- Vanilla & Almond Extract: Vanilla adds a little flavor and enhances the sweetness of the cake and buttercream while the almond extract enhances the almond flavor in the flour.
- Salt: Salt balances out the sweetness and enhances the vanilla flavor of the cake and buttercream.
- Eggs: I use standard large eggs from the store. There are four whole eggs in the cake, just make sure they are at room temperature. Plus egg whites needed in the buttercream.
- Almond Flour: Almond flour keeps this cake light but gives it a delicious nutty flavor. I like using whole almond, almond flour, but blanched almond flour works too!
- All Purpose Flour: Any all purpose flour should work in this cake! I have not yet tried any other flours with this recipe.
- Baking Powder: In addition to the air whipped into the wet ingredients, baking powder helps the cake rise so be sure it hasn’t expired.
- Raspberries: Fresh or frozen raspberries will work for this recipe! When not in season, I like to use frozen because they are more economical and usually have better flavor.
- Dark Chocolate: 60%-75% dark chocolate are best for the chocolate ganache. Be sure to use a bar of chocolate/baking chocolate and not chocolate chips as they won’t melt properly.
- Heavy Cream: Heavy Cream or heavy whipping cream will work in this recipe. It is used as the liquid in the ganache.

How to make a Hazelnut Raspberry Cake?
Hazelnut Butter
- A small blender or food processor will work best for making your own nut butter.
- Simply pour the roasted and peeled hazelnuts into your blender and blend on medium high (or the speed allowed) until smooth. Scrape down the sides of the blender as necessary.
- I find roasted and peeled hazelnuts at trader joes but if your’s are fresh just place them on a sheet pan and roast at 350 F for 10-15 minutes. They should have a slight golden tint and be fragrant.
- Then dump them onto a kitchen towel and rub the skins of or into a sealed mason jar and shake.
- Make sure to let the nut butter cool to room temperature before using it in the buttercream.
Vanilla Almond Cake
- Preheat the oven to 350 F and place a rack in the center of the oven.
- Line a 9” x 13″ metal rectangular pan, with a bit of butter and then one long rectangle of parchment paper that goes up two sides and across the bottom. See tips for notes on a round cake!
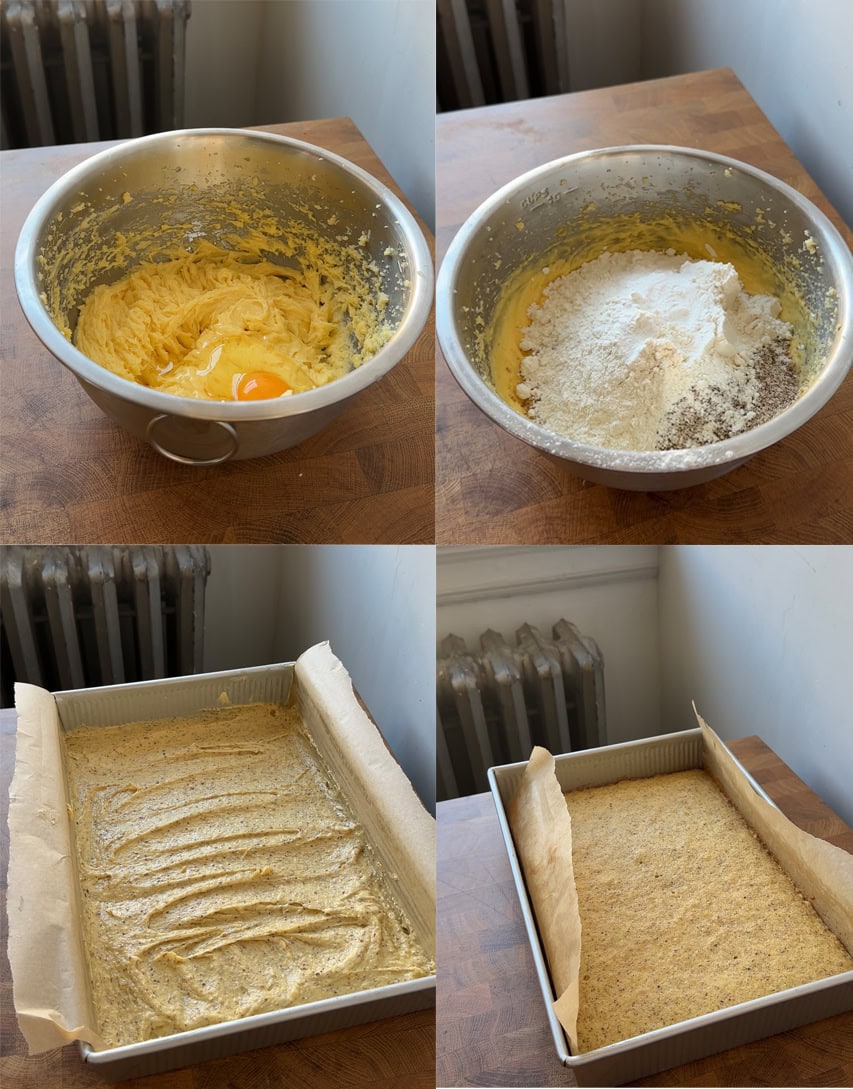
- In the bowl of a stand mixer, add in the butter, sugar, salt, vanilla and almond extracts.
- Use the paddle attachment to beat on medium high speed for 2 minutes until light and fluffy.
- Add in the eggs, one at a time, mixing completely before adding the next. Scrape the sides and bottom of the bowl in between each egg.
- Scrape the sides and bottom of the bowl again.
- Pour in the almond flour, all purpose flour, and baking powder and mix again on medium speed for about 30 seconds until combined.
- Pour the cake batter into the prepared pan and smooth out the top.
- Bake in the preheated oven for 10 minutes, then rotate 180 degrees and bake for another 10 minutes. The edges should be a light golden brown and a toothpick inserted in the center, should come out clean. Do not over bake this cake or it will become dry!
- Place the baked cake on a wire rack to cool for ten minutes. Then lift the cake out of the pan using the parchment paper onto a wire rack to cool completely.
Raspberries
- If using frozen raspberries, pour them into a microwave safe bowl and microwave in 30 second blasts until they are no longer frozen but not hot either! It’s better to go under than over in this case.
- Set aside while you prep the other elements.
- If using fresh raspberries, simply rinse the raspberries. Then pour them onto a big plate or sheet pan and use the back of a fork to mash them up. They shouldn’t be a smooth purée just broken up.

Chocolate Ganache
- Roughly chop the chocolate and place it in a heat safe bowl.
- Heat the heavy cream in the microwave or a sauce pot on the stove until steaming. Pour the hot cream over the chocolate and cover with a lid (could be anything just to keep the heat in). Let it sit for 1 minute.
- After a minute has passed, remove the lid and use a whisk to whisk the chocolate and cream together until smooth.
- Add in 50 grams of soft butter and whisk again.
- Set aside, whisking every 5-10 minutes so that it cools evenly and doesn’t form a skin.

Hazelnut Swiss Meringue Buttercream
- In the bowl of a stand mixer (a hand mixer will work too, it will just take ages), add in the egg whites, sugar, and salt. Whisk to combine.
- Place a medium sauce pot half way full with water onto the stove. Bring the water to a simmer.
- Set the mixing bowl with the egg whites and sugar over the bowl of simmering water and turn the heat to low. The water shouldn’t touch the bottom of the mixing bowl.
- Whisk the egg whites and sugar constantly until the sugar has fully dissolved into the egg whites. To check and see if the sugar has dissolved, pinch and rub some of the mixture in between your fingers and feel if you still feel any of the sugar granules, if not you’re good to go. If you do just keep cooking a bit longer.
- Once the sugar has dissolved, turn off the heat and remove the bowl from the water. Leave it to cool off for about 5 minutes.
- Using your mixer, whip the egg white mixture first on medium and then on high speed until fluffy, shiny and stiff.
- The bottom of the bowl should have cooled off at this point but if not, place the bowl in the fridge for 5 minutes.
- Once cool to the touch, turn the mixer to medium high speed and add in 1″ blocks of butter at a time whipping until all of the butter has mixed in. It will deflate a little bit at the beginning, that’s ok! Also it may start to look split or runny at some point, don’t stress just put the bowl back in the fridge to cool down for a bit and then keep whipping and adding in the butter.
- When almost all of the butter has been added, the mixture is going to look funny, just keep whipping and it will smooth out.
- Once all of the butter has been added, take the bowl from the mixer and scrape down the edges. Pour in 150-200 grams (start with 150 and add more to taste) of the room temperature hazelnut butter and the vanilla bean paste. Whip again on medium high until just combined.

Stacking the cake
- Once all the elements are ready and the cake has cooled off it’s time to stack the cake.
- Lay a piece of parchment paper on a quarter sized baking tray or any tray you have that will also fit in your fridge.
- Peel the parchment off of the cooled cake if you haven’t already. At this point were going to cut the cake in half across the equator, the cut should go from one long side to the other and parallel to the short sides. (hamburger style of you know what I mean). Then each of those halves, into two layers. I know the cake seems thin but trust yourself, it will work!
- If you have zero faith in your layer cutting capabilities, simply level off the top. Then, cut the big cake into 3 equal rectangles instead of two. You will just have a taller skinny cake with thicker cake layers but it will still be equally as delicious!
- Place one of the bottom layers onto the parchment lined tray, cut side up. Fill a piping bag or a zip top bag (with one corner cut off) with 1/3 of the hazelnut buttercream. Pipe a border on the bottom layer of the cake all the way around the edge, do this twice one on top of the other to build up a bit of a wall. Then pipe a little zig zag squiggle of buttercream within the wall, it doesn’t need to cover the whole thing.
- Use the back of a spoon or an offset spatula to smooth the inside butter cream into a thin even layer that connects to the wall that we piped.
- In a second piping bag or zip top bag (with one corner cut off), add in the chocolate ganache. Pipe another zig zag over the buttercream but within the wall. Again it doesn’t need to cover the whole surface. Use a second spoon to smooth out the ganache, it’s ok if it mixes with the butter cream a little. If the ganache is too stiff let it warm up somewhere warm or place the bowl over a bowl of hot water until it is back to spreadable consistency.
- Use a fork to scoop 1/3 of the defrosted raspberries over the chocolate. Leave the excess liquid behind if you used frozen raspberries and disregard if using fresh mashed raspberries. Distribute the raspberries as evenly as possible over the chocolate ganache.
- Then place one of the top layers of cake on top of the raspberry layer, cut side down. Press down on the center of the cake layer gently until it is level and well secured with the “wall” of buttercream that we piped.
- Repeat the filling layers and stacking two more times until all of the cake has been stacked.
- Scoop the remaining buttercream on to the top of the cake. Use the back of a spoon or an offset spatula to smooth the butter cream over the top and on the sides being careful not to catch any cake crumbs or other fillings.
- Smooth out the edges as desired with a bench scraper and place it in the fridge to chill and set for at least an hour.
- It’s ok if there is extra buttercream and chocolate ganache you can use them for decorations!

Decorate
- There are so many ways to decorate this cake whether you want to leave it plain as is or top it with a big pile of raspberries. You can also pipe on more buttercream or chocolate ganache. Or dust the cake with cocoa powder or powdered sugar.
- Simple flowers or candles always look beautiful!
- I recommend serving this cake at room temperature or just slightly chilled, so once it has set in the fridge, take it out to decorate and then serve or simply set it out about 20-30 minutes before you plan to serve it.
- To cut the cake use a thin sharp knife to cut it into slices. Then cut the 1″ slices into thirds or half depending on your preference! Be sure to clean the knife between each cut.


Hazelnut Raspberry Cake
Equipment
- Stand Mixer ideal for meringue
- 9" x 13" metal pan see notes for a round pan!
Ingredients
Hazelnut Butter
- 200 grams hazelnuts roasted and peeled
Almond Cake
- 160 grams unsalted butter soft
- 200 grams granulated sugar
- 1/2 teaspoon fine sea salt
- 1 teaspoon vanilla extract
- 1/4 teaspoon almond extract
- 4 eggs standard large, room temperature
- 100 grams almond flour
- 120 grams all purpose flour
- 1.5 teaspoons baking powder
Raspberries
- 340 grams raspberries fresh or frozen, more as needed
Chocolate Ganache
- 160 grams dark chocolate
- 180 grams heavy cream
- 50 grams unsalted butter soft
Hazelnut Buttercream
- 6 egg whites standard large eggs
- 300 grams granulated sugar
- 1/4 teaspoon fine sea salt
- 450 grams unsalted butter soft not melting
- 180 grams hazelnut butter
- 1 teaspoon vanilla bean paste
Instructions
Hazelnut Butter
- A small blender or food processor will work best for making your own nut butter.
- Simply pour the roasted and peeled hazelnuts into your blender and blend on medium high (or the speed allowed) until smooth. Scrape down the sides of the blender as necessary.
- I find roasted and peeled hazelnuts at trader joes but if your's are fresh just place them on a sheet pan and roast at 350 F for 10-15 minutes. They should have a slight golden tint and be fragrant.
- Then dump them onto a kitchen towel and rub the skins off or into a sealed mason jar and shake.
- Make sure to let the nut butter cool to room temperature before using it in the buttercream.
Vanilla Almond Cake
- Preheat the oven to 350 F and place a rack in the center of the oven.
- Line a 9” x 13" metal rectangular pan, with a bit of butter and then one long rectangle of parchment paper that goes up two sides and across the bottom. See tips for notes on a round cake!
- In the bowl of a stand mixer, add in the butter, sugar, salt, vanilla and almond extracts.
- Use the paddle attachment to beat on medium high speed for 2 minutes until light and fluffy.
- Add in the eggs, one at a time, mixing completely before adding the next. Scrape the sides and bottom of the bowl in between each egg.
- Scrape the sides and bottom of the bowl again.
- Pour in the almond flour, all purpose flour, and baking powder and mix again on medium speed for about 30 seconds until combined.
- Pour the cake batter into the prepared pan and smooth out the top.
- Bake in the preheated oven for 10 minutes, then rotate 180 degrees and bake for another 10 minutes. The edges should be a light golden brown and a toothpick inserted in the center, should come out clean. Do not over bake this cake or it will become dry!
- Place the baked cake on a wire rack to cool for ten minutes. Then lift the cake out of the pan using the parchment paper onto a wire rack to cool completely.
Raspberries
- If using frozen raspberries, pour them into a microwave safe bowl and microwave in 30 second blasts until they are no longer frozen but not hot either! It's better to go under than over in this case.
- Set aside while you prep the other elements.
- If using fresh raspberries, simply rinse the raspberries. Then pour them onto a big plate or sheet pan and use the back of a fork to mash them up. They shouldn't be a smooth purée just broken up.
Chocolate Ganache
- Roughly chop the chocolate and place it in a heat safe bowl.
- Heat the heavy cream in the microwave or a sauce pot on the stove until steaming. Pour the hot cream over the chocolate and cover with a lid (could be anything just to keep the heat in). Let it sit for 1 minute.
- After a minute has passed, remove the lid and use a whisk to whisk the chocolate and cream together until smooth.
- Add in 50 grams of soft butter and whisk again.
- Set aside, whisking every 5-10 minutes so that it cools evenly and doesn't form a skin.
Hazelnut Swiss Meringue Buttercream
- In the bowl of a stand mixer (a hand mixer will work too, it will just take ages), add in the egg whites, sugar, and salt. Whisk to combine.
- Place a medium sauce pot half way full with water onto the stove. Bring the water to a simmer.
- Set the mixing bowl with the egg whites and sugar over the bowl of simmering water and turn the heat to low. The water shouldn't touch the bottom of the mixing bowl.
- Whisk the egg whites and sugar constantly until the sugar has fully dissolved into the egg whites. To check and see if the sugar has dissolved, pinch and rub some of the mixture in between your fingers and feel if you still feel any of the sugar granules, if not you're good to go. If you do just keep cooking a bit longer.
- Once the sugar has dissolved, turn off the heat and remove the bowl from the water. Leave it to cool off for about 5 minutes.
- Using your mixer, whip the egg white mixture first on medium and then on high speed until fluffy, shiny and stiff.
- The bottom of the bowl should have cooled off at this point but if not, place the bowl in the fridge for 5 minutes.
- Once cool to the touch, turn the mixer to medium high speed and add in 1" blocks of butter at a time whipping until all of the butter has mixed in. It will deflate a little bit at the beginning, that's ok! Also it may start to look split or runny at some point, don't stress just put the bowl back in the fridge to cool down for a bit and then keep whipping and adding in the butter.
- When almost all of the butter has been added, the mixture is going to look funny, just keep whipping and it will smooth out.
- Once all of the butter has been added, take the bowl from the mixer and scrape down the edges. Pour in 150-200 grams (start with 150 and add more to taste) of the room temperature hazelnut butter and the vanilla bean paste. Whip again on medium high until just combined.
Stacking the cake
- Once all the elements are ready and the cake has cooled off it's time to stack the cake.
- Lay a piece of parchment paper on a quarter sized baking tray or any tray you have that will also fit in your fridge.
- Peel the parchment off of the cooled cake if you haven't already. At this point were going to cut the cake in half across the equator, the cut should go from one long side to the other and parallel to the short sides. (hamburger style of you know what I mean). Then each of those halves, into two layers. I know the cake seems thin but trust yourself, it will work!
- If you have zero faith in your layer cutting capabilities, simply level off the top. Then, cut the big cake into 3 equal rectangles instead of two. You will just have a taller skinny cake with thicker cake layers but it will still be equally as delicious!
- Place one of the bottom layers onto the parchment lined tray, cut side up. Fill a piping bag or a zip top bag (with one corner cut off) with 1/3 of the hazelnut buttercream. Pipe a border on the bottom layer of the cake all the way around the edge, do this twice one on top of the other to build up a bit of a wall. Then pipe a little zig zag squiggle of buttercream within the wall, it doesn't need to cover the whole thing.
- Use the back of a spoon or an offset spatula to smooth the inside butter cream into a thin even layer that connects to the wall that we piped.
- In a second piping bag or zip top bag (with one corner cut off), add in the chocolate ganache. Pipe another zig zag over the buttercream but within the wall. Again it doesn't need to cover the whole surface. Use a second spoon to smooth out the ganache, it's ok if it mixes with the butter cream a little. If the ganache is too stiff let it warm up somewhere warm or place the bowl over a bowl of hot water until it is back to spreadable consistency.
- Use a fork to scoop 1/3 of the defrosted raspberries over the chocolate. Leave the excess liquid behind if you used frozen raspberries and disregard if using fresh mashed raspberries. Distribute the raspberries as evenly as possible over the chocolate ganache.
- Then place one of the top layers of cake on top of the raspberry layer, cut side down. Press down on the center of the cake layer gently until it is level and well secured with the "wall" of buttercream that we piped.
- Repeat the filling layers and stacking two more times until all of the cake has been stacked.
- Scoop the remaining buttercream on to the top of the cake. Use the back of a spoon or an offset spatula to smooth the butter cream over the top and on the sides being careful not to catch any cake crumbs or other fillings.
- Smooth out the edges as desired with a bench scraper and place it in the fridge to chill and set for at least an hour.
- It's ok if there is extra buttercream and chocolate ganache you can use them for decorations!
Decorate
- There are so many ways to decorate this cake whether you want to leave it plain as is or top it with a big pile of raspberries. You can also pipe on more buttercream or chocolate ganache. Or dust the cake with cocoa powder or powdered sugar.
- Simple flowers or candles always look beautiful!
- I recommend serving this cake at room temperature or just slightly chilled, so once it has set in the fridge, take it out to decorate and then serve or simply set it out about 20-30 minutes before you plan to serve it.
- To cut the cake use a thin sharp knife to cut it into slices. Then cut the 1" slices into thirds or half depending on your preference! Be sure to clean the knife between each cut.
Notes
- Making your own hazelnut butter can seem like a lot of work but I promise it’s actually so easy. The key is to use a small blender or food processor and a decent amount of hazelnuts. If you use too small of an amount, you’ll be stuck scraping the sides of the blender over and over again.
- I decided to make this cake rectangular but if you’re more into round cakes, you can absolutely do that too! I recommend baking it in two 7″ or 8″ metal round cake pans and then splitting each cake into two layers.
- Fresh or frozen raspberries can be used for this cake. I’ve used frozen because it’s February and raspberries aren’t in season making them very expensive. That being said if you’re making this cake in the summer, mashed fresh raspberries are 100% worth it! For frozen just be sure to strain off some of the extra liquid with a fork.
- I recommend using dark chocolate aka something around 60%-75% chocolate to balance out the sweetness in the cake.
- Make sure the bowl and whip for your meringue are completely clean, any streak of fat will keep the meringue from whipping up.
- While meringue is possible with a hand mixer, it will in fact take forever so settle in for the long haul. Ideally use a stand mixer if you have it.
- Make sure to use fresh egg whites for the meringue and not bottled egg whites for best results.
- Swiss Meringue Buttercream can be intimidating but don’t stress. When in doubt cool it down and keep whipping. It’s important that the sugar fully dissolves into the egg whites, the butter should be soft but not melted and the meringue needs to have cooled off before adding the butter.
- If your buttercream starts to look split or soupy, it just needs to chill so either put an ice pack or ice bath under the bowl. Or place the bowl in the fridge for 5-10 minutes.
- Allow the cake to cool fully before moving on to layering and stacking it.
- The chocolate ganache should be thick but still spreadable. If it has cooled down too much it will be impossible to spread. Don’t worry, just place the bowl somewhere warm for a little or over a bowl of warm water until it has softened. I don’t recommend microwaving the ganache as it will melt parts and keep other parts stiff.
- Allow the cake to sit in the fridge for at least an hour to set before slicing.
Nutrition
This page may contain affiliate links. This means that if you click on one of the product links above and complete a purchase, I’ll receive a small commission at no extra cost to you. I will never place a link nor make a recommendation on a product or service that I don’t love or use personally. Read our privacy policy here. Thank you for supporting Red Currant Bakery.


This recipe was perfect to make for Valentines Day! All these components were a bit out of my comfort zone but the directions were great. Even convinced me to get a kitchen scale so I wouldn’t mess up the measurements. The only thing was that I wanted to make a round cake, and I know the recipe calls to use a 6-7″ pan if so but I only had an 8 or 9″ (I can’t remember) so the cakes ended up being fairly thin and hard to cut in half, so I could just make more cake batter for next time. The flavors blend so well and excited to try other recipes!
Amazing recipe
Made this last week and it was amazing!!! I was intimidated by the Italian merengue buttercream but it was surprisingly easy with these instructions. I don’t know if I did something wrong, but I only had enough batter for one 9” round cake pan. Nevertheless it es delicious but any tips on that would be appreciated!! Making this again soon!!
I made the cake with strawberries instead since they are what I had on hand but it was still so good! The frosting was absolutely amazing. This is definitely the hardest cake I have made, but the instructions were very easy to follow and made it very doable.
Would I be able to make this recipe without the chocolate ganache?
Yes! The chocolate ganache just helps to balance out the sweetness but if you don’t like it you can leave it out!
This recipe is so good! Made a gluten free version for galentines and it was divine! The hazelnut swiss meringue buttercream might be the best thing I’ve ever had. To make it gluten free I just used a 1:1 gf flour blend and the cake came out great! My only critique for myself is that I wish I would have tasted my raspberries beforehand since they were pretty tart, I might have sprinkled powdered sugar on each layer or something to sweeten them up!
Made for my boyfriend’s birthday yesterday and it was phenomenal! Will definitely make the cake and frosting for more casual affairs! I’m curious about really pushing the almond flavor and using almond butter in lieu of hazelnut next time
My boyfriend requested this as his birthday cake this year and safe to say it did not disappoint! He said it was the best cake he’s ever had, & I definitely agree! Directions were super clear & easy to follow, & I am so so happy with how this turned out. Will definitely be making this again, thank you so much!!
Made for a cake picnic in Denver and it was gone in the first round! I will say the amount of butter going into the buttercream was slightly alarming … in a good way because I knew it’d make it so good! I let the cake set in the freezer for 2 hours and it stayed sturdy for 2 hours in the sun before it was cut. Love this recipe and love all your work @redcurrantbakery!
Oh my gosh yayyy thank you so much Riley!
SO DELICIOUS!! I made this for my friend after she handed in their thesis and it was such a hit! I only had a 9″ circle cake tin and that worked. I frosted it very generously and still had just under half of the ganache and about 1/4 of the buttercream left. With all my leftover egg yolks I made lemon curd which actually paired really nicely with the cake!
My meringue buttercream was looking pretty grainy at one point but I followed the steps and let it chill out. Once I added in the spread, it stiffened up :). I don’t have a food processor and nowhere sells hazelnut spread near me but I found a raspberry and macadamia butter that worked soooo well instead!