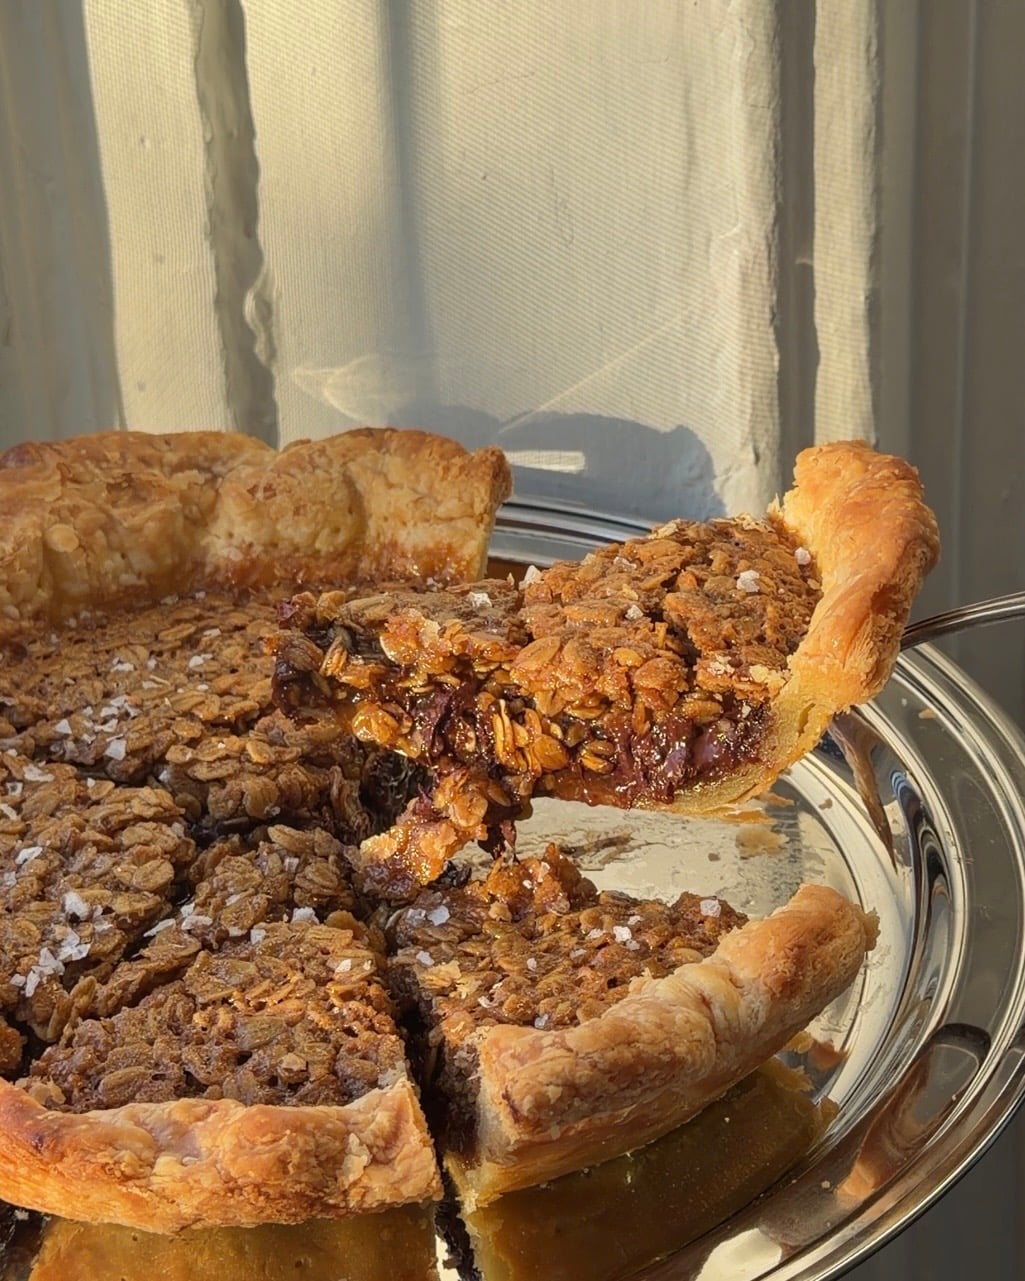
Think classic Chocolate Pecan Pie but swap the pecans for oats and with the most delicious maple caramel, this Maple Oatmeal Chocolate Chip Pie is my new favorite for Thanksgiving.
How to make flaky pie dough?
Personally I LOVE a flaky pie dough if I’m going through the effort of making it myself, so this recipe is extra flaky, think almost puff pastry kinda vibes. The key is to use cold butter, a cold bowl, ice water when making the dough and then a couple rounds of folds to create those flaky layers.
What is the best pie pan?
I know they aren’t always the prettiest but a classic metal pie pan always works the best! The heat transfers quickly to the crust helping to get a flaky, well baked, crust that doesn’t shrink back. I like this one!
Can I make this pie in advance?
Yes! This pie can be made 4 hours or 24 hours before. I actually love this pie the longer it sits because the maple caramel kind of needs to set up and the oats absorb even more of the flavor. It keeps well at room temperature so it’s the perfect make ahead pie!
Tips for making a Maple Oatmeal Chocolate Chip Pie
- If you don’t have time you can use a store bought pie crust but I really recommend making it yourself! This recipe is super simple, just takes a little bit of time.
- It’s ok if the dough looks rough and scraggly in the beginning. The folding, rolling, and chilling process smooths out and hydrates the dough.
- Keep everything COLD when making the pie dough, you don’t want the butter to melt into dough.
- Be sure to use enough pie weights to FILL the pie pan, if you don’t have pie weights you can use white granulated sugar and then use it again later or dried beans.
- I 100% recommend using a metal pie pan – it’ll make the best flaky pie dough and keep the crust from shrinking back. I recommend this one!
- If your pie crust puffs during the par-bake just use the back of a fork to kind of gently smush it back into place as best you can without tearing it.
- There’s always a chance the pie crust shrinks down, just pour enough of the maple caramel until it reaches the edge of the crust. If you have a little extra don’t use it or it will spill and burn.
- This pie is best made at least 8 hours before or ideally the night before!
Additional Recipes to try:
Ingredients
- All Purpose Flour: I recommend King Arthur Baking All Purpose flour for the crust!
- Sugar: Brown sugar is used in the maple caramel and a little white granulated sugar is used in the crust.
- Fine Sea Salt: A little fine sea salt enhances the flavors and balances out the sweetness.
- Butter: High fat, salted butter is best for this pie crust and the maple caramel but unsalted works too!
- Ice Water: Really cold water is best for this crust, ideally ice water.
- Chocolate: I recommend using a high quality chocolate baking bar or baking chips because they melt into a smooth layer. Classic chips will hold their shape and won’t meld into the maple caramel layer.
- Maple Syrup: Be sure to use high quality real maple syrup! Amber or dark amber will work.
- Egg yolks: Only egg yolks are used in the maple caramel but you can save the whites for a meringue!
- Vanilla: Vanilla extract is used in the maple caramel.
- Heavy Cream: Heavy cream is used in the maple caramel.
- Cinnamon: A touch of cinnamon adds warmth and depth to the oatmeal layer.
- Oats: Whole rolled oats should be used for this pie, don’t use quick cooking or steel cut oats.
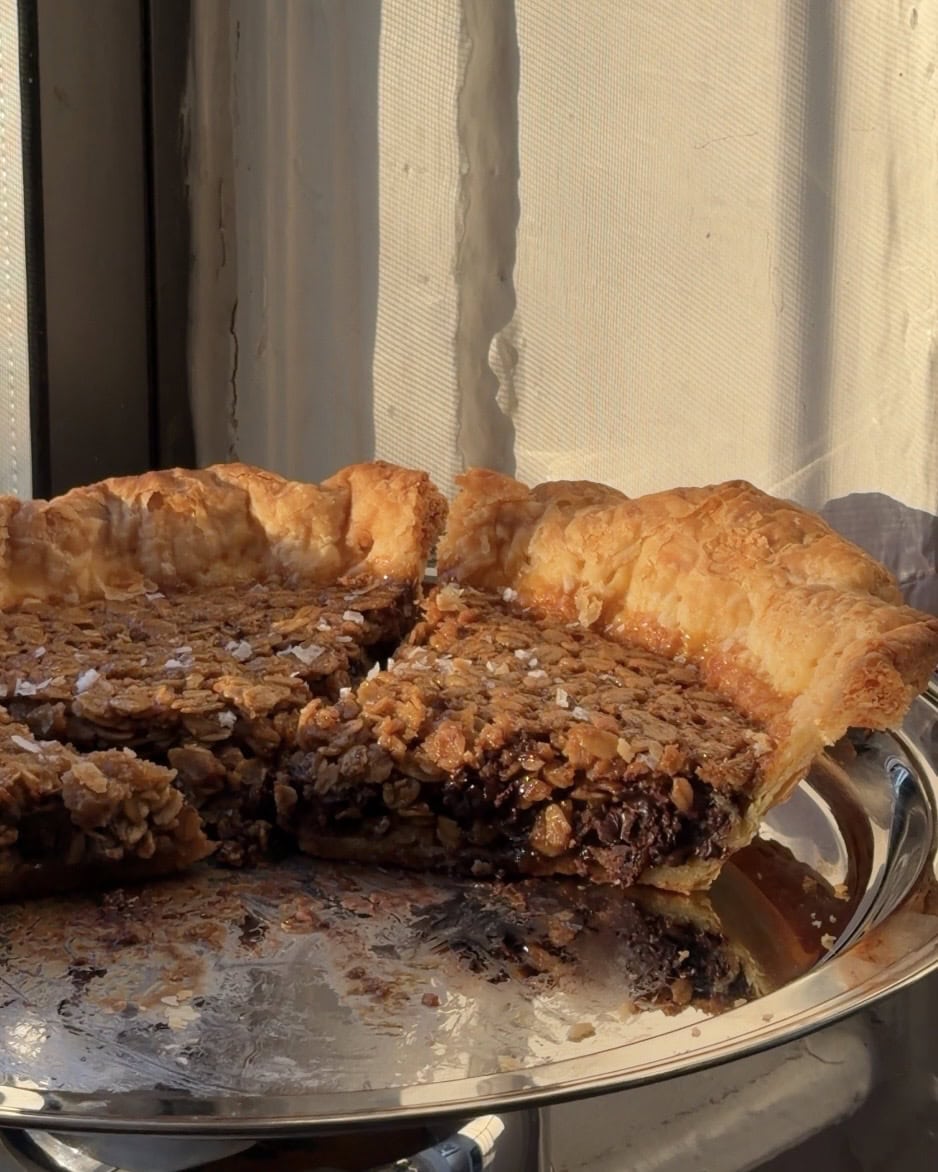
How to make a Maple Oatmeal Chocolate Chip Pie
Pie Dough
- Add ice into a cup of water and set aside.
- In a medium mixing bowl, whisk together the flour, salt, and sugar with a fork.
- Thinly slice the cold butter, dropping it into the dry ingredients as you do. The slices should be between 1/8th and 1/4 of an inch thick.
- I like to use a pairing knife and cut directly off a big Kerrygold block but you can also pre slice the butter on a cutting board if you prefer. Just make sure the butter stays cold.
- Smush each slice of butter between your fingers into the dry ingredients to flatten them out and start working in the flour mixture.
- Drizzle the ice water onto the surface of everything in the bowl.
- Use a fork to mix and slightly smush the water into the mixture until it looks shaggy. It’s ok if it still looks a little dry but there shouldn’t be large amounts of completely dry flour left. Don’t be tempted to add more water.
- Pour the mixture onto a sheet of plastic wrap and use the sides of the plastic wrap to smush the dough into a square that’s between 1/2″ and 1″ thick.
- Place the dough in the fridge to chill for 45 minutes.
- After 45 minutes, dust your work surface with flour. Take the pie dough out of the fridge and roll the dough out in a rectangle that is about 1/4″ thick. Use flour and a bench scraper as needed to keep the dough moving and keep it from sticking.
- Letter fold the dough so fold the top third over the middle third, and then the bottom third over the other two thirds.
- Rotate the dough 90 degrees and roll the dough back out to 1/4″ thick. Repeat the letter folds, it should be a skinny long rectangle so when you fold it you will have a square.
- Rewrap the dough and chill for another 45 minutes.
- After the 45 minutes have passed roll and fold the dough again twice. Rewrap the dough and chill for another 45 minutes. At this point you can chill it for as long as you need until you’re ready to use it.
- If chilling for more than 6 hours, place it in a ziptop bag to make sure it doesn’t dry out.
Par Bake
- Roll out the chilled pie dough, using flour as needed to keep it from sticking. The pie dough should be thin, about 1/8″ thick!
- Gently drape the dough over the metal pie pan and lift the sides to allow the pie dough to reach all the way into the bottom edges of the pan. The dough should overhang by at least 1″ all the way around.
- Trim off the corners with scissors but leave any other overhang. Fold the overhand under the edge of the pie dough to create a double thick crust that sits on the lip of the pie pan.
- Crimp the pie dough however you want, just make sure the double layer of dough stays resting on the lip of the pie pan.
- Prick the bottom and sides with a fork and then place the pan in the freezer.
- Place a rack one level below the center of the oven and turn it on to 425 F. After the pie has been in the freezer for at least 20 minutes (you can leave it in there overnight if that’s easier for you!) and the oven is hot, take the pie out of the freezer.
- Crumple a sheet of parchment paper and press it into the frozen crust. Pour your pie weights (or sugar or dried beans) into the pie – be sure to fill it up to the top. The weights are there to also keep the sides up!
- Place the pie pan on a baking sheet and place it in the preheated oven to bake for 15 minutes.
- After 15 minutes have passed, take it out of the oven and lift the parchment and weights out into a heat safe bowl.
- Re-prick the bottom and sides with a fork and place it back in the oven to bake for 8 minutes until the edges are just golden brown and the base looks dry.
- Take the par-baked pie out of the oven and turn off the oven. Set the crust aside to cool and start on the maple caramel.
Assemble & Bake
- Move the baking rack to the middle of the oven and pre-heat to 350 F.
- In a medium pot, melt the butter. Remove from the heat and add in the brown sugar, maple syrup, vanilla, salt, egg yolks, cinnamon, and heavy cream and whisk until smooth.
- In the semi cooled pie crust, add in the chocolate – if using a chocolate bar, roughly chop it and scatter it over the base and if using baking chips also just scatter over the base.
- Add the oats overtop of the chocolate and smooth it into an even layer.
- Pour the maple caramel over the back of a spoon or a rubber spatula over the oats to keep the oats sort of in place instead of them mixing with the chocolate.
- Place the whole tray and pie back in the hot oven and bake for 25 minutes. After 25 minutes rotate and bake for another 15 minutes.
- It’s a bit hard to tell if it’s done because it will still have quite a jiggle but the edges should have puffed up a bit and the oats will kind of create a top crust. At a max bake for 5 more minutes.
- Once baked, take it out of the oven, immediately sprinkle with flaked salt. Then let it set at room temperature ideally for at least 6 hours or up to overnight. No need to store in the fridge or even an airtight container unless you have critters.
- Optionally top with a simple whipped cream to serve.

Maple Oatmeal Chocolate Chip Pie
Equipment
- Pie weights you need 6 of these to fill the pie pan!
Ingredients
Pie Crust
- 180 grams all purpose flour
- 1 tablespoon granulated sugar
- 1/2 teaspoon fine sea salt
- 180 grams salted butter cold
- 78 grams ice water
Maple Caramel
- 90 grams salted butter
- 150 grams dark brown sugar
- 150 grams maple syrup
- 1 teaspoon vanilla extract
- 1 teaspoon cinnamon
- 1/2 teaspoon fine sea salt
- 4 egg yolks
- 60 grams heavy cream
Add Ins
- 114 grams 60% chocolate either baking chips or chopped bar
- 140 grams whole rolled oats
Instructions
Pie Dough
- Add ice into a cup of water and set aside.
- In a medium mixing bowl, whisk together the flour, salt, and sugar with a fork.
- Thinly slice the cold butter, dropping it into the dry ingredients as you do. The slices should be between 1/8th and 1/4 of an inch thick.
- I like to use a pairing knife and cut directly off a big Kerrygold block but you can also pre slice the butter on a cutting board if you prefer. Just make sure the butter stays cold.
- Smush each slice of butter between your fingers into the dry ingredients to flatten them out and start working in the flour mixture.
- Drizzle the ice water onto the surface of everything in the bowl.
- Use a fork to mix and slightly smush the water into the mixture until it looks shaggy. It’s ok if it still looks a little dry but there shouldn’t be large amounts of completely dry flour left. Don’t be tempted to add more water.
- Pour the mixture onto a sheet of plastic wrap and use the sides of the plastic wrap to smush the dough into a square that’s between 1/2″ and 1″ thick.
- Place the dough in the fridge to chill for 45 minutes.
- After 45 minutes, dust your work surface with flour. Take the pie dough out of the fridge and roll the dough out in a rectangle that is about 1/4″ thick. Use flour and a bench scraper as needed to keep the dough moving and keep it from sticking.
- Letter fold the dough so fold the top third over the middle third, and then the bottom third over the other two thirds.
- Rotate the dough 90 degrees and roll the dough back out to 1/4″ thick. Repeat the letter folds, it should be a skinny long rectangle so when you fold it you will have a square.
- Rewrap the dough and chill for another 45 minutes.
- After the 45 minutes have passed roll and fold the dough again twice. Rewrap the dough and chill for another 45 minutes. At this point you can chill it for as long as you need until you’re ready to use it.
- If chilling for more than 6 hours, place it in a ziptop bag to make sure it doesn’t dry out.
Par Bake
- Roll out the chilled pie dough, using flour as needed to keep it from sticking. The pie dough should be thin, about 1/8″ thick!
- Gently drape the dough over the metal pie pan and lift the sides to allow the pie dough to reach all the way into the bottom edges of the pan. The dough should overhang by at least 1″ all the way around.
- Trim off the corners with scissors but leave any other overhang. Fold the overhand under the edge of the pie dough to create a double thick crust that sits on the lip of the pie pan.
- Crimp the pie dough however you want, just make sure the double layer of dough stays resting on the lip of the pie pan.
- Prick the bottom and sides with a fork and then place the pan in the freezer.
- Place a rack one level below the center of the oven and turn it on to 425 F. After the pie has been in the freezer for at least 20 minutes (you can leave it in there overnight if that’s easier for you!) and the oven is hot, take the pie out of the freezer.
- Crumple a sheet of parchment paper and press it into the frozen crust. Pour your pie weights (or sugar or dried beans) into the pie – be sure to fill it up to the top. The weights are there to also keep the sides up!
- Place the pie pan on a baking sheet and place it in the preheated oven to bake for 15 minutes.
- After 15 minutes have passed, take it out of the oven and lift the parchment and weights out into a heat safe bowl.
- Re-prick the bottom and sides with a fork and place it back in the oven to bake for 8 minutes until the edges are just golden brown and the base looks dry.
- Take the par-baked pie out of the oven and turn off the oven. Set the crust aside to cool and start on the maple caramel.
Assemble & Bake
- Move the baking rack to the middle of the oven and pre-heat to 350 F.
- In a medium pot, melt the butter. Remove from the heat and add in the brown sugar, maple syrup, vanilla, salt, egg yolks, cinnamon, and heavy cream and whisk until smooth.
- In the semi cooled pie crust, add in the chocolate – if using a chocolate bar, roughly chop it and scatter it over the base and if using baking chips also just scatter over the base.
- Add the oats overtop of the chocolate and smooth it into an even layer.
- Pour the maple caramel over the back of a spoon or a rubber spatula over the oats to keep the oats sort of in place instead of them mixing with the chocolate.
- Place the whole tray and pie back in the hot oven and bake for 25 minutes. After 25 minutes rotate and bake for another 15 minutes.
- It’s a bit hard to tell if it’s done because it will still have quite a jiggle but the edges should have puffed up a bit and the oats will kind of create a top crust. At a max bake for 5 more minutes.
- Once baked, take it out of the oven, immediately sprinkle with flaked salt. Then let it set at room temperature ideally for at least 6 hours or up to overnight. No need to store in the fridge or even an airtight container unless you have critters.
- Optionally top with a simple whipped cream to serve.
Notes
- If you don’t have time you can use a store bought pie crust but I really recommend making it yourself! This recipe is super simple, just takes a little bit of time.
- It’s ok if the dough looks rough and scraggly in the beginning. The folding, rolling, and chilling process smooths out and hydrates the dough.
- Keep everything COLD when making the pie dough, you don’t want the butter to melt into dough.
- Be sure to use enough pie weights to FILL the pie pan, if you don’t have pie weights you can use white granulated sugar and then use it again later or dried beans.
- I 100% recommend using a metal pie pan – it’ll make the best flaky pie dough and keep the crust from shrinking back. I recommend this one!
- If your pie crust puffs during the par-bake just use the back of a fork to kind of gently smush it back into place as best you can without tearing it.
- There’s always a chance the pie crust shrinks down, just pour enough of the maple caramel until it reaches the edge of the crust. If you have a little extra don’t use it or it will spill and burn.
- This pie is best made at least 8 hours before or ideally the night before!
This page may contain affiliate links. This means that if you click on one of the product links above and complete a purchase, I’ll receive a small commission at no extra cost to you. I will never place a link nor make a recommendation on a product or service that I don’t love or use personally. Read our privacy policy here. Thank you for supporting Red Currant Bakery.