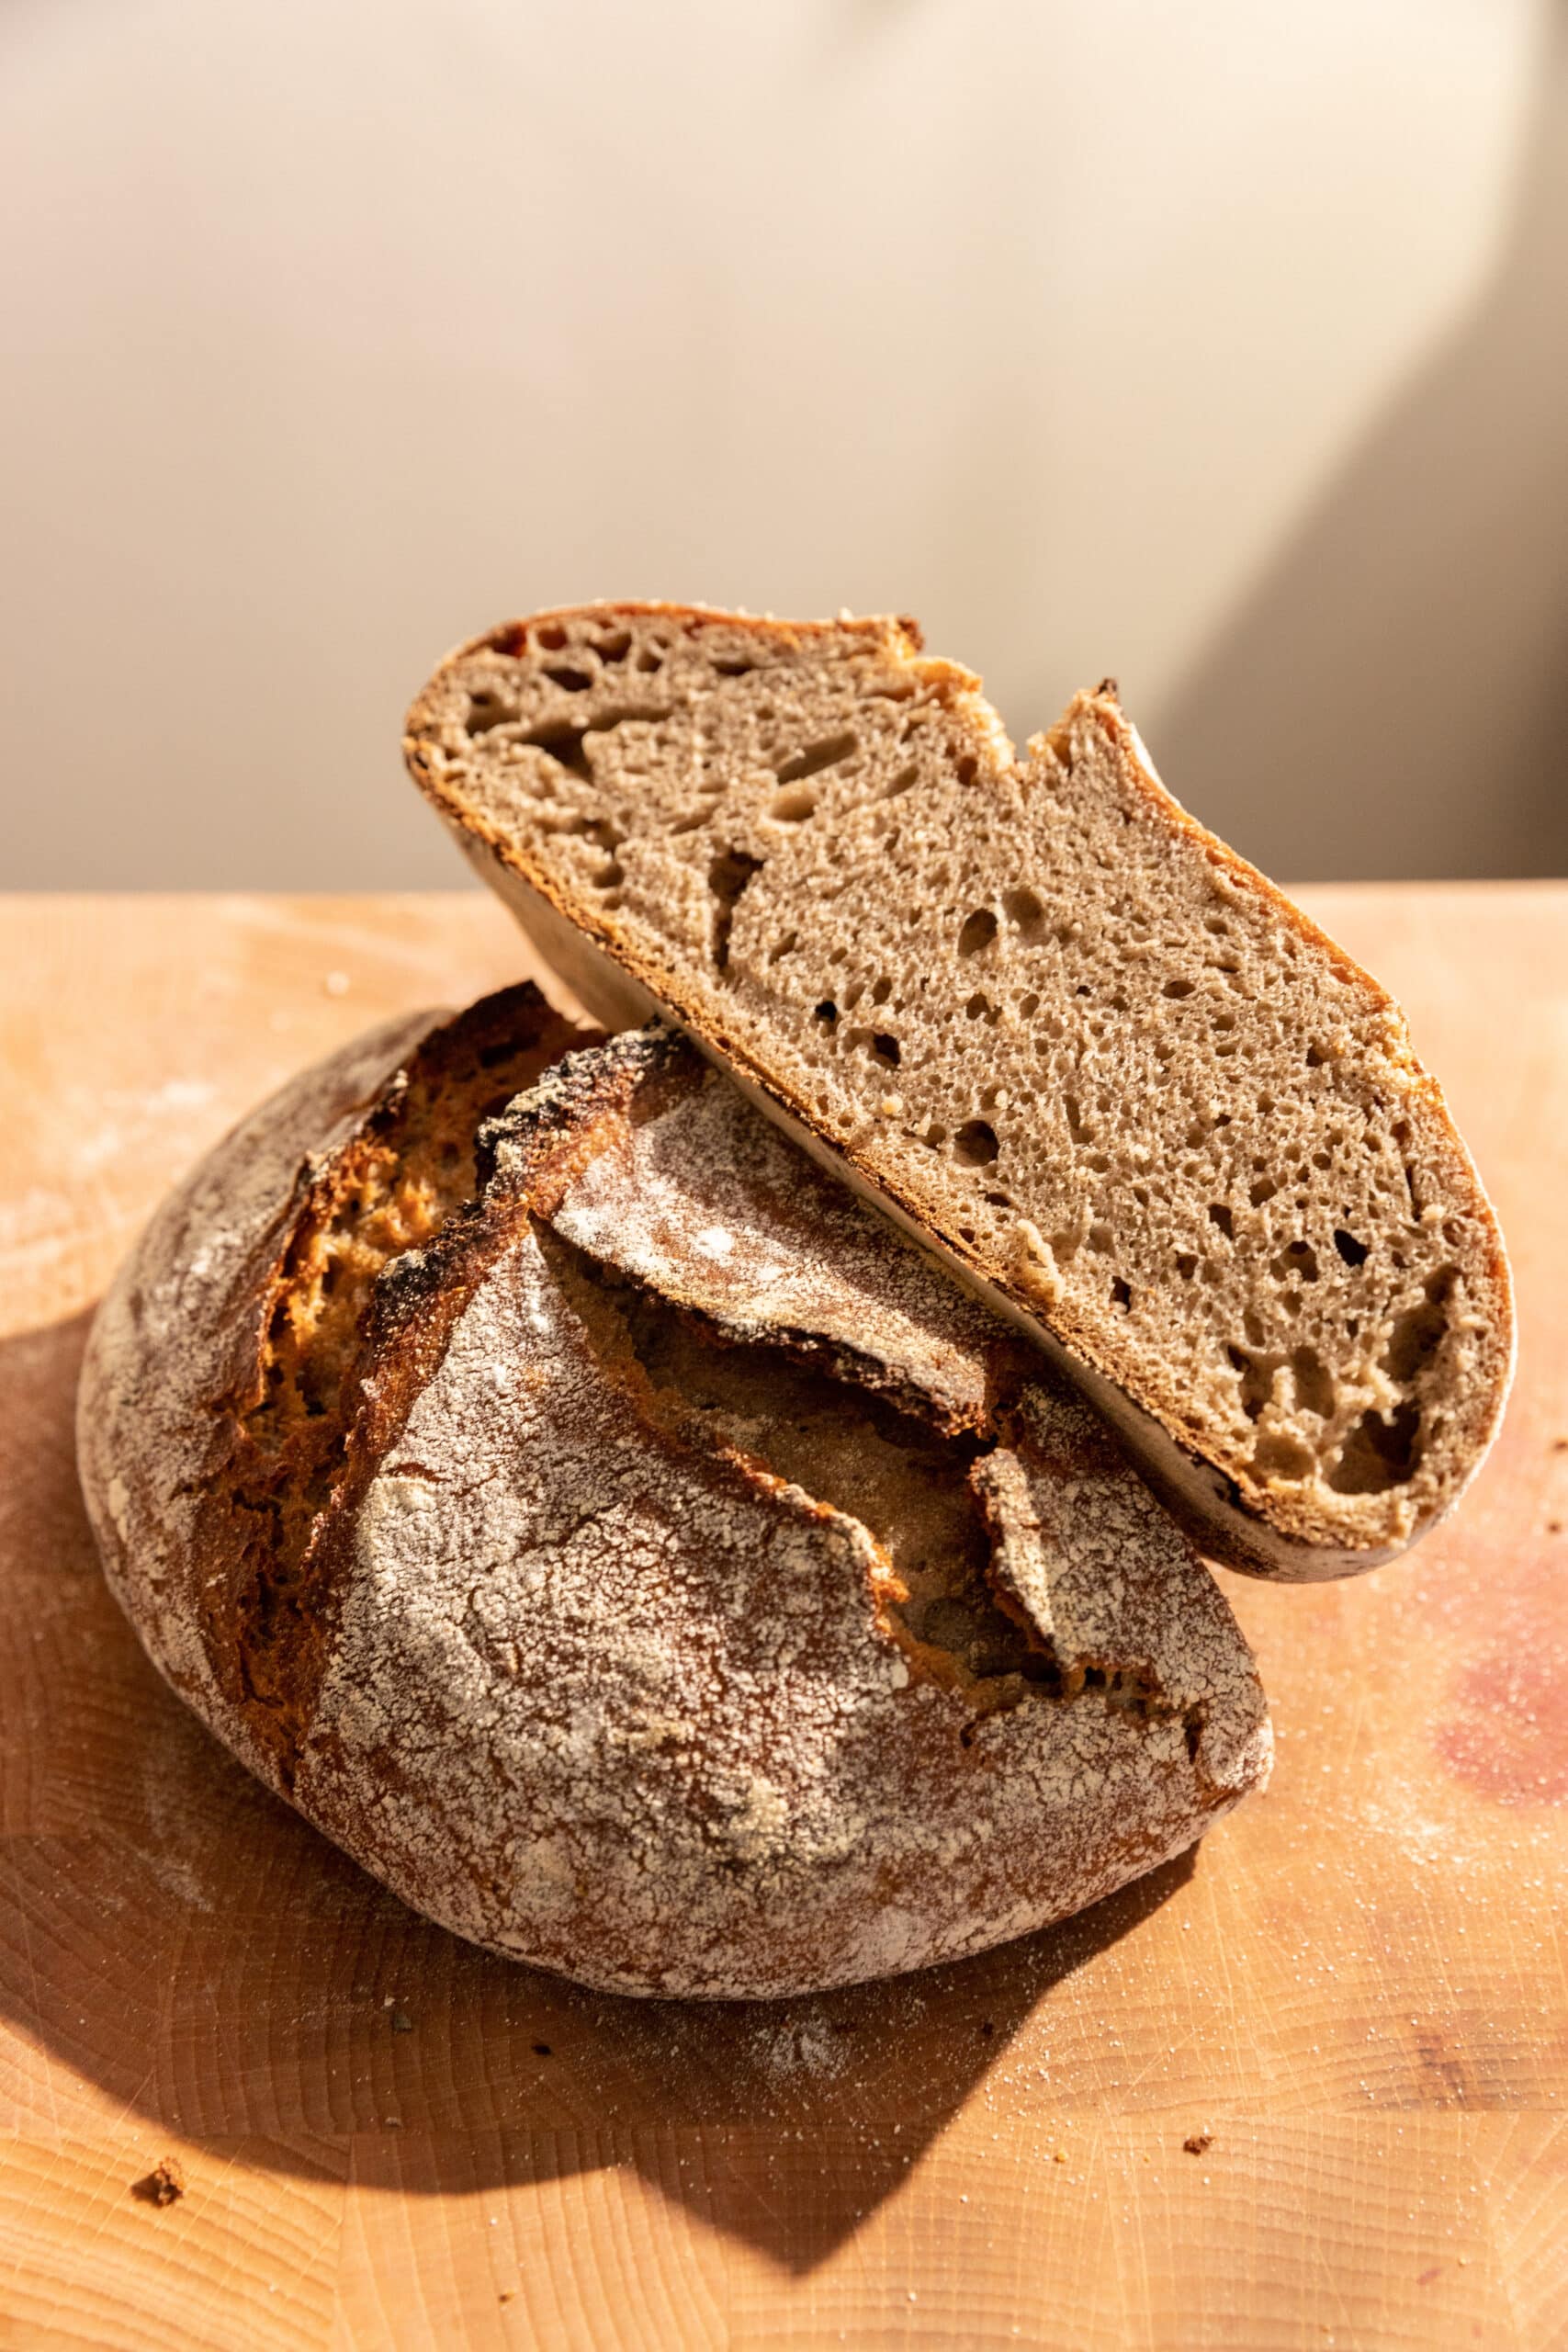
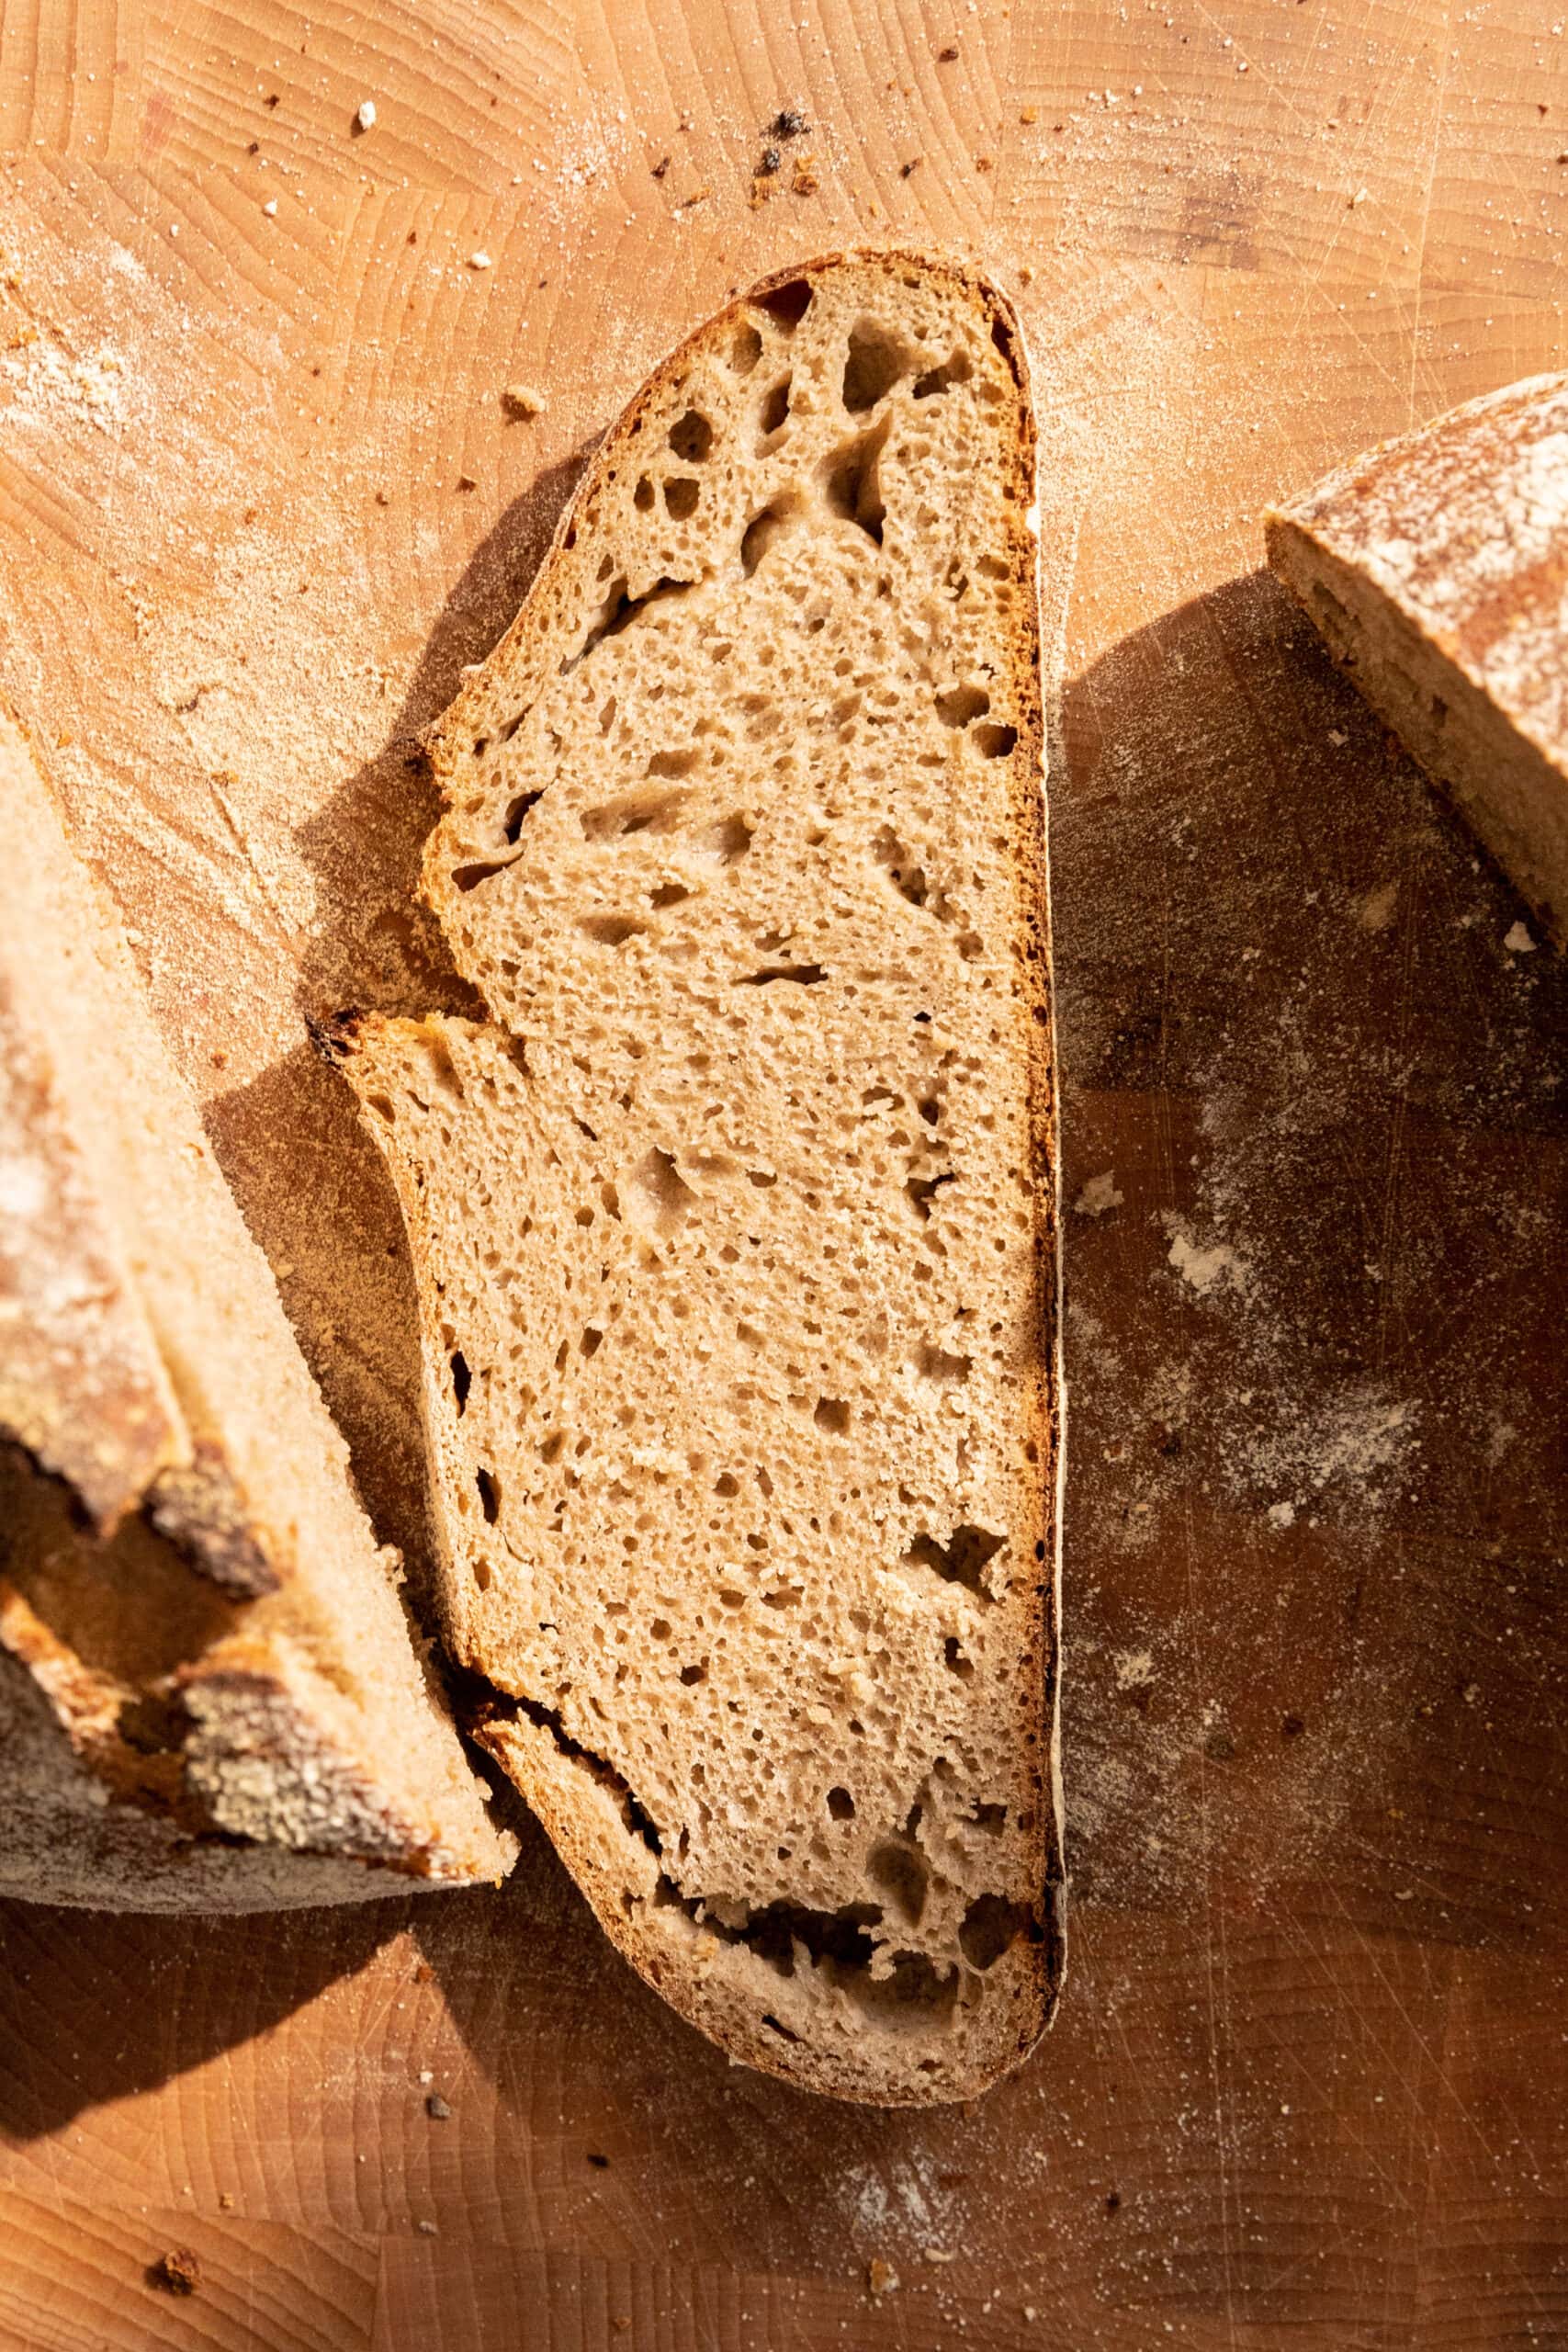
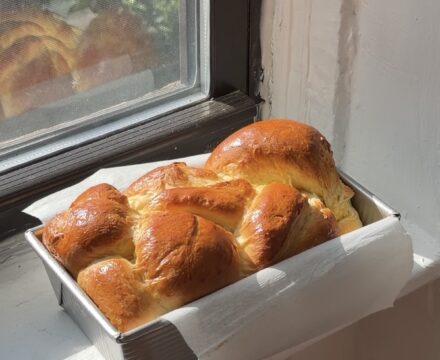
Homemade Rye Sourdough Bread is so flavorful and such a magical alternative to a basic sourdough loaf. This recipe is based off of one of my favorite breads in Germany which is a mixture of rye flour, rye sourdough starter, and bread flour.
What is Rye?
Rye is a grain that is grown as a grass, it contains gluten like wheat but not nearly as much which can make it more difficult to bake with. Rye has a different flavor than wheat but adds so much earthiness to any bake.
What is the difference between sourdough and rye sourdough?
A basic sourdough is made with only wheat flour, sometimes just white flour and sometimes a combination of whole wheat flour and white flour. On the other hand, rye sourdough is a bread that starts with sourdough starter instead of yeast but has at least some rye flour. It can be a mixture of rye and wheat or just rye.
Is rye flour good for sourdough?
I LOVE rye in sourdough, it adds so much depth of flavor and makes the yummiest crust. However, the lack of gluten can make it difficult for the bread to have enough structure so sometimes you need to play around a bit with the flour ration depending on your specific rye blend.
What if I don’t have a Brotform?
For years, I didn’t have a brotform and while I love mine now, I used to just line a big bowl with a kitchen towel and generously sprinkle it with the mixed flour in the recipe. If you are looking to get one, this Frieling Brotform from Crate and Barrel is great!
Where can I get Rye Flour?
Rye, especially dark rye can be difficult to find and expensive. I like to order mine in bulk from Central Milling Company.
Additional Recipes to try:
- Butterkuchen – German Butter Cake
- Kräuter Quark Scones
- Mohnkuchen – German Poppyseed Cake
Tips for making Rye Sourdough
- Make sure your starter is active, it should be fed at least once a day and grow to at least double the size, I personally like to take a plain sourdough starter and use the discard to create a rye starter by feeding it with rye flour. This will give you optimal flavor of both sourdough tartness and rye earthiness.
- Having a sourdough starter doesn’t need to be difficult or overwhelming. I make mine, starting with a 1:1:2 ratio of bread flour, whole wheat flour, and room temperature water. I usually feed it in the morning, dump about half of it out (this is discard) and then feed again with the same ratio. It can take a week or two before it really gets active. However, once your starter is comfortable, you can store it in the fridge in an airtight container for a couple of weeks and take it out 2 days before you plan to use it to bring it back to life.
- Rye sourdough can take a few tries to figure out so don’t get discouraged. Different rye flours have different hydration rates and different gluten levels so the amount of rye flour may need to be decreased while the bread flour is increased to give the bread a little more structure.
- Don’t skip or shorten the resting times, if you do it won’t be able to develop enough structure or flavor.
- Because of the lack of gluten in this dough, it can be fragile and sticky. When you are doing the folds be sure not to pull too hard on the dough or it will snap and break (this isn’t the end of the world just try to stretch the dough gently. Additionally, when shaping the loaf, use flour as needed to keep it from sticking too much to your hands or the counter.
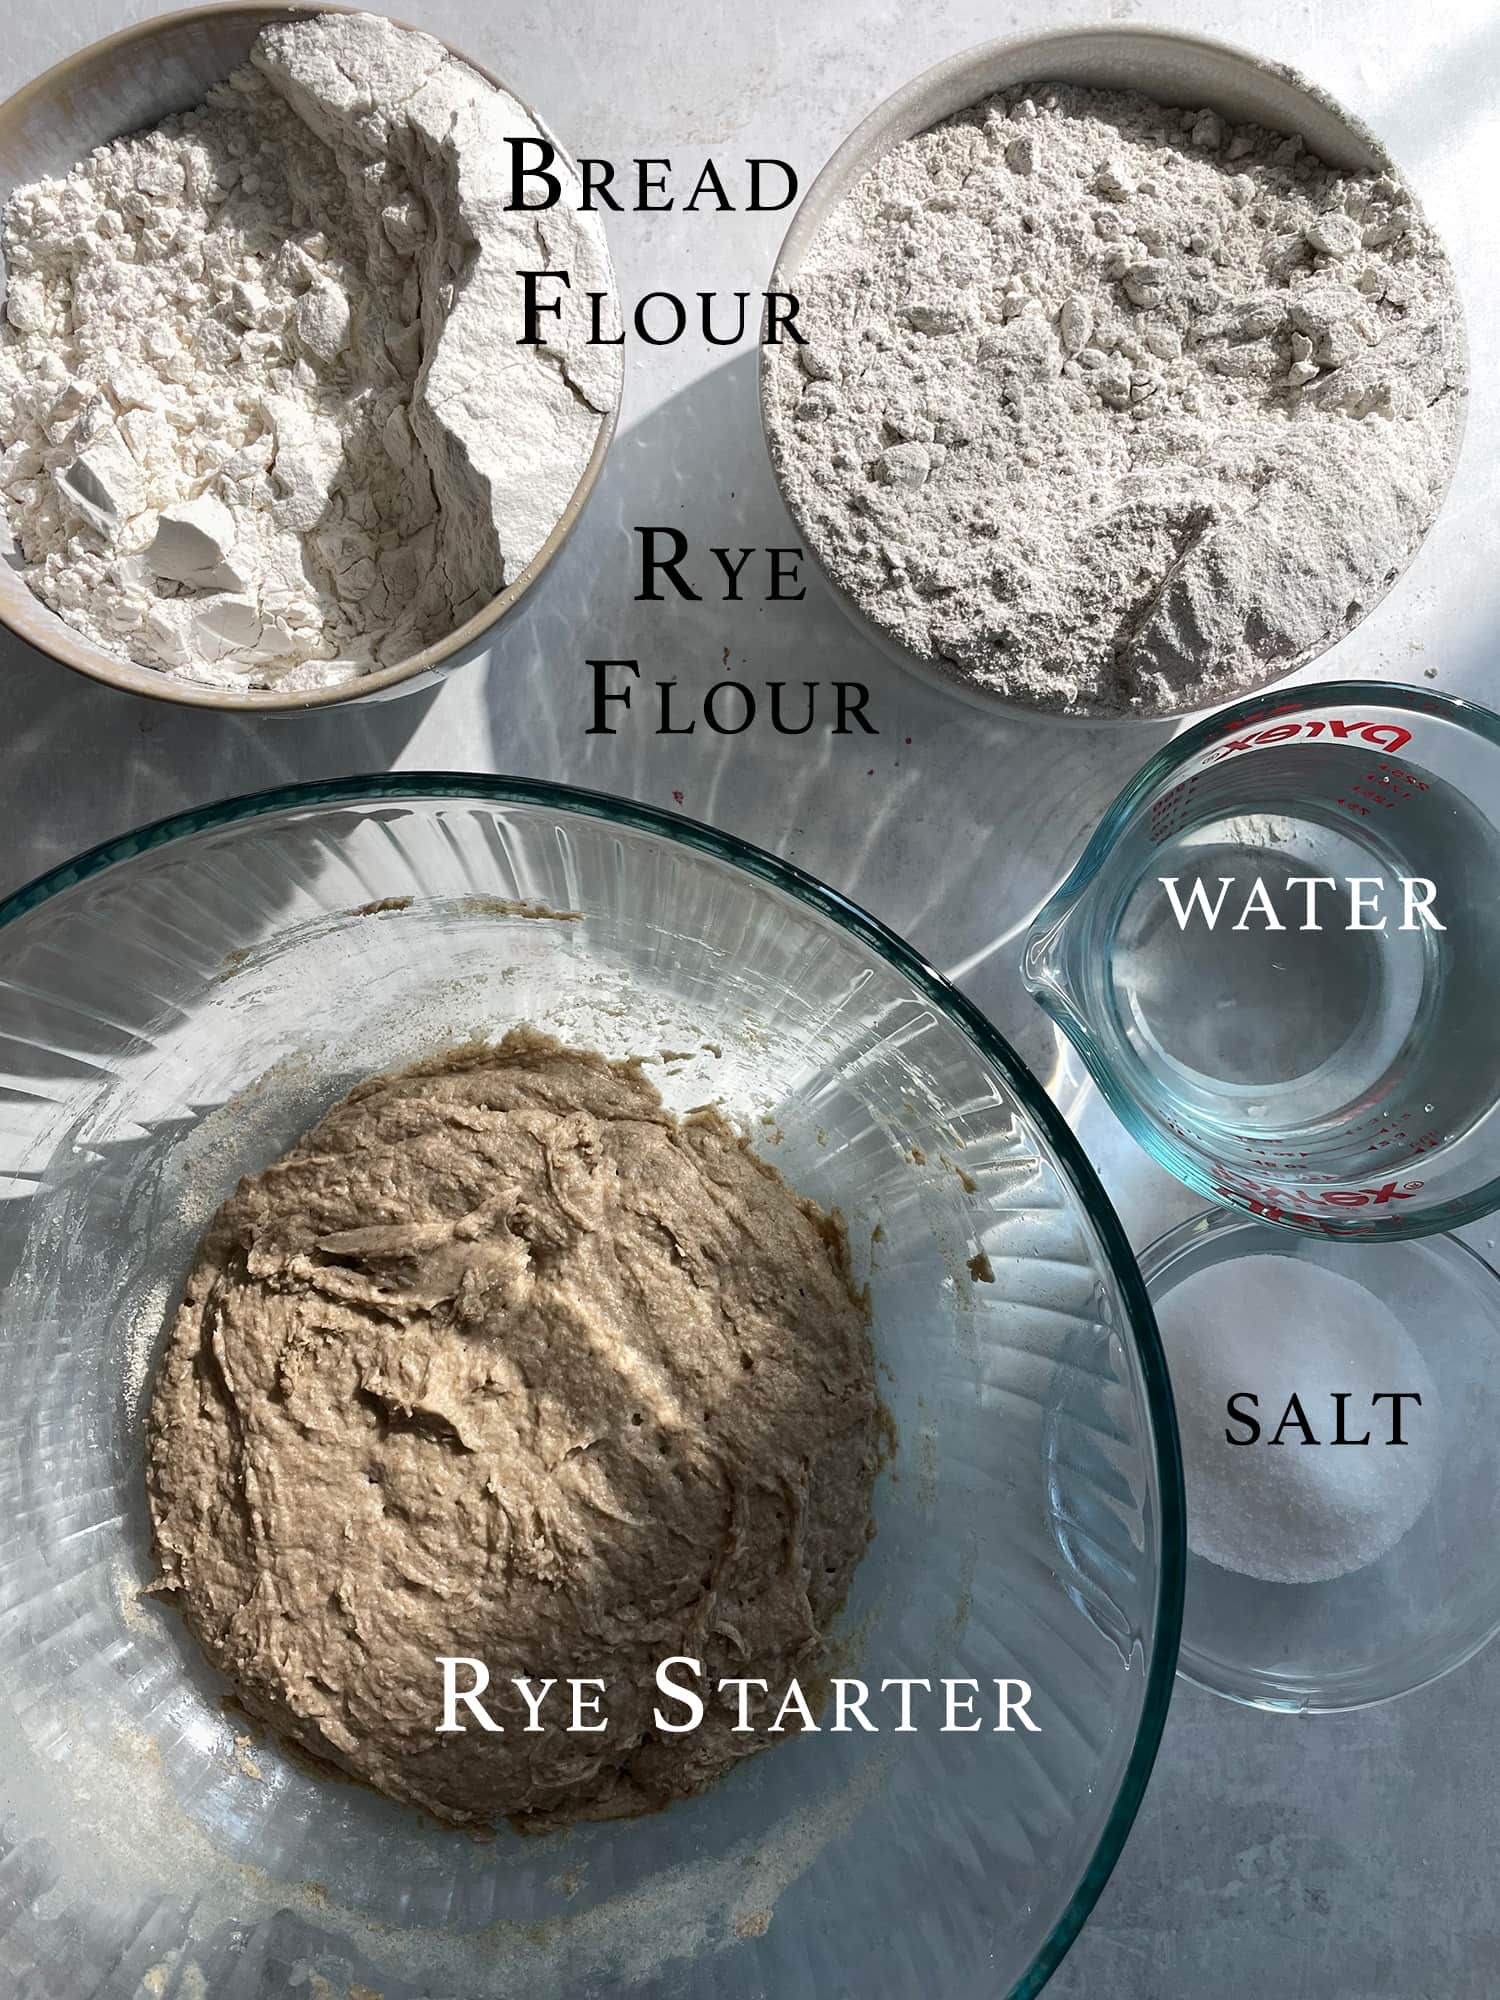
Ingredients
- Rye Sourdough Starter: As mentioned in the above tips, I like to make a rye starter by feeding my plain wheat starter with rye flour so that it is a 1:1 ratio of rye flour and water for a couple of days before using it for this bread.
- Water: I have always used tap water where I have lived and never had issues but many people like to use filtered water or bottled water.
- Rye Flour: I use dark rye flour for this recipe from Central Milling Company. Other dark rye flour will work too but they will all be slightly different so it may take a few tests to know if you need to decrease the rye and increase the bread flour.
- Bread Flour: It’s important that you use bread flour for this recipe because it contains more gluten which gives the bread more structure. Bread flour can be easily found at most grocery stores but you can also order it online.
- Salt: Kosher salt should be used in this recipe.
How to make Homemade Rye Sourdough Bread
Pre-Dough
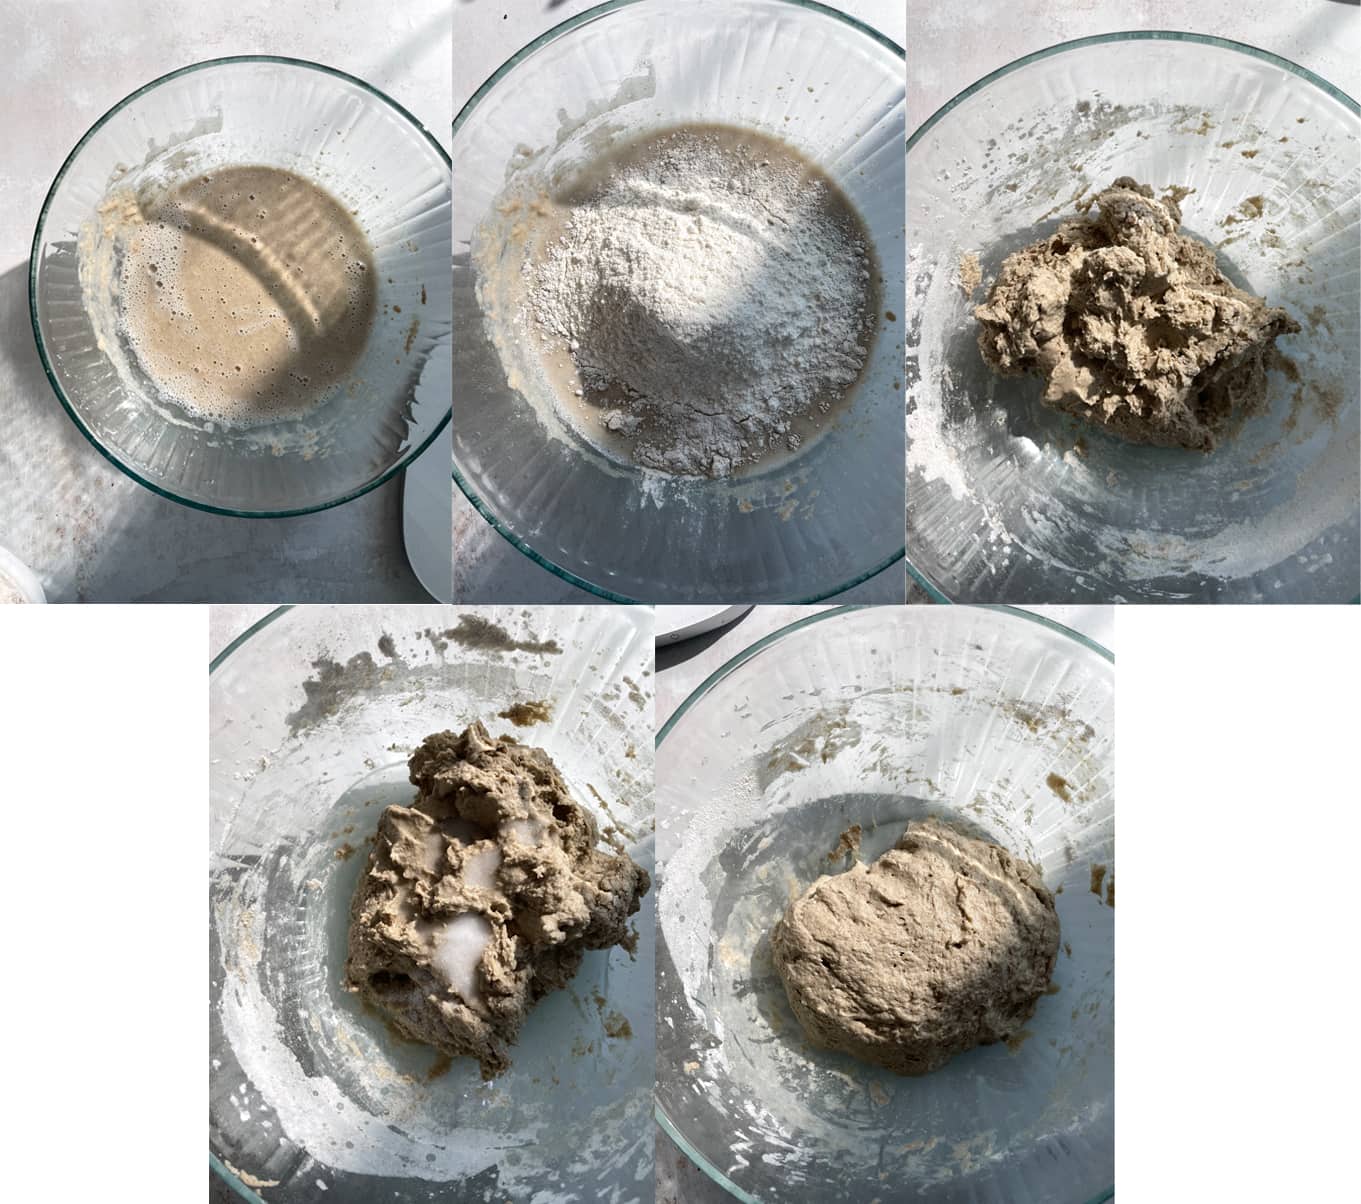
- The day before you plan to make the bread, you want to feed your starter as normal in the morning with equal parts water and rye flour. In the evening (around dinner time), you need to make the pre-dough.
- Spoon 25 grams of rye starter into a large glass bowl. Pour in 140 grams of water that is room temperature or slightly warmer, it should not be warm. Stir to combine.
- Add 150 grams of rye flour into the bowl and stir again until fully combined. Cover the bowl with a lid, doesn’t need to be airtight but there shouldn’t be any gaping holes. Leave the pre-dough on your counter overnight.
Dough
- The next day, the pre-dough should be bubbly and puffy. If it isn’t, wait a couple more hours until it is (it can take up to 16-18 hours).
- Once the pre-dough is ready, pour in 170 grams or water approximately the same temperature as before. Use a spoon to stir together until combined.
- Pour in the 130 grams of rye flour and 150 grams of bread flour. Use your hands to stir the mixture together until fully combined. Lay a lid or cover over the dough and leave it to sit for 20 minutes.
- After 20 minutes, add the 10 grams of salt and remaining 30 grams of water and use your hands mix the dough together.
- Cover the dough again and let it sit for 35-40 minutes.
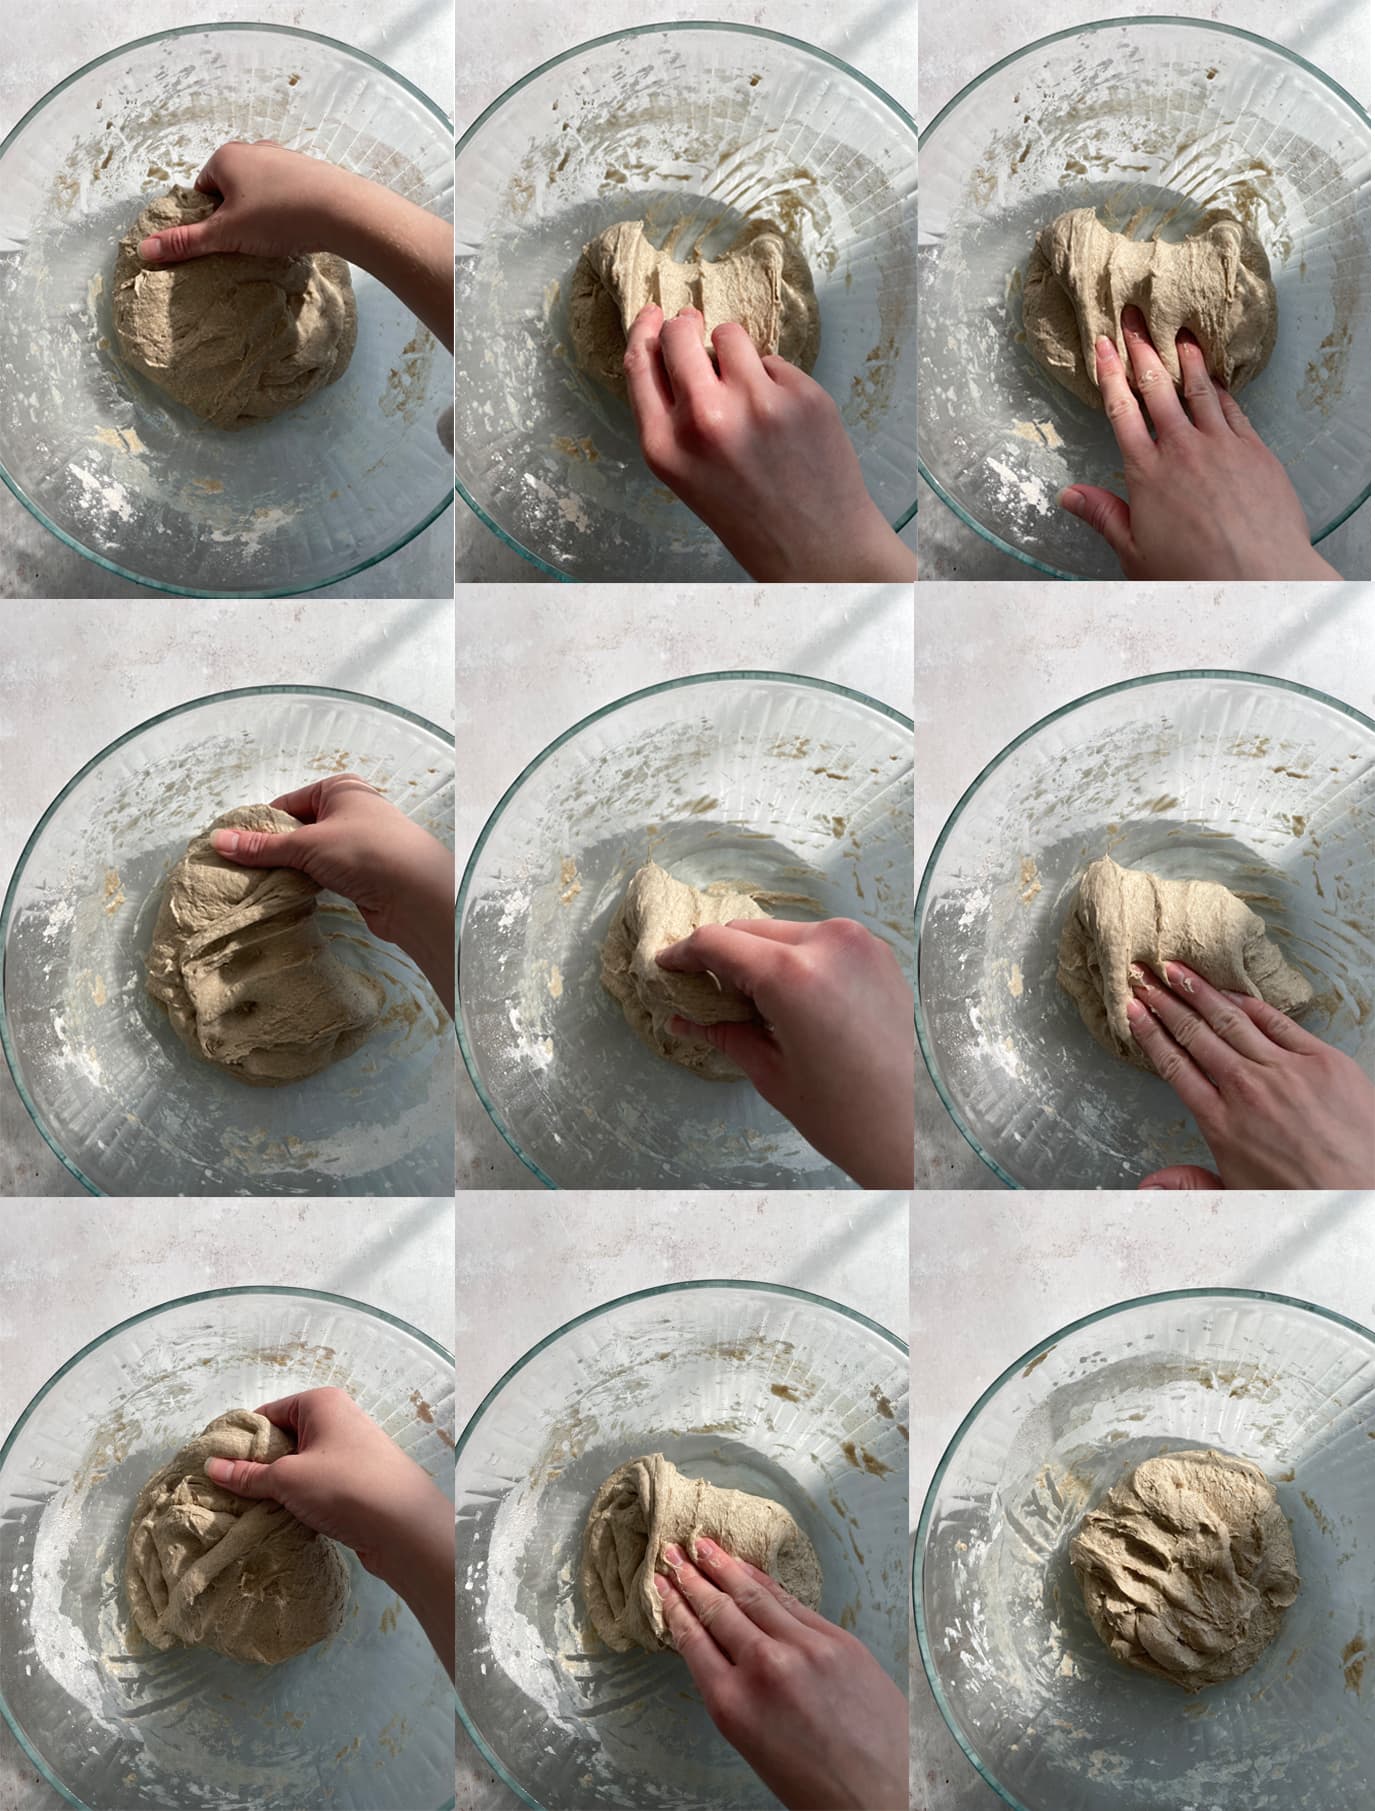
Fold
- Place a bowl of water next to the bowl of bread dough. After the 40 minutes, take the lid off of the bowl, wet one hand and imagine that the bowl has four sides. Use the wet hand to gently pull up one side of the dough.
- Lift the side over the top of the rest of the dough and gently press down. Rotate the bowl 90 degrees and repeat the lifting and folding. Do this twice more until all sides have been folded.
- Place the lid back over the bowl and leave it to sit for 35-40 minutes.
- Repeat the folding and resting process 2 more times.
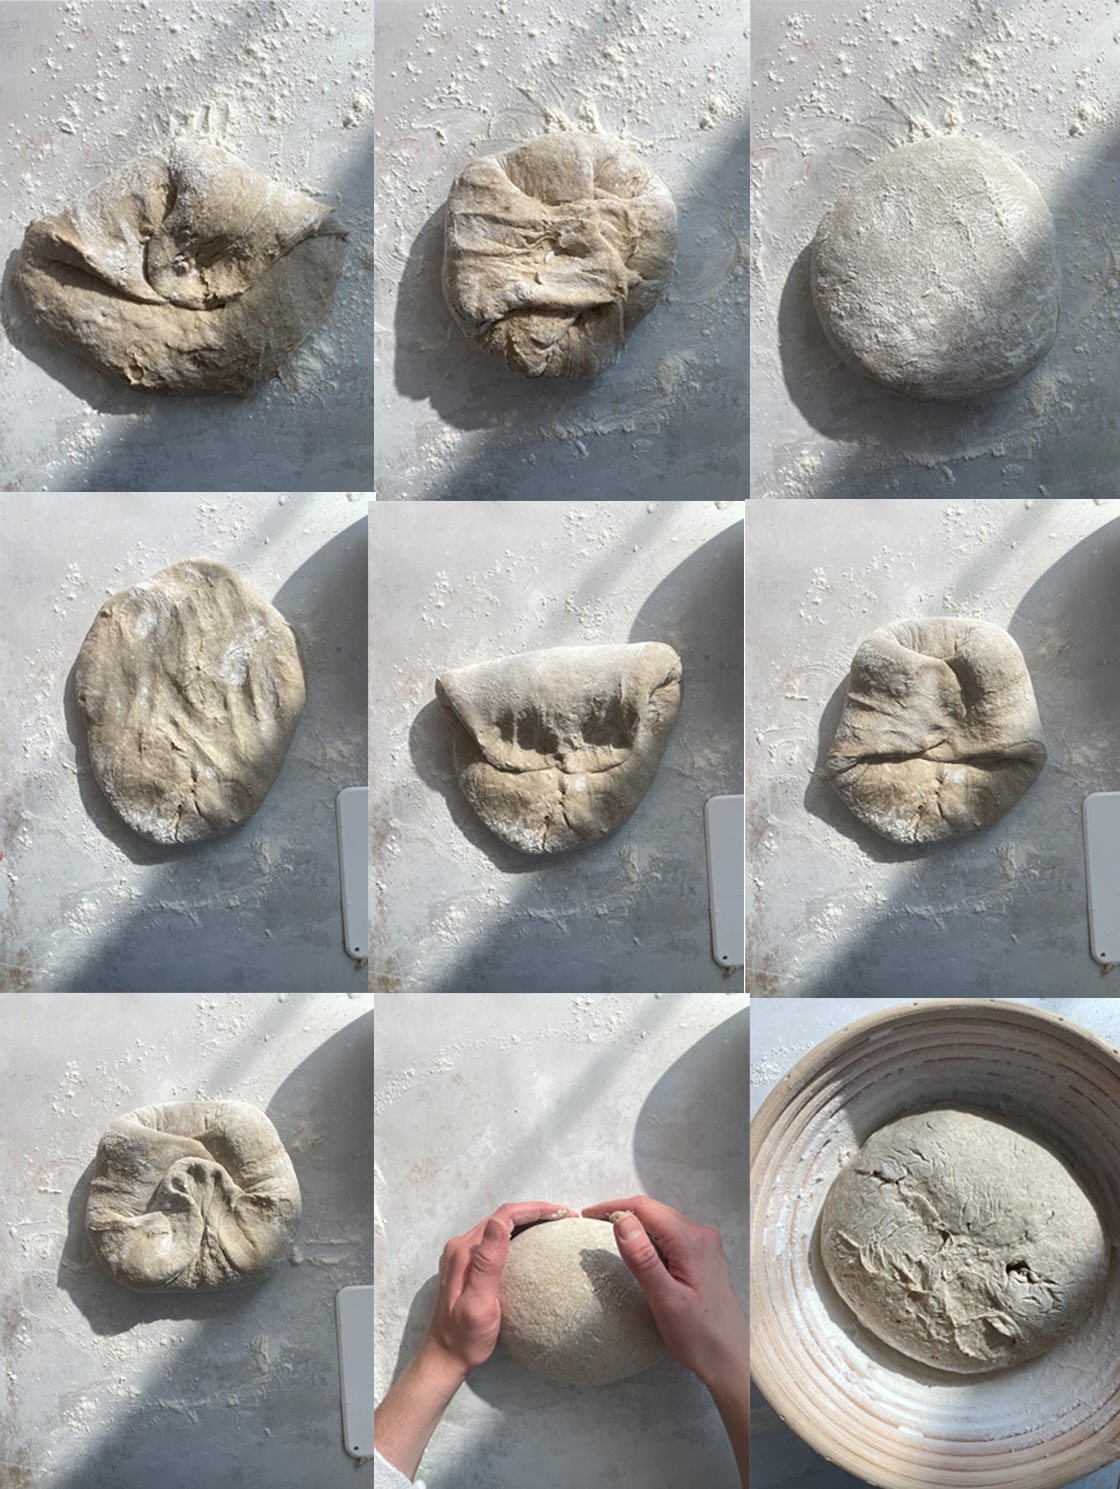
First Shape
- In a small bowl, or sealable container, mix together equal parts brown rice flour and bread flour. Line a brotform with the flour mixture. The first time you use it, you will need to first mist the basket with water to allow the flour to stick.
- After the last rest, sprinkle a work surface with bread flour. Sprinkle flour over the top of the dough and use your hands or a bowl scraper to scoop the dough out of the bowl onto the floured surface.
- Gently pat the dough into a roundish shape that is about 1″-2″ thick. Similar to the folding process, grab the top edge of the dough round, gently pull it up and press it into the center of the round. Do this all the way around the dough round.
- It will be more than four folds, probably 6-8.
- Flip the round over so that the seam is face down. Cover the round of dough with a dish towel and leave it to rest for 20 minutes.
Second Shape
- After 20 minutes, flip the round over so the seam side is up, and pat the dough into another round about 1″ thick. Grab the top edge and pull the dough up and over to just past the middle point of the round. Grab the right side of the dough and pull it up and over the center of the dough. Then, repeat with the left side and then the bottom. This time it is only four folds.
- Flip the round back over. Clean off your work surface and use both hands to cup under the dough from the top side and pull the dough towards yourself, rotating it slightly. Continue to reset the dough and pull it, rotating to seal the bottom of the dough.
- Sprinkle the top of the round with the brown rice flour mixture. Flip the loaf over into the brotform and sprinkle the seam side, which is now face up, with more of the mixed flour.
- Cover the bowl with the fabric cover that comes with the bowl or some other type of lid. Place the whole thing into a large plastic bag or put a plastic shower cap over the top of the fabric.
- Place the whole thing in the fridge overnight.
Prepare to Bake
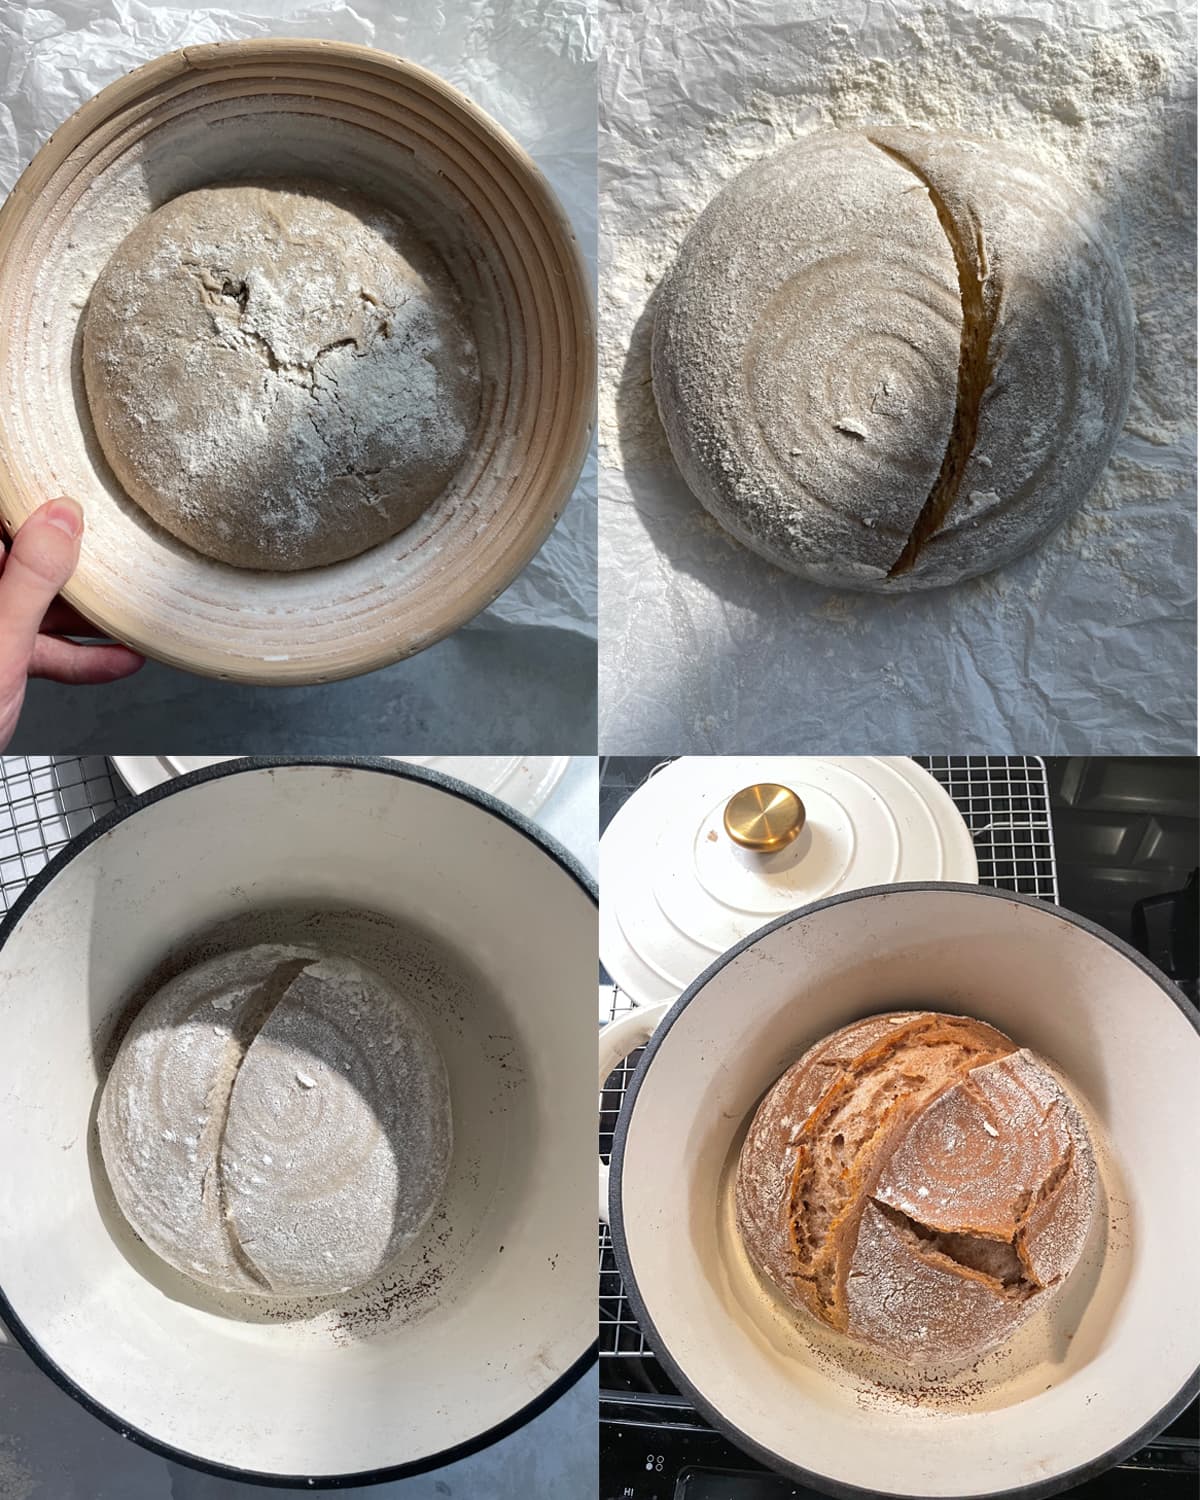
- The next day, take the bread out of the fridge and remove the plastic bag or shower cap. Leave the dough to sit for an hour.
- After the hour has passed, put the dutch oven with the lid into the cold oven on the middle rack and preheat to 450 degrees F. Allow the oven to really heat up, I recommend leaving it to sit for about 20-30 minutes once hot to make sure the dutch oven is fully heated.
- Lay a piece of parchment down close to your oven on the counter, sprinkle it liberally with more of the mixed flour. Take off the fabric cover from the basket and tip the dough onto the baking sheet.
- Use a razor blade or a bread lame to make a slice at a 45 degree angle in a slight curve through the middle of the loaf. It should be between 1/2″ and 1″ deep.
- If you have two, take two cooling racks out and set them side by side close to the oven or on your stove top.
Bake
- Use potholders (I usually double them up because the dutch oven is hot), to take the heated dutch oven out of the oven. Place onto one of the cooling racks. Remove the lid and carefully scoop the bread, I like to use the help of a bowl scraper, to lift the bread off the parchment and into the dutch oven.
- BE CAREFUL, the dutch oven is hot and you will burn yourself. It’s ok if you need to sort of drop the loaf in to avoid burning your hands.
- Immediately place the lid back on and put it in the oven for 25 minutes. After 25 minutes, remove the lid and leave it to bake for another 20 minutes.
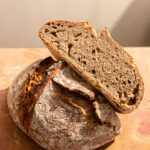
- Once baked, remove the dutch oven and place it on a cooling rack. Tip the loaf out of the dutch oven and place it on the second cooling rack to cool fully before cutting into the loaf.

Rye Sourdough
Equipment
- 1 brotform
Ingredients
Pre-dough
- 25 grams rye starter
- 140 grams water room temperature or slightly warmer
- 150 grams dark rye flour
Dough
- 200 grams water divided, room temperature or slightly warmer
- 130 grams dark rye flour
- 150 grams bread flour
- 10 grams kosher salt
Mixed flour for dusting
- 50 grams brown rice flour
- 50 grams bread flour
Instructions
Pre-Dough
- The day before you plan to make the bread, you want to feed your starter as normal in the morning with equal parts water and rye flour. In the evening (around dinner time), you need to make the pre-dough.
- Spoon 25 grams of rye starter into a large glass bowl. Pour in 140 grams of water that is room temperature or slightly warmer, it should not be warm. Stir to combine.
- Add 150 grams of rye flour into the bowl and stir again until fully combined. Cover the bowl with a lid, doesn't need to be airtight but there shouldn't be any gaping holes. Leave the pre-dough on your counter overnight.
Dough
- The next day, the pre-dough should be bubbly and puffy. If it isn't, wait a couple more hours until it is (it can take up to 16-18 hours).
- Once the pre-dough is ready, pour in 170 grams or water approximately the same temperature as before. Use a spoon to stir together until combined.
- Pour in the 130 grams of rye flour and 150 grams of bread flour. Use your hands to stir the mixture together until fully combined. Lay a lid or cover over the dough and leave it to sit for 20 minutes.
- After 20 minutes, add the 10 grams of salt and remaining 30 grams of water and use your hands mix the dough together.
- Cover the dough again and let it sit for 35-40 minutes.
Fold
- Place a bowl of water next to the bowl of bread dough. After the 40 minutes, take the lid off of the bowl, wet one hand and imagine that the bowl has four sides. Use the wet hand to gently pull up one side of the dough.
- Lift the side over the top of the rest of the dough and gently press down. Rotate the bowl 90 degrees and repeat the lifting and folding. Do this twice more until all sides have been folded.
- Place the lid back over the bowl and leave it to sit for 35-40 minutes.
- Repeat the folding and resting process 2 more times.
First Shaping
- In a small bowl, or sealable container, mix together equal parts brown rice flour and bread flour. Line a brotform with the flour mixture. The first time you use it, you will need to first mist the basket with water to allow the flour to stick.
- After the last rest, sprinkle a work surface with bread flour. Sprinkle flour over the top of the dough and use your hands or a bowl scraper to scoop the dough out of the bowl onto the floured surface.
- Gently pat the dough into a roundish shape that is about 1"-2" thick. Similar to the folding process, grab the top edge of the dough round, gently pull it up and press it into the center of the round. Do this all the way around the dough round.
- It will be more than four folds, probably 6-8.
- Flip the round over so that the seam is face down. Cover the round of dough with a dish towel and leave it to rest for 20 minutes.
Second Shaping
- After 20 minutes, flip the dough over so the seam side is up, and pat the dough into another round about 1" thick. Grab the top edge and pull the dough up and over to just past the middle point of the round. Grab the right side of the dough and pull it up and over the center of the dough. Then, repeat with the left side and then the bottom. This time it is only four folds.
- Flip the round back over. Clean off your work surface and use both hands to cup under the dough from the top side and pull the dough towards yourself, rotating it slightly. Continue to reset the dough and pull it, rotating to seal the bottom of the dough.
- Sprinkle the top of the round with the brown rice flour mixture. Flip the loaf over into the brotform and sprinkle the seam side, which is now face up, with more of the mixed flour.
- Cover the bowl with the fabric cover that comes with the bowl or some other type of lid. Place the whole thing into a large plastic bag or put a plastic shower cap over the top of the fabric.
- Place the whole thing in the fridge overnight.
Prepare to Bake
- The next day, take the bread out of the fridge and remove the plastic bag or shower cap. Leave the dough to sit for an hour.
- After the hour has passed, put the dutch oven with the lid into the cold oven on the middle rack and preheat to 450 degrees F. Allow the oven to really heat up, I recommend leaving it to sit for about 20-30 minutes once hot to make sure the dutch oven is fully heated.
- Lay a piece of parchment down close to your oven on the counter, sprinkle it liberally with more of the mixed flour. Take off the fabric cover from the basket and tip the dough onto the baking sheet.
- Use a razor blade or a bread lame to make a slice at a 45 degree angle in a slight curve through the middle of the loaf. It should be between 1/2" and 1" deep.
- If you have two, take two cooling racks out and set them side by side close to the oven or on your stove top.
Bake
- Use potholders (I usually double them up because the dutch oven is hot), to take the heated dutch oven out of the oven. Place onto one of the cooling racks. Remove the lid and carefully scoop the bread, I like to use the help of a bowl scraper, to lift the bread off the parchment and into the dutch oven.
- BE CAREFUL, the dutch oven is hot and you will burn yourself. It's ok if you need to sort of drop the loaf in to avoid burning your hands.
- Immediately place the lid back on and put it in the oven for 25 minutes. After 25 minutes, remove the lid and leave it to bake for another 20 minutes.
- Once baked, remove the dutch oven and place it on a cooling rack. Tip the loaf out of the dutch oven and place it on the second cooling rack to cool fully before cutting into the loaf.
Notes
Nutrition
This page may contain affiliate links. This means that if you click on one of the product links above and complete a purchase, I’ll receive a small commission at no extra cost to you. I will never place a link nor make a recommendation on a product or service that I don’t love or use personally. Read our privacy policy here. Thank you for supporting Red Currant Bakery.


This is one of my first sourdough recipe attempts. I bought some organic Danko Rye flour from Oechsner Farms in New York State and found your rye recipe. Lots of steps but the bread came out terrific – full of flavor. The loaf is quite small – I wish I had made 2 and my only regret is not taking it out of the oven 5 minutes earlier (bottom is a bit dark and hard to slice). I used parchment paper to drop into Dutch oven, and I used a colander with towel sprinkled with cornflour instead of a brotform. Now that I have my rye starter, will try again. Do you recommend keeping starter in refrig, feeding once a week, with 25 gr of starter, 25 gr rye flour, 25 gr water? The starter definitely did not look as bubbly as the regular flour sourdough starter.
Hi! rye is actually a much more active flour so it tends to “eat” through the flour you feed it with much faster. I usually just keep my standard starter and use it to make a rye starter by feeding with rye flour 2-3 days before I make the loaf, the starter will be much more stable! I hope that helps