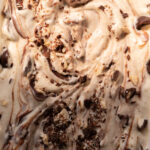
Simple and creamy, this no churn hazelnut ice cream *semi optionally* swirled with chocolate hazelnut spread and chocolate covered hazelnuts.
Are there eggs in ice cream?
Sometimes there are eggs in ice cream and sometimes there aren’t. In this recipe, the no churn hazelnut ice cream is made by folding together sweetened condensed milk and whipped cream and therefore there are no eggs used to make any sort of custard.
Can I use store bought hazelnut butter?
Yes! If you can find it, definitely go for using store bought hazelnut butter as it will make this ice cream that much simpler. However, be sure that the hazelnut butter doesn’t have any additives inside. You could also use almond or peanut butter instead.
Can I leave out the chocolate hazelnut spread and chocolate covered hazelnuts?
Definitely, I just think they add a yummy flavor and crunch to the ice cream. I love using the Bonne Maman Chocolate Hazelnut spread.
What is no-churn ice cream?
No churn ice cream simply means that you don’t need an ice cream maker to give it the soft fluffy texture that most ice cream has. Most often, no-churn ice creams are made from a base of sweetened condensed milk and whipped cream.
Tips for No-Churn Hazelnut Ice Cream
- When toasting hazelnuts keep the heat below medium and don’t walk away- you want to keep tossing the hazelnuts to keep them from burning. This allows the oils to release and therefore the skin to come off.
- While the recipe only calls for 100 grams of hazelnut butter, I find that I need at least 250 grams of hazelnuts for my vitamix to actually turn it into hazelnut butter. You can store any extra in an airtight container in the fridge and use as you would use any other nut butter.
- If you find the hazelnut butter difficult to stir in just let it sit out for a little until it comes to room temperature.
- If you don’t have flaky sea salt you can always leave it out, I don’t recommend substituting regular table salt because it will simply make salty ice cream whereas the flaky salt adds little bursts of salt to balance out the sweet richness.
- Both elements of chocolate can be left out but I think they make quite the yummy addition.
- This recipe is quite creamy but for optimal scoopability, allow it to sit out for 5-10 minutes before scooping and serving.
Additional Cake Recipes to try!

Ingredients
- Hazelnuts: Raw unsalted hazelnuts are needed to make hazelnut butter for this ice cream – you can use store bought hazelnut butter instead if you prefer.
- Sweetened Condensed Milk: I love this recipe because it uses exactly 1 14 oz can of sweetened condensed milk that you can find at almost any grocery store.
- Heavy Whipping Cream: Any heavy whipping cream will work for this hazelnut ice cream, just be sure it is nice an cold before you whip it.
- Vanilla Extract: A little vanilla enhances both the sweetness and flavor of the ice cream.
- Flaky Sea Salt: Flaky salt can be a little polarizing in desserts but I truly think it makes this ice cream SO DELICIOUS.
- Chocolate Hazelnut Spread: Very optional but I love swirling in chocolate hazelnut spread, it hardens when frozen but adds delicious flavor to the ice cream.
- Chocolate Covered Hazelnuts: Once again, very optional but chopped up dark chocolate coated hazelnuts bring this ice cream to the next level.

How to make Hazelnut Ice Cream
Hazelnut Butter
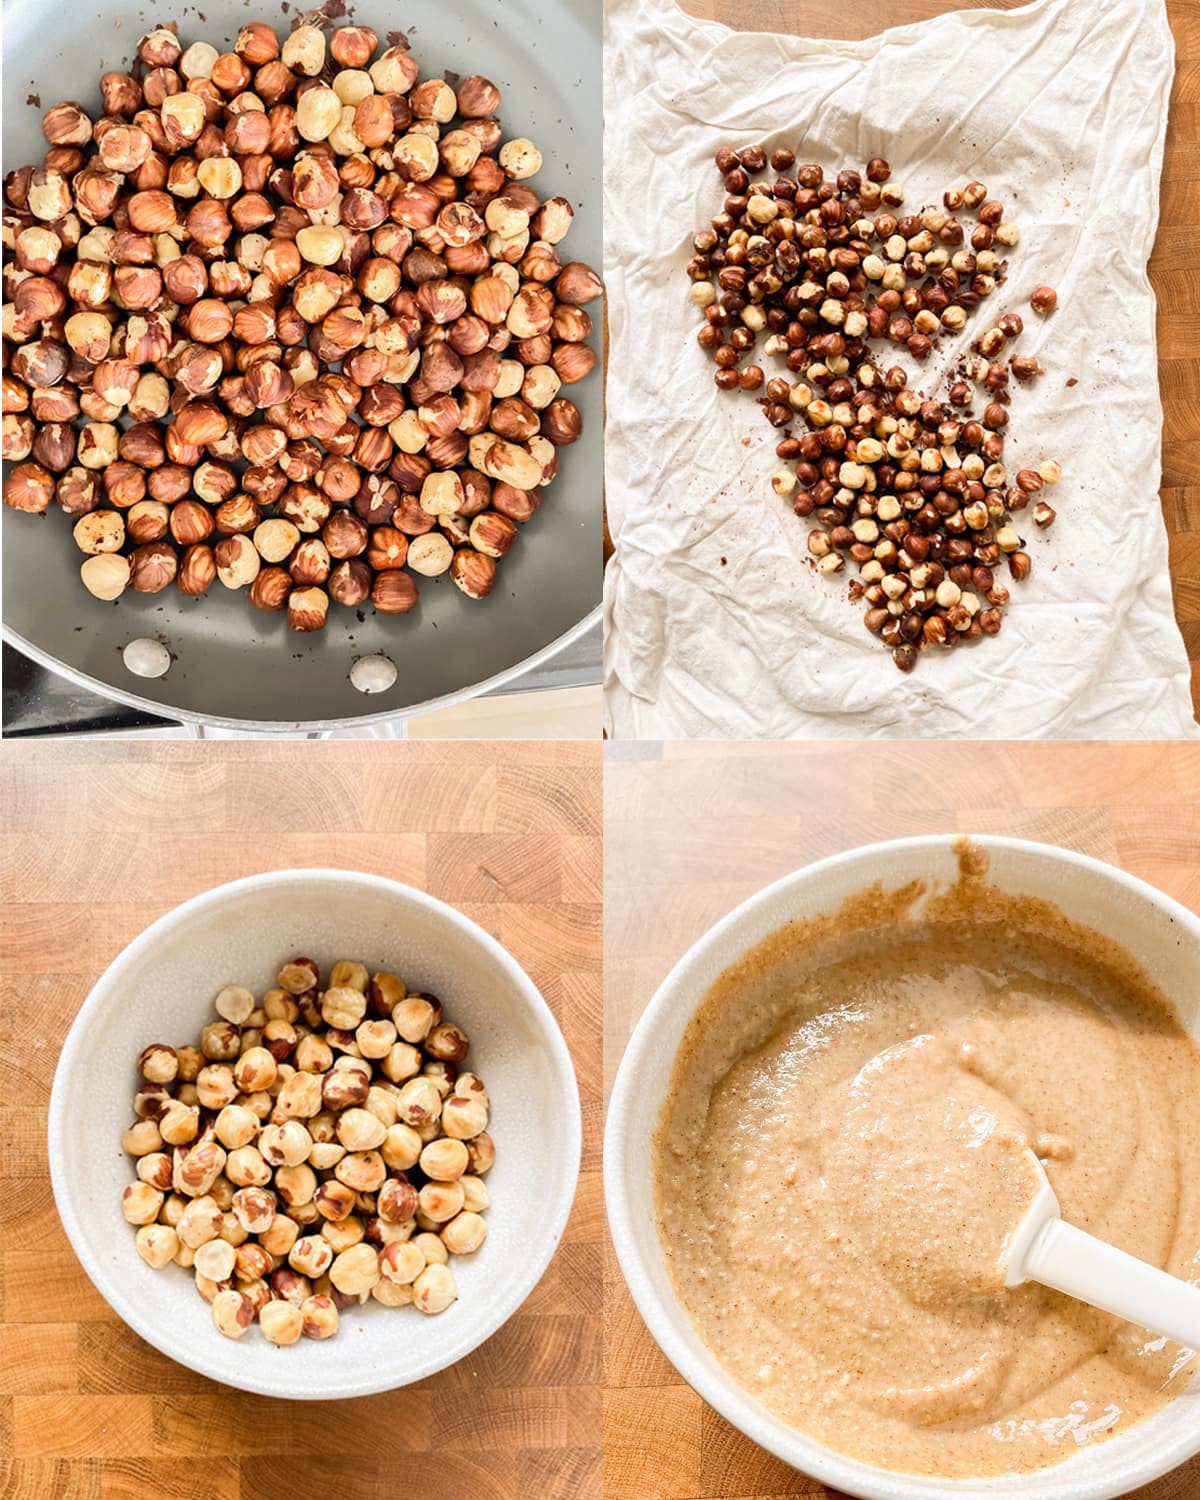
- In a large pan, pour in the hazelnuts. Place over medium low heat, stirring frequently to keep from burning, until they become golden brown and the skins start to flake off.
- Pour the toasted hazelnuts onto a kitchen towel and rub against each other with the towel to remove the skins. Ideally this will take off most of the skins, if it doesn’t, use your fingers to peel as much as you can (but don’t stress if there’s still some left).
- Transfer the toasted and peeled hazelnuts to a high powered blender or food processor. Blend on medium low speed, slowly increasing to high until a smooth butter forms.
Make the No Churn Ice Cream
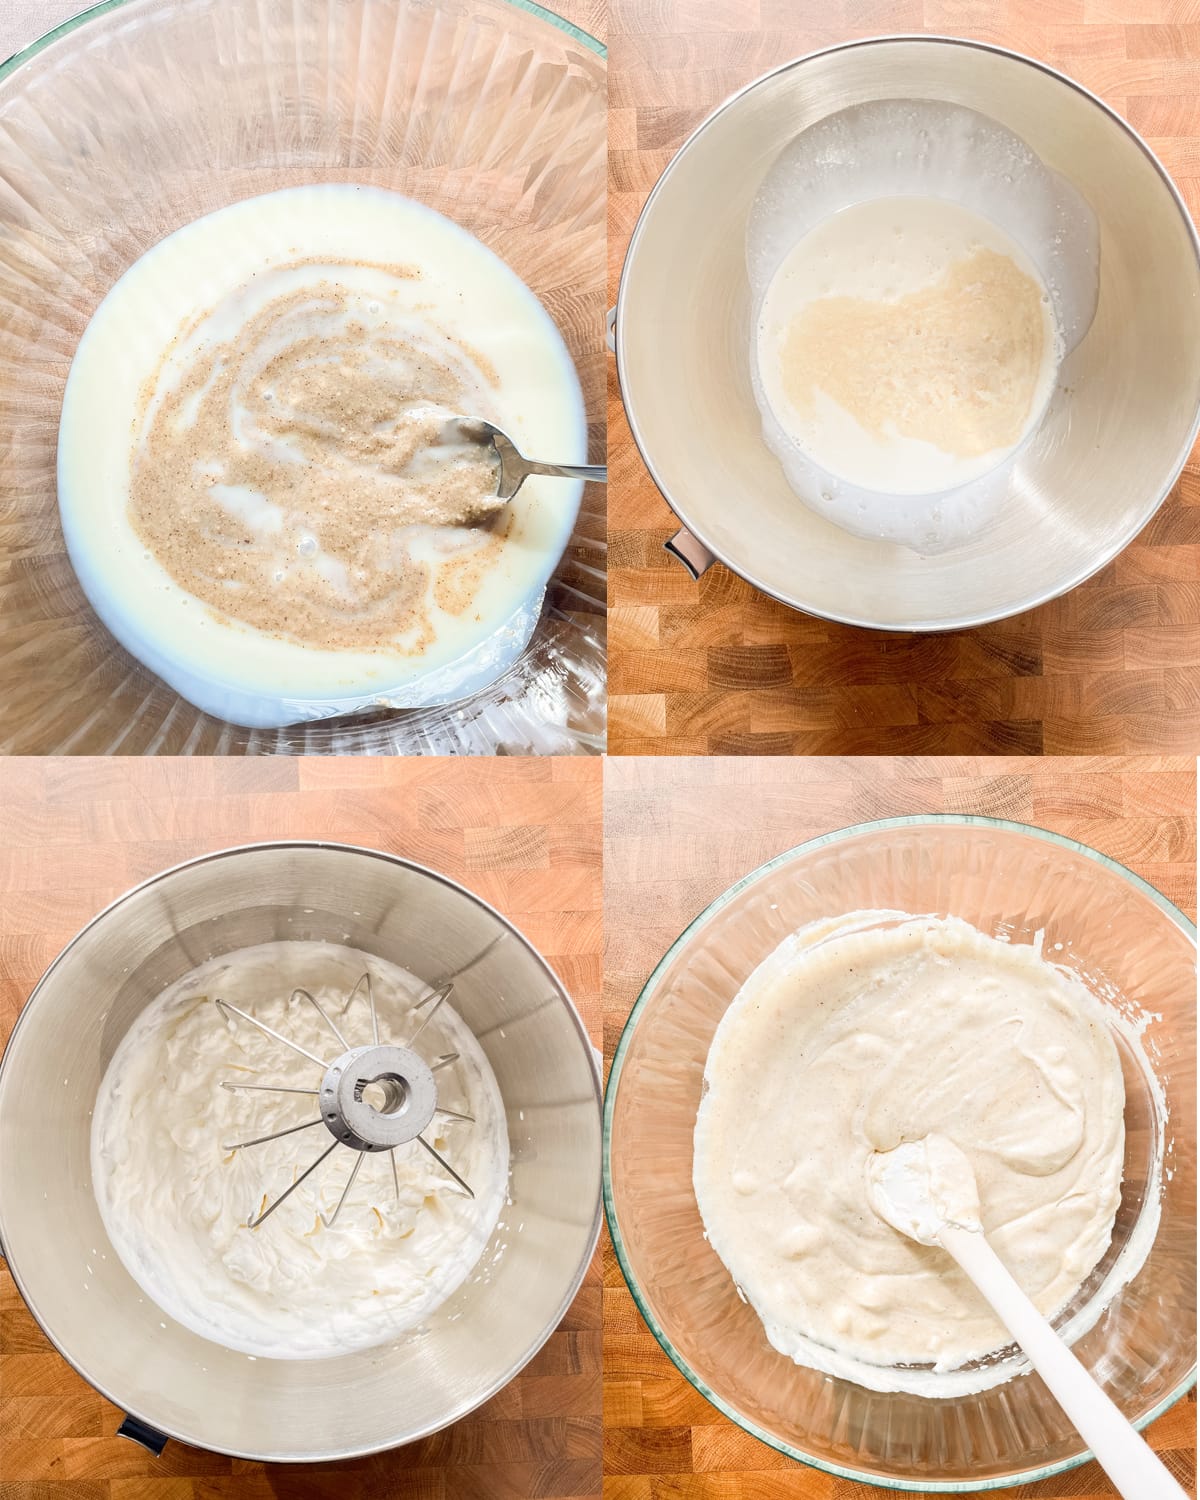
- In a large mixing bowl, pour in the sweetened condensed milk along with 100 grams of hazelnut butter. Stir to combine and then sprinkle in the flaky sea salt and stir once more.
- In the bowl of a stand mixer, add in the heavy cream and vanilla extract. Use a whisk attachment to whip on medium high speed until stiff peaks form.
- Add half of the whipped cream to the hazelnut milk mixture. Use a large flat rubber spatula to fold the hazelnut milk into the heavy cream, being careful not to stir thereby knocking the air out.
- Once mixed, add the remaining heavy cream and fold again. Place in the fridge for a moment until ready to assemble.
Assemble and Freeze
- Line a metal loaf pan with parchment paper or prepare your container of choice for the ice cream.
- If adding, chop the dark chocolate covered hazelnuts and set aside.
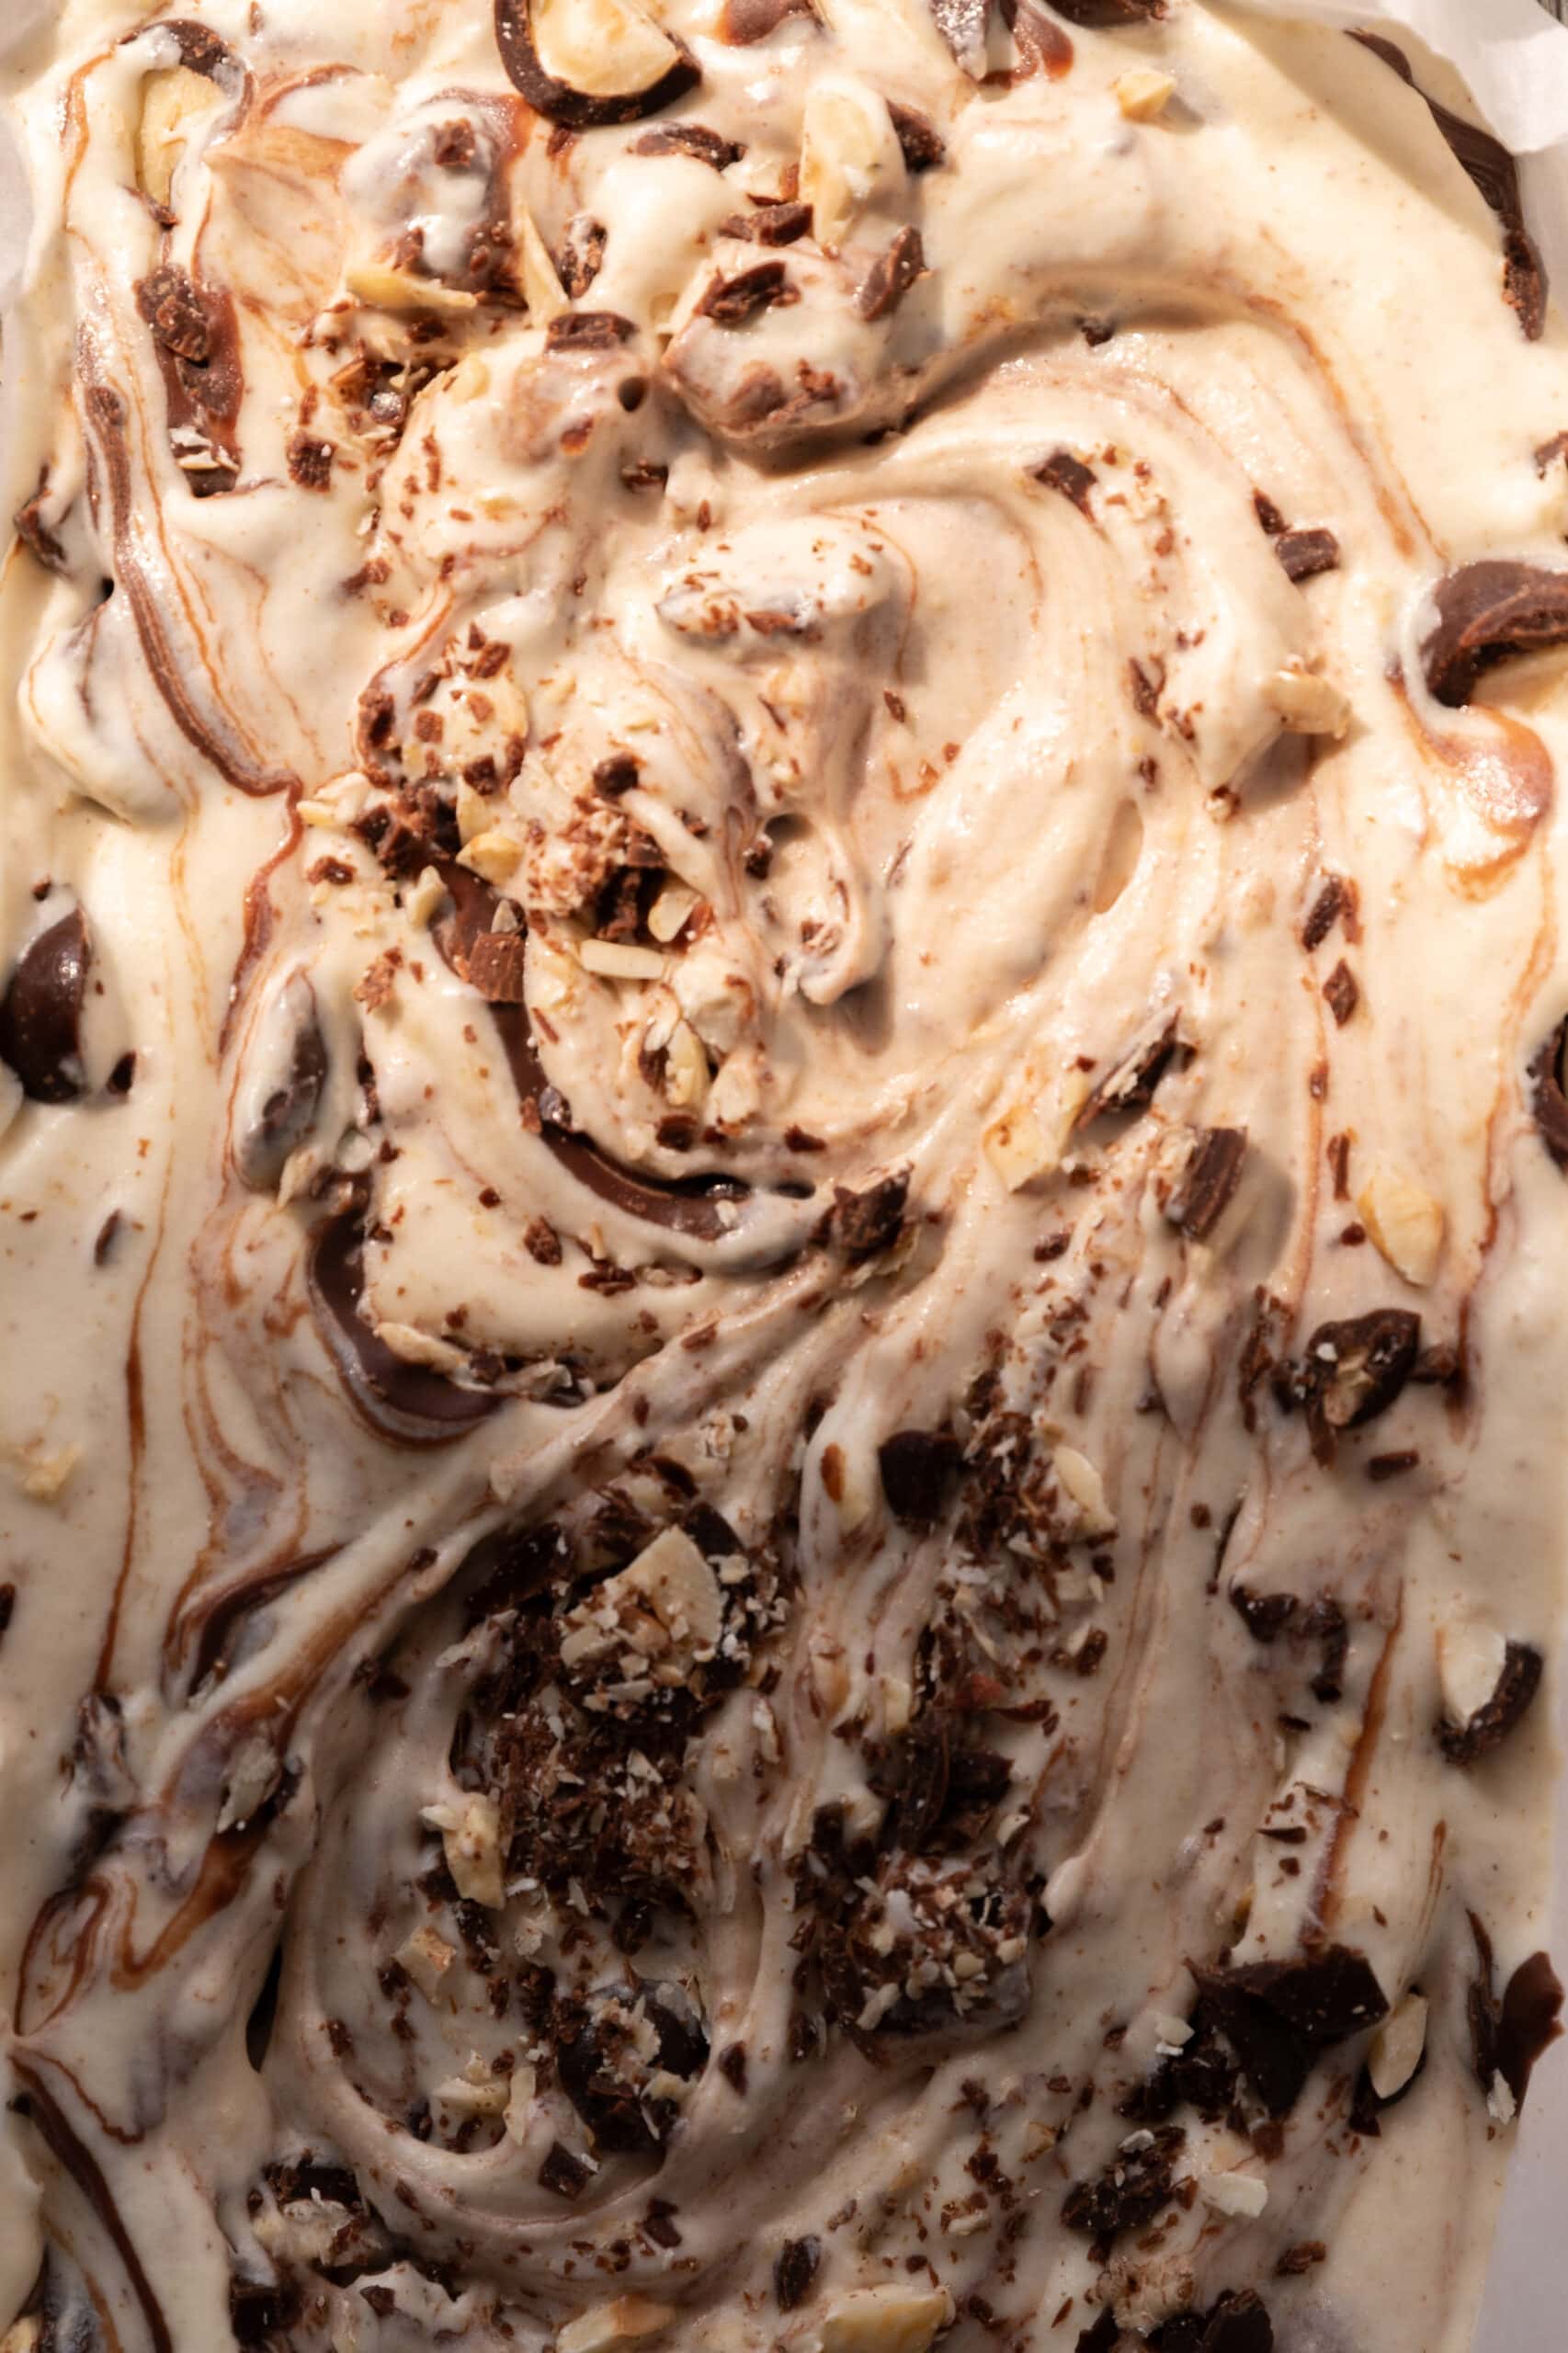
- Pour half of the hazelnut ice cream mixture into the lined pan. Drizzle with the chocolate hazelnut spread and sprinkle with half of the chocolate hazelnuts. Swirl together and then repeat with the remaining ice cream and mix ins.
- If not adding any chocolate, simply pour the hazelnut cream mixture into the lined pan and place in the freezer.
- Place the assembled ice cream into the freezer to set for at least 8 hours or over night.
- Remove from the freezer about 10 minutes prior to serving.


Hazelnut Ice Cream
Equipment
- Electric Mixer
Ingredients
Hazelnut Ice Cream
- 125 grams hazelnuts
- 397 grams sweetened condensed milk
- 400 milliliters heavy whipping cream cold
- 1 teaspoon vanilla extract
- 1.5 teaspoon flaky sea salt
Add Ins
- 80 grams chocolate hazelnut spread
- 225 grams chocolate covered hazelnuts
Instructions
Hazelnut Butter
- In a large pan, pour in the hazelnuts. Place over medium low heat, stirring frequently to keep from burning, until they become golden brown and the skins start to flake off.
- Pour the toasted hazelnuts onto a kitchen towel and rub against each other with the towel to remove the skins. Ideally this will take off most of the skins, if it doesn't, use your fingers to peel as much as you can (but don't stress if there's still some left).
- Transfer the toasted and peeled hazelnuts to a high powered blender or food processor. Blend on medium low speed, slowly increasing to high until a smooth butter forms.
No Churn Ice Cream
- In a large mixing bowl, pour in the sweetened condensed milk along with 100 grams of hazelnut butter. Stir to combine and then sprinkle in the flaky sea salt and stir once more.
- In the bowl of a stand mixer, add in the heavy cream and vanilla extract. Use a whisk attachment to whip on medium high speed until stiff peaks form.
- Add half of the whipped cream to the hazelnut milk mixture. Use a large flat rubber spatula to fold the hazelnut milk into the heavy cream, being careful not to stir thereby knocking the air out.
- Once mixed, add the remaining heavy cream and fold again. Place in the fridge for a moment until ready to assemble.
Assemble & Freeze
- Line a metal loaf pan with parchment paper or prepare your container of choice for the ice cream.
- If adding, chop the dark chocolate covered hazelnuts and set aside.
- Pour half of the hazelnut ice cream mixture into the lined pan. Drizzle with the chocolate hazelnut spread and sprinkle with half of the chocolate hazelnuts. Swirl together and then repeat with the remaining ice cream and mix ins.
- If not adding any chocolate, simply pour the hazelnut cream mixture into the lined pan and place in the freezer.
- Place the assembled ice cream into the freezer to set for at least 8 hours or over night.
- Remove from the freezer about 10 minutes prior to serving.
Notes
- When toasting hazelnuts keep the heat below medium and don’t walk away- you want to keep tossing the hazelnuts to keep them from burning. This allows the oils to release and therefore the skin to come off.
- While the recipe only calls for 100 grams of hazelnut butter, I find that I need at least 250 grams of hazelnuts for my vitamix to actually turn it into hazelnut butter. You can store any extra in an airtight container in the fridge and use as you would use any other nut butter.
- If you find the hazelnut butter difficult to stir in just let it sit out for a little until it comes to room temperature.
- If you don’t have flaky sea salt you can always leave it out, I don’t recommend substituting regular table salt because it will simply make salty ice cream whereas the flaky salt adds little bursts of salt to balance out the sweet richness.
- Both elements of chocolate can be left out but I think they make quite the yummy addition.
- This recipe is quite creamy but for optimal scoopability, allow it to sit out for 5-10 minutes before scooping and serving.
Nutrition
This page may contain affiliate links. This means that if you click on one of the product links above and complete a purchase, I’ll receive a small commission at no extra cost to you. I will never place a link nor make a recommendation on a product or service that I don’t love or use personally. Read our privacy policy here. Thank you for supporting Red Currant Bakery.