Probably the most classic birthday cake I’ve ever made, this Brown Butter Cake with Chocolate Cream Cheese Frosting is simple but not too sweet.
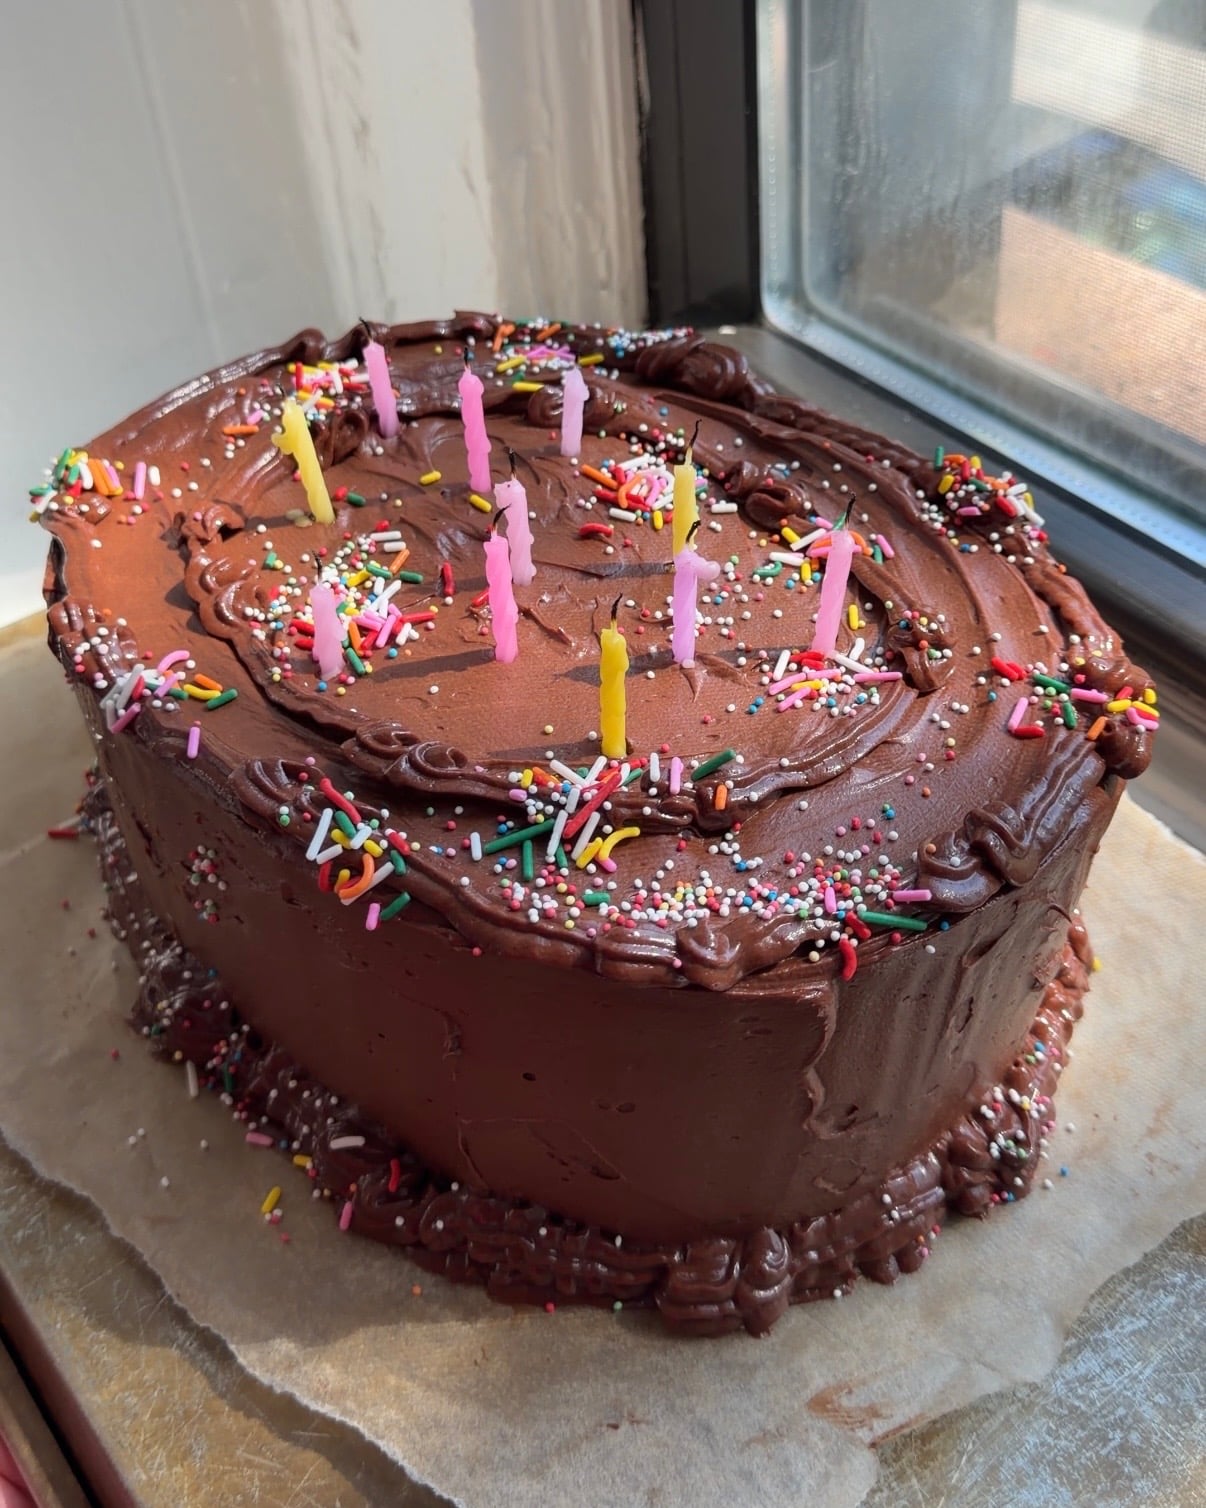
How do you make an oval cake?
To make an oval cake, make two round cakes. Once they are stacked and chilled, find a middle line as if you were cutting the cake into two half circles. Then move over 1″ in each direction and cut straight down. Use a long sharp knife to lift the rectangle out and set it aside. Push the two halves together so you have a pointy oval. Then turn the cake 90 degrees and cut it in half again but this time just one cut in the middle. Spread the two halves (which are now each made up of two pieces) approximately 2.5″ apart. Slide the rectangle we cut out in the opening and then push the pieces all back together so there aren’t any gaps. The center rectangle will stick out a bit on one side, just trim off the extra. Then fully crumb coat and continue frosting as usual.
How long does it take to make brown butter?
It’s important to fully brown your butter, don’t be scared! It should first melt, then be loud and popping. Then it’ll quiet down and foam – at this point you want to stir it and scrape the bottom of the pan – then it will foam again and this time brown bits should rise to the top. At this point your butter is brown but not before!
Can I make this cake in advance?
Yes! I think this cake is best served at room temperature. It takes between an hour and two to to soften if it was fully chilled in the fridge. That being said you could totally frost the whole thing and put it in the fridge the day before. Then just take it out day of! If you want to make it an oval, be sure to chill it in the fridge before doing the final decorations – otherwise it is a little unstable.
Tips for making a Brown Butter Cake with Chocolate Cream Cheese Frosting
- This cake will work best if all the ingredients are at room temperature from the eggs in the cake to the cream cheese in the frosting.
- You can make this cake any size or shape you want, just make sure to calculate the surface area of your baking pan to make sure it’s matching up with two 8″ pans or scale the recipe accordingly.
- Make sure to really BROWN the butter. It should first melt, then be loud and popping. Then it’ll quiet down and foam – at this point you want to stir it and scrape the bottom of the pan – then it will foam again and this time brown bits should rise to the top. At this point your butter is brown but not before!
- This frosting is somewhat temperature sensitive. I recommend allowing it to chill until relatively firm for stacking the cake to allow for thick filling layer. However for frosting the outside you’ll want it to be a bit softer. The good news is it can easily soften if you set it somewhere warm-ish and stir it a few times.
- If you want to make this an oval cake be sure to crumb coat it and let it firm up in the fridge before doing the final decorations. Otherwise you’ll struggle with the quadrants falling away from the center.
Additional Birthday Cakes to try!
Ingredients for a Brown Butter Cake with Chocolate Frosting
- Butter: I like using salted butter for this cake but if you only have unsalted, add a couple extra pinches of salt.
- Eggs: Standard large eggs are used for the cake – it’s important to bring them to room temperature.
- Sugar: White granulated sugar is used in both the cake and the frosting.
- Salt: Fine sea salt helps balance out all of the sweetness in the cake and enhances the flavors.
- Vanilla Extract: Vanilla extract is added into the cake batter and the frosting. I used vanilla bean paste in the frosting but either will work!
- Almond Extract: I accidentally cut t his out of the video but adding a touch of almond extract adds so much flavor to this cake.
- Greek yogurt: full fat, unsweetened greek yogurt is used for the batter to make it extra tender but sour cream would work too!
- All Purpose Flour: Any all purpose flour will work for this cake, I use King Arthur all-purpose flour! The flour is used in the cake batter.
- Baking Soda & Baking Powder: These both help make the cake rise – make sure to check the expiration date! If they are expired, they won’t be very effective.
- Chocolate: I used 60% chocolate for the cream cheese frosting but anything from semi-sweet to 70% will work. Make sure to use high quality baking chocolate not classic chocolate chips as they won’t melt well.
- Cream Cheese: Full fat cream cheese is the main base of the frosting for this cake.
- Heavy Cream: Cold heavy whipping cream is used to thin and fluff the chocolate cream cheese frosting.
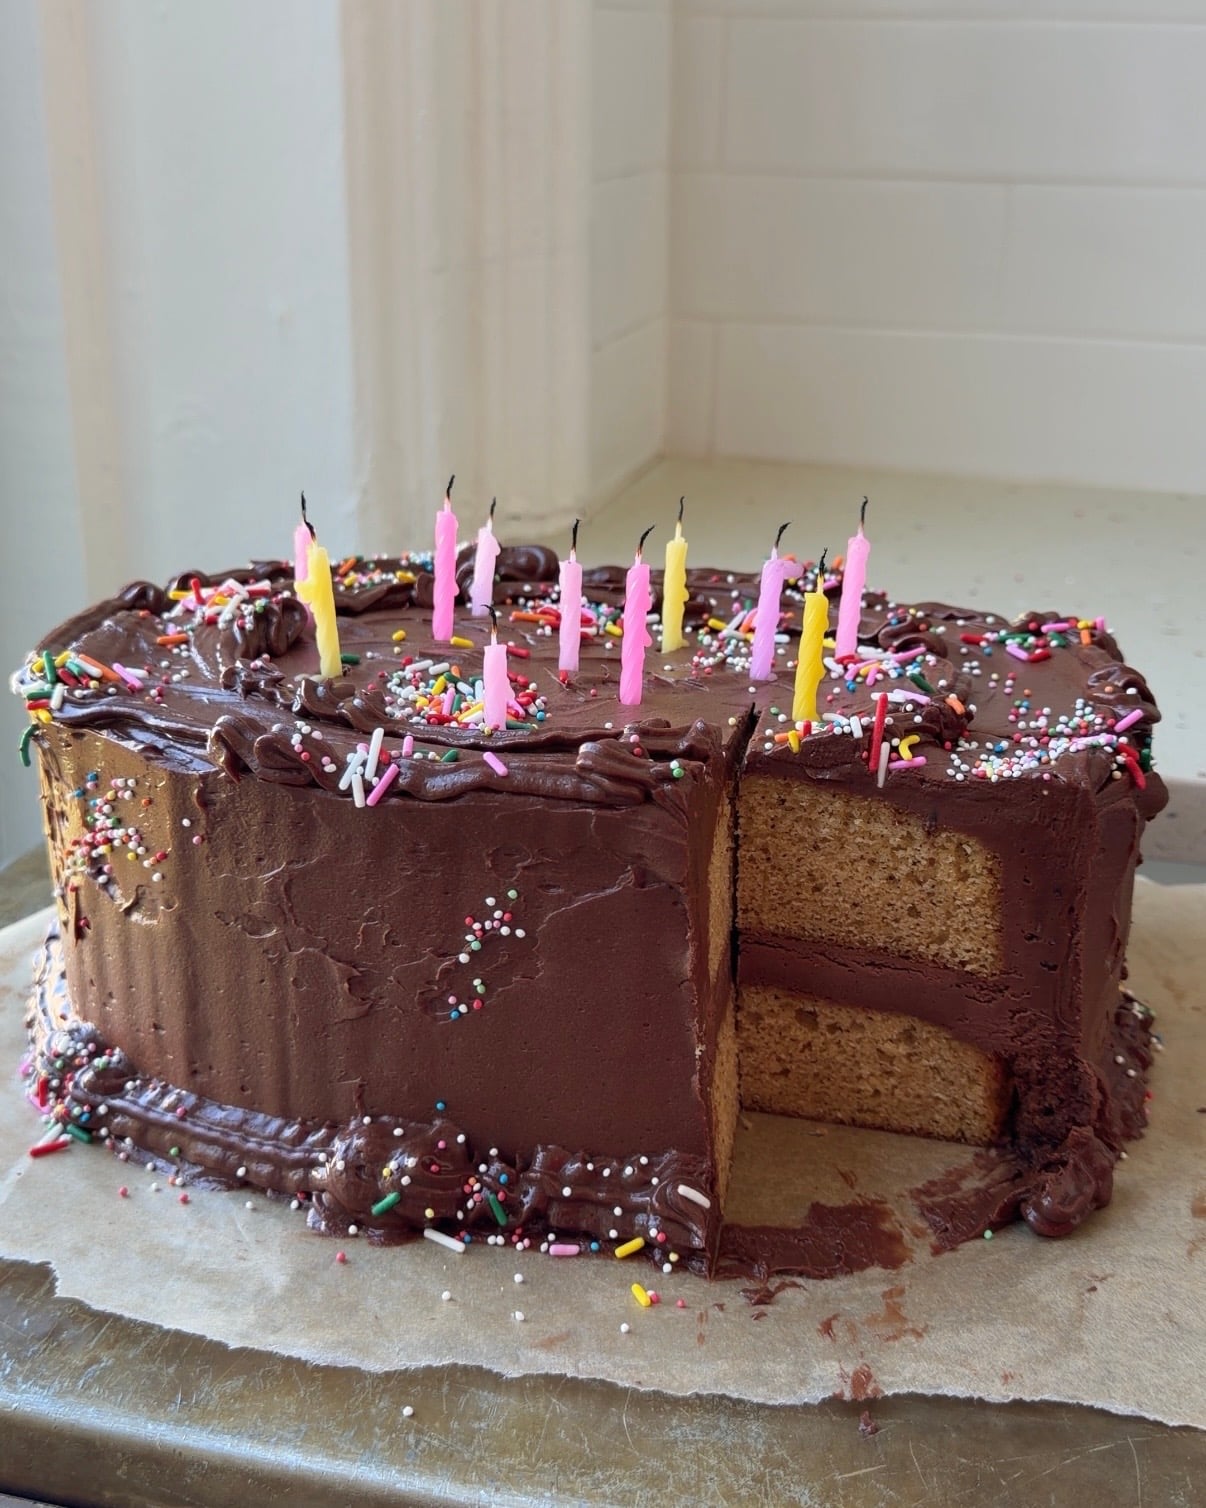
How to make a Brown Butter Cake with Chocolate Cream Cheese Frosting
Brown Butter Sponge
- Preheat the oven to 350 F and place a rack in the center.
- Line the base of 2 8″ cake pans with a parchment round. *See tips if you want to make a different size.
- In a medium pot add in the butter and turn the heat onto medium low. We are browning the butter. First it will melt, then be loud and popping. Then it’ll quiet down and foam – at this point you want to stir it and scrape the bottom of the pan – then it will foam again and this time brown bits should rise to the top. At this point your butter is brown but not before!
- Remove the pot from the heat and pour the brown butter with all the bits into a heat safe measuring cup or bowl. Set aside on the counter.
- In a medium mixing bowl, add in the eggs, sugar, vanilla, almond, and salt. Use an electric mixer to whip on high until fluffy. Then add in the greek yogurt and whip again until smooth.
- With the mixer running on medium speed, slowly pour in the brown butter. It’s ok if it’s still a bit hot. You want the stream of brown butter to hit next to the beaters – try not to hit them or you’ll spray hot butter everywhere.
- Pour in the flour and then the baking soda and baking powder on top of the flour. Mix once more until mostly combined.
- Use a flat rubber spatula scrape the bottom and edges of the bowl to ensure the dry and wet are completely combined.
- Divide the cake batter evenly between the 2 pans. Smooth out the cake with a rubber or offset spatula.
- Bake the cakes in the hot oven for 15 minutes. After 15 minutes, rotate the cakes and bake again for another 10-15 minutes until golden brown on the edges and set in the center.
- Take the pans out of the oven and leave them to cool for 10 minutes. Flip the partially cooled cakes out and leave them to cool completely on a wire rack. *If you are prepping these a day before frosting, wrap them in plastic wrap and store in an air tight zip top bag at room temperature NOT the fridge.
Chocolate Cream Cheese Frosting
- Once the cakes have cooled to room temperature, start on the frosting. I like to make 2/3 of the frosting for stacking and crumb coating the cake. Then make the second 1/3 just before doing the final frosting. That being said you can absolutely make it all at once and store the extra in the fridge. You’ll just need to let it warm up until smooth and spreadable before beginning to decorate.
- In a double boiler, microwave, or directly in a medium pot (be careful and stir CONSTANTLY if you’re doing this method), melt the chocolate. Once melted, set aside on the counter.
- In another large mixing bowl, add in the cream cheese, sugar, salt and vanilla. Whip until smooth and fluffy. Pour in about 1/3 of the melted chocolate – whip until combined. Add in another 1/3, whip again, and then the last 1/3 and whip until just combined. It might look funny and split – it’s ok it’ll come back together.
- Scrape the edges and bottom of the bowl with a rubber spatula. Pour in the heavy cream and whip until smooth. It should be soft and spreadable.
Stack the Cake
- For stacking the cake, you want the frosting to be a bit firmer. Scoop about 1 1/2 -2 cups of the frosting into a smaller bowl and place it in the fridge for 10-15 minutes. Whisk every 5 minutes – it may only take 5-10 minutes to become firm.
- Once thick, like thick peanut butter consistency, scoop the frosting onto the top of the bottom layer of cake. Use the back of a spoon or offset spatula to spread it within 1/2″ of the edge of the cake.
- Lay the second layer of cake on top of the first. Then use most of the remaining softer frosting (if you only made 2/3 of the frosting to start, if you made all you’ll only use about 1/2 of what’s left or a little less) to fully coat the cake. Top and sides. Use an offset spatula and bench scraper to smooth out the top and sides.
- *If you want to make an oval cake: Once they are stacked and chilled, find a middle line as if you were cutting the cake into two half circles. Then move over 1″ in each direction and cut straight down. Use a long sharp knife to lift the rectangle out and set it aside. Push the two halves together so you have a pointy oval. Then turn the cake 90 degrees and cut it in half again but this time just one cut in the middle. Spread the two halves (which are now each made up of two pieces) approximately 2.5″ apart. Slide the rectangle we cut out in the opening. Then push the pieces all back together so there aren’t any gaps. The center rectangle will stick out a bit on one side, just trim off the extra. Then re-frost the cracks to get it to hold together.
- Chill the cake in the fridge for at least an hour or two before decorating or up to overnight. If you made all the frosting at the start, just cover the leftover with plastic. Leave it at room temperature as long as it isn’t too hot. If you need to put it in the fridge, just know it’ll need a bit of time to warm up and soften.
Decorate
- With the remaining 1/3 of frosting, decorate the cake however you want. I did a little bit of piping and sprinkles but anything works!
- Serve the cake at room temperature, it takes about an hour or two to come to room temperature if it’s been in the fridge.
- I like to store leftovers wrapped in plastic wrap in the fridge.
Brown Butter Cake with Chocolate Cream Cheese Frosting
Equipment
Ingredients
Brown Butter Sponge
- 260 grams salted butter
- 4 eggs large, room temperature
- 350 grams granulated sugar
- 1 teaspoon vanilla extract
- 1/4 teaspoon almond extract
- 1/2 teaspoon fine sea salt
- 200 grams greek yogurt
- 300 grams all purpose flour
- 1 teaspoon baking soda
- 1 teaspoon baking powder
Chocolate Cream Cheese Frosting (including enough for decorations)
- 855 grams 60% chocolate
- 681 grams cream cheese 3 – 8oz blocks, room temperature
- 150 grams granulated sugar
- 2 teaspoons vanilla bean paste or vanilla extract
- 1/2 teaspoon fine sea salt
- 650 grams heavy whipping cream cold
Instructions
Brown Butter Sponge
- Preheat the oven to 350 F and place a rack in the center.
- Line the base of 2 8″ cake pans with a parchment round. *See tips if you want to make a different size.
- In a medium pot add in the butter and turn the heat onto medium low. We are browning the butter. First it will melt, then be loud and popping. Then it’ll quiet down and foam – at this point you want to stir it and scrape the bottom of the pan – then it will foam again and this time brown bits should rise to the top. At this point your butter is brown but not before!
- Remove the pot from the heat and pour the brown butter with all the bits into a heat safe measuring cup or bowl. Set aside on the counter.
- In a medium mixing bowl, add in the eggs, sugar, vanilla, almond, and salt. Use an electric mixer to whip on high until fluffy. Then add in the greek yogurt and whip again until smooth.
- With the mixer running on medium speed, slowly pour in the brown butter. It’s ok if it’s still a bit hot. You want the stream of brown butter to hit next to the beaters – try not to hit them or you’ll spray hot butter everywhere.
- Pour in the flour and then the baking soda and baking powder on top of the flour. Mix once more until mostly combined.
- Use a flat rubber spatula scrape the bottom and edges of the bowl to ensure the dry and wet are completely combined.
- Divide the cake batter evenly between the 2 pans. Smooth out the cake with a rubber or offset spatula.
- Bake the cakes in the hot oven for 15 minutes. After 15 minutes, rotate the cakes and bake again for another 10-15 minutes until golden brown on the edges and set in the center.
- Take the pans out of the oven and leave them to cool for 10 minutes. Flip the partially cooled cakes out and leave them to cool completely on a wire rack. *If you are prepping these a day before frosting, wrap them in plastic wrap and store in an air tight zip top bag at room temperature NOT the fridge.
Chocolate Cream Cheese Frosting
- Once the cakes have cooled to room temperature, start on the frosting.
- I like to make 2/3 of the frosting for stacking and crumb coating the cake. (the ingredient amounts are for the FULL amount of frosting with decorations!)
- Then make the second 1/3 just before doing the final frosting. That being said you can absolutely make it all at once and store the extra in the fridge. You'll just need to let it warm up until smooth and spreadable before beginning to decorate.
- In a double boiler, microwave, or directly in a medium pot (be careful and stir CONSTANTLY if you’re doing this method), melt the chocolate. Once melted, set aside on the counter.
- In another large mixing bowl, add in the cream cheese, sugar, salt and vanilla. Whip until smooth and fluffy. Pour in about 1/3 of the melted chocolate – whip until combined. Add in another 1/3, whip again, and then the last 1/3 and whip until just combined. It might look funny and split – it’s ok it’ll come back together.
- Scrape the edges and bottom of the bowl with a rubber spatula. Pour in the heavy cream and whip until smooth. It should be soft and spreadable.
Stack the Cake
- For stacking the cake, you want the frosting to be a bit firmer. Scoop about 1 1/2 -2 cups of the frosting into a smaller bowl and place it in the fridge for 10-15 minutes. Whisk every 5 minutes – it may only take 5-10 minutes to become firm.
- Once thick, like thick peanut butter consistency, scoop the frosting onto the top of the bottom layer of cake. Use the back of a spoon or offset spatula to spread it within 1/2″ of the edge of the cake.
- Lay the second layer of cake on top of the first. Then use most of the remaining softer frosting (if you only made 2/3 of the frosting to start, if you made all you’ll only use about 1/2 of what’s left or a little less) to fully coat the cake. Top and sides. Use an offset spatula and bench scraper to smooth out the top and sides.
- *If you want to make an oval cake: Once they are stacked and chilled, find a middle line as if you were cutting the cake into two half circles. Then move over 1″ in each direction and cut straight down. Use a long sharp knife to lift the rectangle out and set it aside. Push the two halves together so you have a pointy oval. Then turn the cake 90 degrees and cut it in half again but this time just one cut in the middle. Spread the two halves (which are now each made up of two pieces) approximately 2.5″ apart. Slide the rectangle we cut out in the opening. Then push the pieces all back together so there aren’t any gaps. The center rectangle will stick out a bit on one side, just trim off the extra. Then re-frost the cracks to get it to hold together.
- Chill the cake in the fridge for at least an hour or two before decorating or up to overnight. If you made all the frosting at the start, just cover the leftover with plastic. Leave it at room temperature as long as it isn’t too hot. If you need to put it in the fridge, just know it’ll need a bit of time to warm up and soften.
Decorate
- With the remaining 1/3 of frosting, decorate the cake however you want. I did a little bit of piping and sprinkles but anything works!
- Serve the cake at room temperature, it takes about an hour or two to come to room temperature if it’s been in the fridge.
- I like to store leftovers wrapped in plastic wrap in the fridge.
Notes
- This cake will work best if all the ingredients are at room temperature from the eggs in the cake to the cream cheese in the frosting.
- You can make this cake any size or shape you want, just make sure to calculate the surface area of your baking pan to make sure it’s matching up with two 8″ pans or scale the recipe accordingly.
- Make sure to really BROWN the butter. It should first melt, then be loud and popping. Then it’ll quiet down and foam – at this point you want to stir it and scrape the bottom of the pan – then it will foam again and this time brown bits should rise to the top. At this point your butter is brown but not before!
- This frosting is somewhat temperature sensitive. I recommend allowing it to chill until relatively firm for stacking the cake to allow for thick filling layer. However for frosting the outside you’ll want it to be a bit softer. The good news is it can easily soften if you set it somewhere warm-ish and stir it a few times.
- If you want to make this an oval cake be sure to crumb coat it and let it firm up in the fridge before doing the final decorations. Otherwise you’ll struggle with the quadrants falling away from the center.
This page may contain affiliate links. This means that if you click on one of the product links above and complete a purchase, I’ll receive a small commission at no extra cost to you. I will never place a link nor make a recommendation on a product or service that I don’t love or use personally. Read our privacy policy here. Thank you for supporting Red Currant Bakery.



I have a doubt?? The frosting sounds delicious but can I just make half of that recipe will it be enough???? And instead of this
What if I make brownsugar mascarpone chocolate frosting(using melted chocolate)for this cake I think it sounds so good it matches the caramelness and richness. What do u think of it???