Soft and chewy insides, with a thin brown crust, these extra large German Pretzels are worth the effort and one of my favorite snacks.

What makes German Pretzels different?
German Pretzels are different than any other kind of pretzel for many reasons. First is their texture, they aren’t hard and crunchy like the tiny ones you snack on as a kid. And while soft they aren’t overly gummy and squishy like the ones you get in nyc from a street cart. Second is that they are traditionally dipped in food grade lye which not only gives them the classic dark brown color but also gives them that distinctive pretzel flavor!
What gives pretzels their color and flavor?
Lye is what gives pretzels their distinctive color and flavor. It can seem scary to use lye because it is toxic until baked BUT with just a few safety precautions you’ll be just fine! It’s important to use food grade lye when working with food. Here are some more tips to keep in mind:
- Work in a well ventilated area, such as by a window. After the lye has dissolved most of the fumes will have evaporated, so just put the bowl by the window while stirring to combine.
- Always sprinkle the lye into the water, do not pour the water into a bowl with the lye beads already in it.
- Wear long sleeves, long pants, gloves, and eye protection.
- Remember to only use stainless steel or glass when working with lye as it will react with other materials.
- Cover your work surface if you’re worried about spilling/ damaging the surface.
- Once finished, the mixture can be neutralized by pouring in white vinegar. It can be poured down the drain as is because (don’t freak out) it is the base for drain cleaners. If you are concerned, simply add the white vinegar and then pour it down the drain.
What can I use instead of Lye?
Many people use baking soda boiled in water as an alternative because it isn’t toxic and will give a “similar” taste. I have tried this method as well but I don’t think it really does the trick. If you make these, I highly recommend using lye for the full effect. If you do decide to go with the baking soda bath, here is an article from King Arthur Baking about using a baking soda bath for pretzels.
How to refresh day old Pretzels?
If you weren’t able to eat all the pretzels fresh, store them in an airtight container. When ready to eat the old pretzels, preheat the oven to 400 F, spritz the pretzel with some water, sprinkle with more salt if needed, and bake on the metal rack in the oven for 5-10 minutes until the outside feels hard/crunchy. That being said, they are best day of and since this recipe only makes four, I suggest sharing any extras!
Additional Recipes to try:
Tips for making Brezeln
- This dough is stiff so make sure your mixer is set on low speed. You don’t have to use a mixer for this dough as it comes together pretty quickly but if you are kneading it by hand, start in a bowl until it all sticks together and then dump it out and knead until smooth. It’s important the dough is smooth (doesn’t have to pass the window pane test) to get smooth pretzels.
- Rising/proofing time will vary depending on the temperature of your water, butter, and room. Just be sure that the dough has doubled in size before dividing and shaping it.
- This recipe uses instant yeast because it’s easier and usually what I have on hand. If you use active dry, I recommend stirring it in with the water and leaving it to sit for 5-10 minutes, until bubbly, before adding it to the flour.
- Don’t use extra flour when shaping the pretzels because the dough is already quite dry.
- Because the dough is on the dry side, it can be hard to form them into the initial log with any surface tension. If that happens, rub a little olive oil on your hands and work surface so the dough can stick to itself a bit better.
- Don’t start the lye (or baking soda bath) process until your oven has heated. The pretzels become quite sticky once they have been dipped and you don’t want all the extra moisture soaking in to them.
- Be sure to bake until they have become a dark golden brown color. The lye will cause them to darken so allow it to do it’s work and bake them for the full amount of time.
- If you want to double the recipe, I recommend leaving one batch in the fridge until the first batch is done baking.
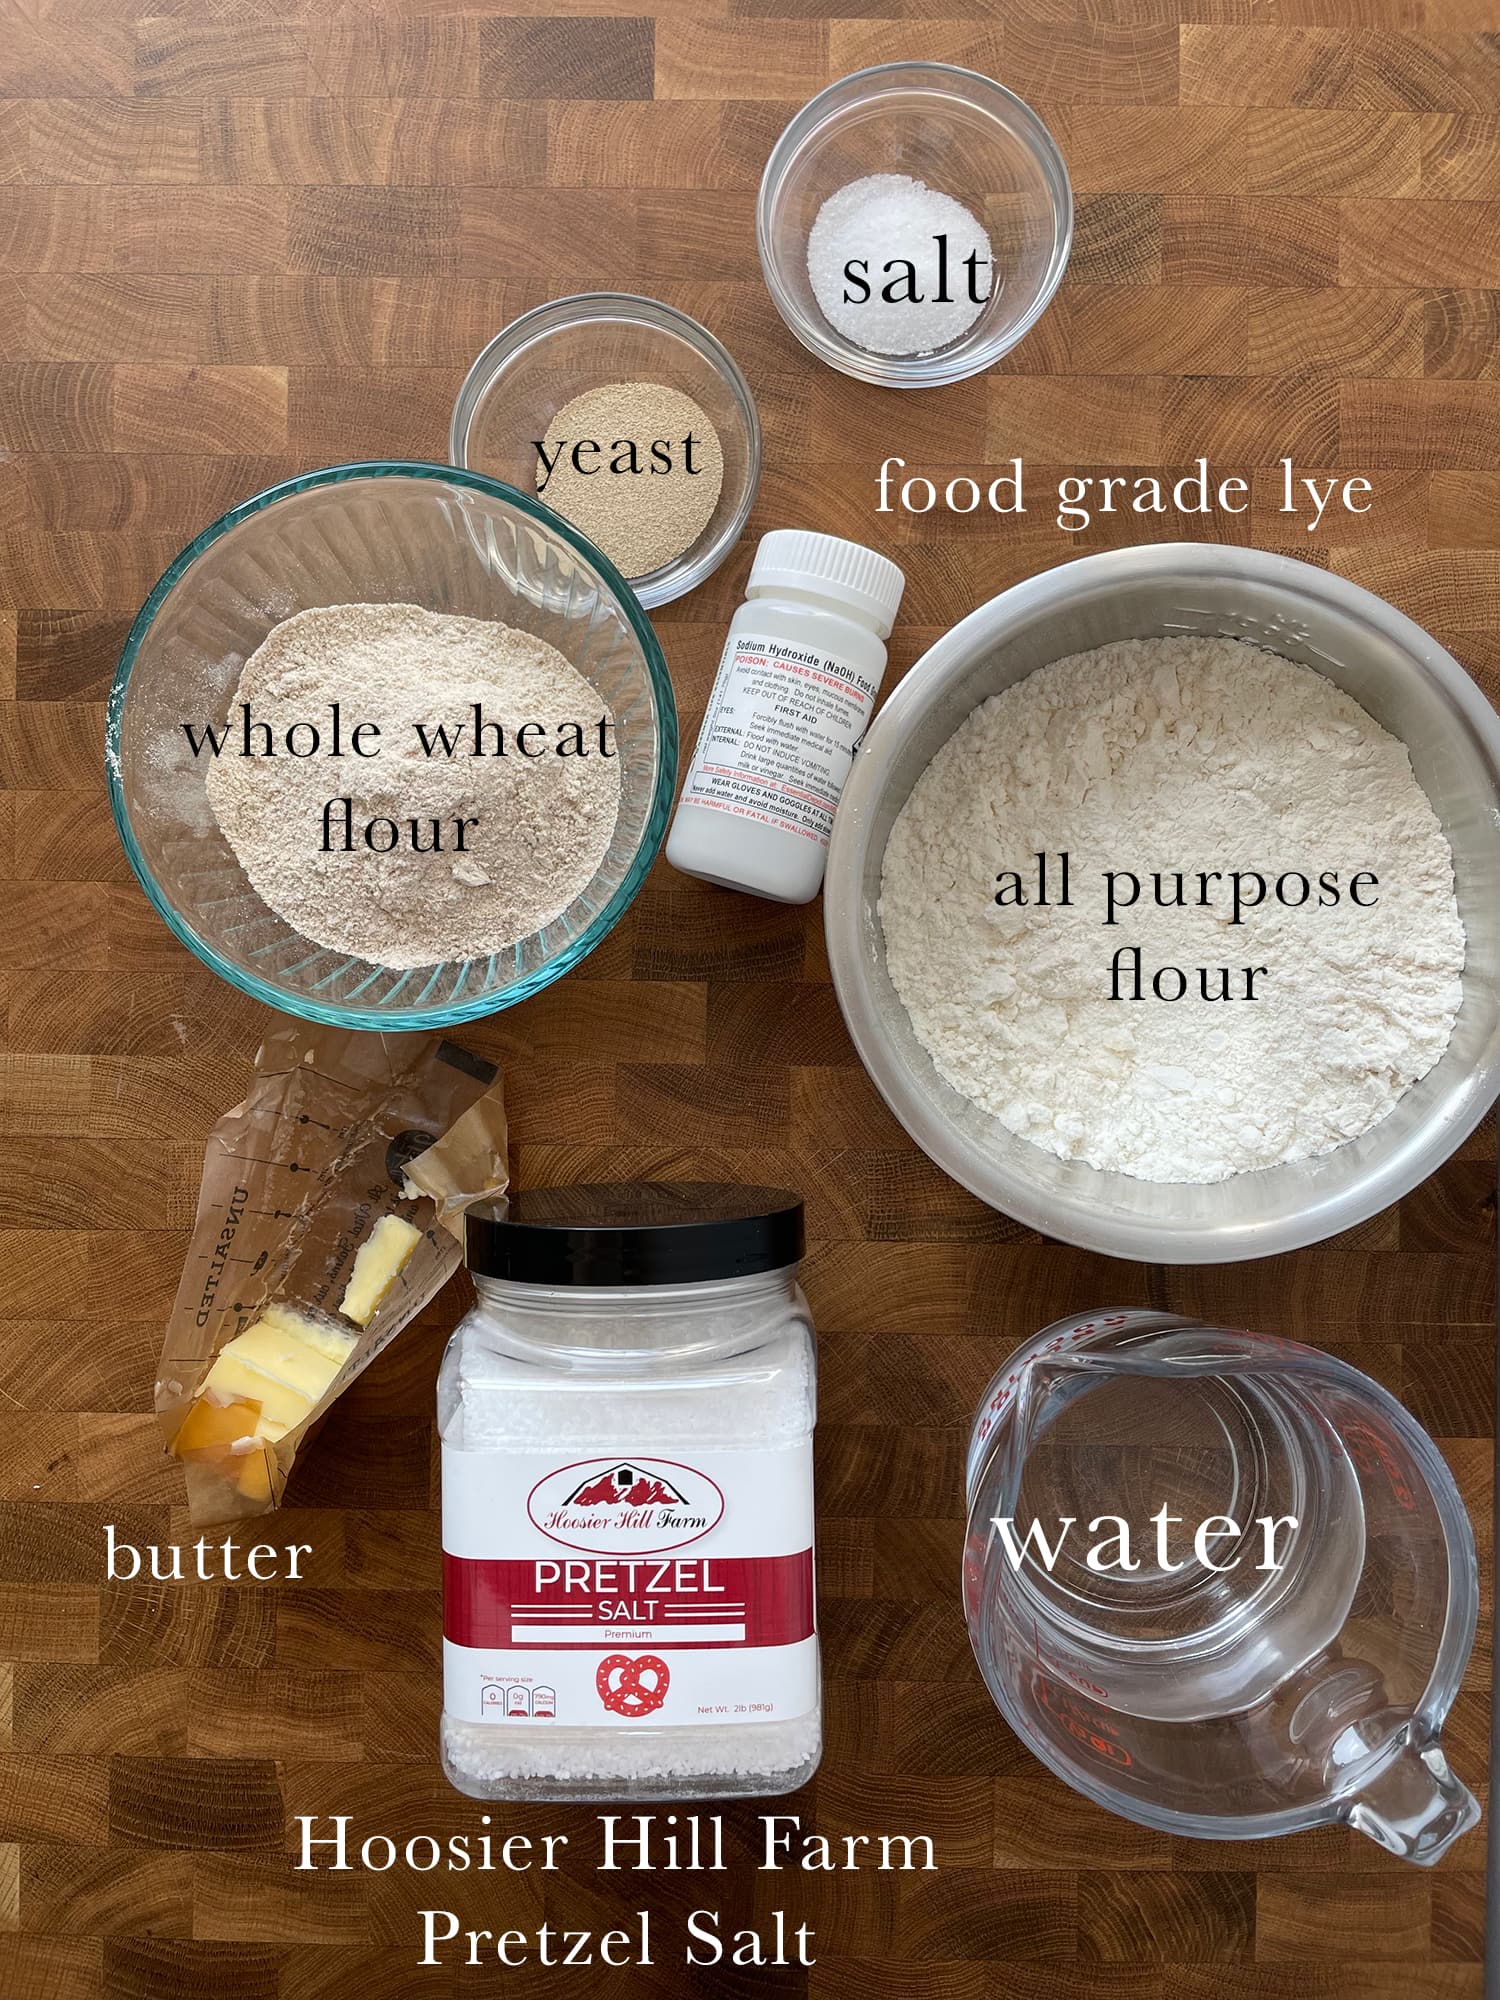
Ingredients
- All Purpose Flour: I love this recipe because it uses all purpose flour and whole wheat flour, both of which are easy to find. I recommend King Arthur Baking All Purpose flour!
- Whole Wheat Flour: While rye flour is very common in most German Pretzels to give them more depth of flavor, I have chosen to use whole wheat flour because it is easier to find but still gives a delicious flavor to the pretzels.
- Water: I have always used tap water where I have lived and never had issues but many people like to use filtered water or bottled water.
- Instant yeast: I like to use instant yeast because it can be whisked in with the flour and doesn’t need to be bloomed first. That being said, active dry yeast can be used as well!
- Kosher Salt: This recipe uses two types of salt, kosher salt should be used in the dough itself, just be sure to add it after the yeast has been whisked in to keep it from killing the yeast.
- Butter: Traditionally, a small amount of butter is added to the dough for richness and flavor.
- Pretzel Salt: Basically the key to making these yummy pretzels is Hoosier Hill Farms Pretzel Salt, it is larger than regular salt and won’t dissolve into the pretzels.
- Lye: Lye is what gives pretzels their distinctive color and flavor. It can be intimidating to use at first but the results are so worth it and once you’ve done it a couple of times, it becomes much easier and less daunting. This is the lye that I used.

How to make Homemade German Pretzels
Dough
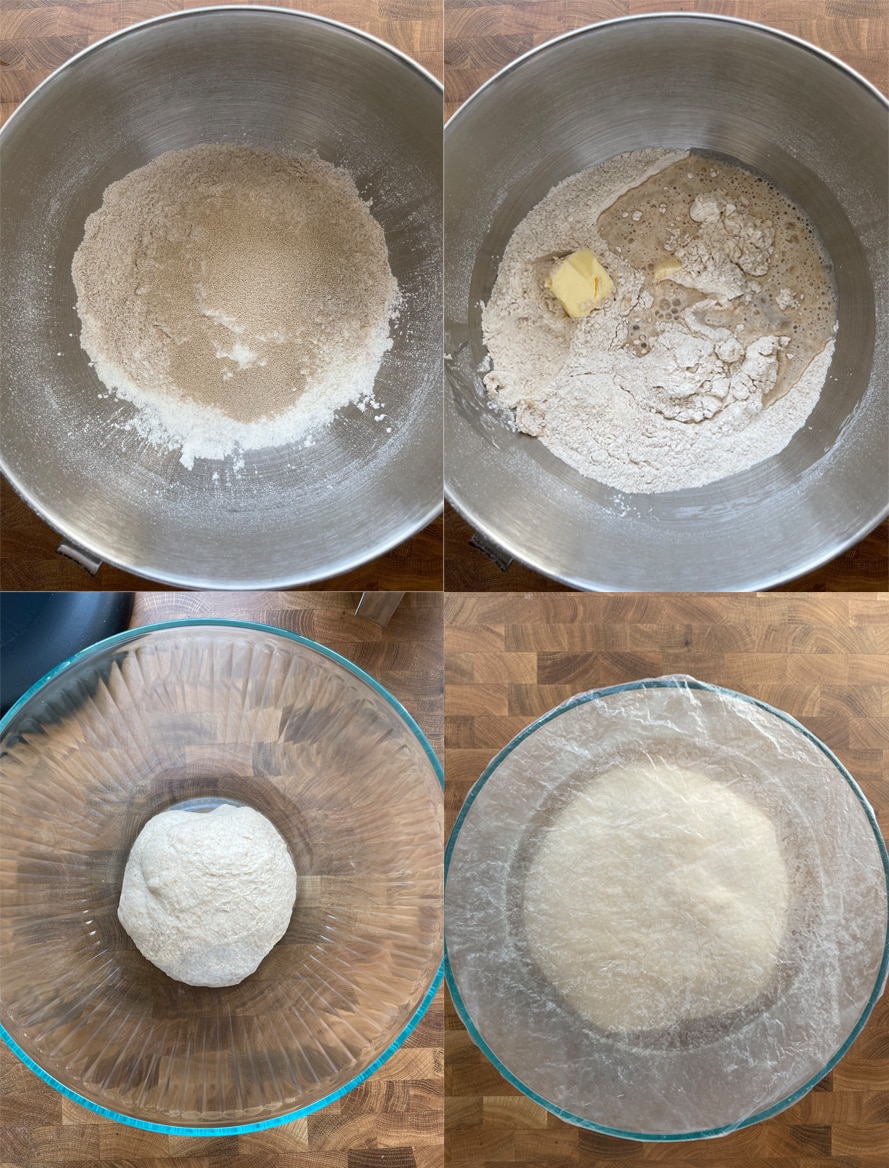
- In the bowl of a stand mixer, whisk together the all purpose flour (350 grams), the whole wheat flour (150 grams) and the instant yeast (8 grams).
- Pour in the lukewarm water (300 grams), softened butter (20 grams), and kosher salt (10 grams).
- Use the dough hook attachment to knead the dough on low speed until smooth, about 10-15 minutes.
- Shape the dough into a ball and place back in the mixing bowl. Cover the bowl with a lid or some sort of cover. Leave somewhere warm to rise until doubled in size, about 45 minutes – 1 hour.
- Line a baking sheet with a piece of parchment paper or a silicone baking mat.
Shape
Part 1: The log
- Once doubled in size, knock the air out of the dough by punching it down. Then, briefly re-knead it by hand. Do not use any extra flour from this point forward.
- Pat the dough into a fat square. Use a bench scraper, knife, or your hands to divide the dough into 4 equal logs.
- Working with one log at a time, pat the dough into a flat(ish) log. It should be just over 1/4″ thick. This part doesn’t need to be precise. Cover the remaining logs with a kitchen towel.
- With the log laid out in front of you horizontally, start with the long side furthest away from you and fold it just over itself towards you. Almost as if you are going to roll it up but after each fold/roll, smush the edge into the rest of the log to press out any extra air.
- Continue this folding and sealing until the flattened log is rolled up into a tight log. When you get to the opposite long side, seal the edge to the rest of the rolled log.
- Place the log seam side down and use the heals of your hands to roll the log to about 36″-40″ long. For a traditional shape, keep the center of the log a bit fatter to get that fat belly.
- If needed rub a little olive oil on your hands and work surface to create a bit of tension.
Part 2: The pretzel
- Once it is long enough take the (now very long) log and shape it into a bit of a wide U. Cross both ends over each other so you have a bit of a bunny shape. Think a rounded triangular shape at the bottom with two long tails (8″ approximately) coming off the top. If possible check the photos for better reference.
- Then cross the ends over each other again so they are now twisted together and not just crossed over one another.
- Pick up both ends and flip them down over the rounded triangle to the bottom corners of the triangle. About 1/2″ up from the ends of the tails, press them into the bottom corners of the triangle.
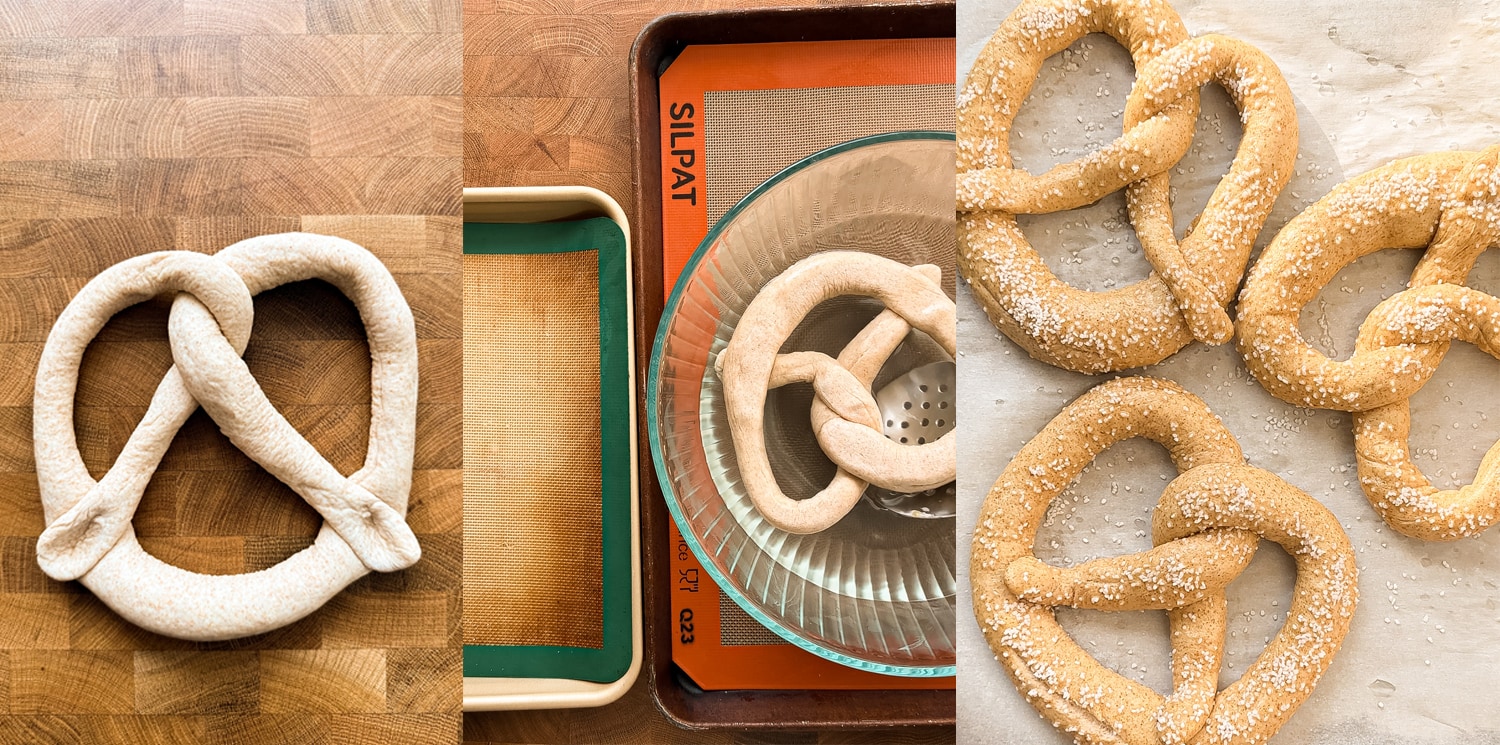
- You should now have something resembling a pretzel.
- Transfer the shaped pretzel to one quarter of the lined baking sheet, reshape as needed.
- Repeat with the remaining logs of dough.
- Once all pretzels are shaped, cover the baking sheet with plastic wrap and place in the fridge for an hour.
- In the meantime, preheat the oven to 450 F with a rack in the middle of the oven. Place another one, one to two slots below it.

Lye Bath
- Place an empty baking sheet on the bottom rack of the oven (you want it to get nice and hot).
- Once the oven is hot and the pretzels have been in the fridge for an hour, it’s time for the lye bath. Refer to the tips section earlier in the blog post for all the information and precautions when working with lye! Most importantly, wear gloves, eye protection, work in a well ventilated space, use a glass or stainless steel bowl, and add the lye into the water, not the other way around.
- In a large glass bowl, add in 1 liter of water. Sprinkle with 37 grams of food grade lye. Use a stainless steel slotted spoon to stir it until the water becomes clear again. This is when the majority of the fumes will be released so I recommend being close to the window or even outside for this part.
- Take the pretzels out of the fridge and remove the plastic wrap.
- Place one pretzel at a time, ideally with the top (the side with the tails pressed in) face down into the lye bath. The tails, may come unstuck but that’s ok just be gentle. Leave it to float for 15 seconds. Then, use a slotted spoon and another stainless steel tool to carefully flip the pretzel over. Leave it to float for another 15 seconds.
- Carefully lift the pretzel out of the lye bath with the two stainless steel tools. Allow the excess lye bath to drip off.
- Place the pretzel back on the parchment lined baking sheet and repeat with the remaining pretzels.
- Be intentional about where you place the pretzels because they are hard to move once on the parchment paper.
Score and Salt
- Sprinkle the top of each pretzel with your desired amount of pretzel salt. I like a lot but you can always do less if you prefer.
- Use a bread lame, razor blade, or knife to cut one slit in the belly (the bottom fat part) of each pretzel. The slit doesn’t need to be very deep.
- Bring your sheet of scored and salted pretzels next to the oven. Measure out a 1/2 cup or 125 milliliters of water in a measuring cup.
Bake
- Place the baking sheet with the pretzels in the oven, on the middle rack.
- Immediately after, pull out the bottom rack with the baking sheet and pour the water onto it. Quickly close the oven to trap in the steam and bake for 15 minutes.
- After 15 minutes, rotate the baking sheet with the pretzels 180 degrees. Bake for another 10-15 minutes until they become a deep golden brown color.
- Once baked, take the baking sheet with the pretzels out of the oven. Place on a wire rack to cool for 5 minutes. Use oven mitts or a spatula to transfer the pretzels to their own cooling rack. This allows any excess moisture to evaporate rather than soak back in.
- Allow the pretzels to cool for another 10 minutes before serving!


Brezeln (German Pretzels)
Equipment
- Stand Mixer
- Glass Bowl
- Stainless Steel Slotted Spoon
Ingredients
Dough
- 350 grams all purpose flour
- 150 grams whole wheat flour
- 8 grams instant yeast
- 300 grams water lukewarm
- 20 grams butter softened
- 10 grams kosher salt
Lye Bath
- 1 liter water
- 37 grams lye
Pretzel Salt
- 20 grams pretzel salt
Instructions
Dough
- In the bowl of a stand mixer, whisk together the all purpose flour (350 grams), the whole wheat flour (150 grams) and the instant yeast (8 grams).
- Pour in the lukewarm water (300 grams), softened butter (20 grams), and kosher salt (10 grams).
- Use the dough hook attachment to knead the dough on low speed until smooth, about 10-15 minutes.
- Shape the dough into a ball and place back in the mixing bowl. Cover the bowl with a lid or some sort of cover and leave somewhere warm to rise until doubled in size, about 45 minutes – 1 hour.
- Line a baking sheet with a piece of parchment paper or a silicone baking mat.
Shape: Part 1
- Once doubled in size, knock the air out of the dough by punching it down. Then, briefly re-knead it by hand. Do not use any extra flour from this point forward.
- Pat the dough into a fat square. Use a bench scraper, knife, or your hands to divide the dough into 4 equal logs.
- Working with one log at a time, pat the dough into a flat(ish) log. It should be just over 1/4" thick. This part doesn't need to be precise. Cover the remaining logs with a kitchen towel.
- With the log laid out in front of you horizontally, start with the long side furthest away from you and fold it just over itself towards you. Almost as if you are going to roll it up but after each fold/roll, smush the edge into the rest of the log to press out any extra air.
- Continue this folding and sealing until the flattened log is rolled up into a tight log. When you get to the opposite long side, seal the edge to the rest of the rolled log.
- Place the log seam side down and use the heals of your hands to roll the log to about 36"-40" long. For a traditional shape, keep the center of the log a bit fatter to get that fat belly.
- If needed rub a little olive oil on your hands and work surface to create a bit of tension.
Shape: Part 2
- Once it is long enough take the (now very long) log and shape it into a bit of a wide U. Cross both ends over each other so you have a bit of a bunny shape. Think a rounded triangular shape at the bottom with two long tails (8" approximately) coming off the top. If possible check the photos for better reference.
- Then cross the ends over each other again so they are now twisted together and not just crossed over one another.
- Pick up both ends and flip them down over the rounded triangle to the bottom corners of the triangle. About 1/2" up from the ends of the tails, press them into the bottom corners of the triangle.
- You should now have something resembling a pretzel.
- Transfer the shaped pretzel to one quarter of the lined baking sheet, reshape as needed.
- Repeat with the remaining logs of dough.
- Once all pretzels are shaped, cover the baking sheet with plastic wrap and place in the fridge for an hour.
- In the meantime, preheat the oven to 450 F with a rack in the middle of the oven. Place another one, one to two slots below it.
Lye Bath
- Place an empty baking sheet on the bottom rack of the oven (you want it to get nice and hot).
- Once the oven is hot and the pretzels have been in the fridge for an hour, it's time for the lye bath. Refer to the tips section earlier in the blog post for all the information and precautions when working with lye! Most importantly, wear gloves, eye protection, work in a well ventilated space, use a glass or stainless steel bowl, and add the lye into the water, not the other way around.
- In a large glass bowl, add in 1 liter of water. Sprinkle with 37 grams of food grade lye. Use a stainless steel slotted spoon to stir it until the water becomes clear again. This is when the majority of the fumes will be released so I recommend being close to the window or even outside for this part.
- Take the pretzels out of the fridge and remove the plastic wrap.
- Place one pretzel at a time, ideally with the top (the side with the tails pressed in) face down into the lye bath. The tails, may come unstuck but that's ok just be gentle. Leave it to float for 15 seconds. Then, use a slotted spoon and another stainless steel tool to carefully flip the pretzel over. Leave it to float for another 15 seconds.
- Carefully lift the pretzel out of the lye bath with the two stainless steel tools. Allow the excess lye bath to drip off.
- Place the pretzel back on the parchment lined baking sheet and repeat with the remaining pretzels.
- Be intentional about where you place the pretzels because they are hard to move once on the parchment paper.
Score and Salt
- Sprinkle the top of each pretzel with your desired amount of pretzel salt. I like a lot but you can always do less if you prefer.
- Use a bread lame, razor blade, or knife to cut one slit in the belly (the bottom fat part) of each pretzel. The slit doesn't need to be very deep.
- Bring your sheet of scored and salted pretzels next to the oven. Measure out a 1/2 cup or 125 milliliters of water in a measuring cup.
Bake
- Place the baking sheet with the pretzels in the oven, on the middle rack.
- Immediately after, pull out the bottom rack with the baking sheet and pour the water onto it. Quickly close the oven to trap in the steam and bake for 15 minutes.
- After 15 minutes, rotate the baking sheet with the pretzels 180 degrees. Bake for another 10-15 minutes until they become a deep golden brown color.
- Once baked, take the baking sheet with the pretzels out of the oven. Place on a wire rack to cool for 5 minutes. Use oven mitts or a spatula to transfer the pretzels to their own cooling rack. This allows any excess moisture to evaporate rather than soak back in.
- Allow the pretzels to cool for another 10 minutes before serving!
Notes
- This dough is stiff so make sure your mixer is set on low speed. You don’t have to use a mixer for this dough as it comes together pretty quickly but if you are kneading it by hand, start in a bowl until it all sticks together and then dump it out and knead until smooth. It’s important the dough is smooth (doesn’t have to pass the window pane test) to get smooth pretzels.
- Rising/proofing time will vary depending on the temperature of your water, butter, and room. Just be sure that the dough has doubled in size before dividing and shaping it.
- This recipe uses instant yeast because it’s easier and usually what I have on hand. If you use active dry, I recommend stirring it in with the water and leaving it to sit for 5-10 minutes, until bubbly, before adding it to the flour.
- Don’t use extra flour when shaping the pretzels because the dough is already quite dry.
- Because the dough is on the dry side, it can be hard to form them into the initial log with any surface tension. If that happens, rub a little olive oil on your hands and work surface so the dough can stick to itself a bit better.
- Don’t start the lye (or baking soda bath) process until your oven has heated. The pretzels become quite sticky once they have been dipped and you don’t want all the extra moisture soaking in to them.
- Be sure to bake until they have become a dark golden brown color. The lye will cause them to darken so allow it to do it’s work and bake them for the full amount of time.
- If you want to double the recipe, I recommend leaving one batch in the fridge until the first batch is done baking.
Nutrition
This page may contain affiliate links. This means that if you click on one of the product links above and complete a purchase, I’ll receive a small commission at no extra cost to you. I will never place a link nor make a recommendation on a product or service that I don’t love or use personally. Read our privacy policy here. Thank you for supporting Red Currant Bakery.