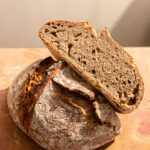
Rye Sourdough
Homemade Rye Sourdough Bread is so flavorful and such a magical alternative to a basic sourdough loaf. This recipe is based off of one of my favorite breads in Germany which is a mixture of rye flour, rye sourdough starter, and bread flour.
Servings: 10
Calories: 152kcal
Equipment
- 1 brotform
Ingredients
Pre-dough
- 25 grams rye starter
- 140 grams water room temperature or slightly warmer
- 150 grams dark rye flour
Dough
- 200 grams water divided, room temperature or slightly warmer
- 130 grams dark rye flour
- 150 grams bread flour
- 10 grams kosher salt
Mixed flour for dusting
- 50 grams brown rice flour
- 50 grams bread flour
Instructions
Pre-Dough
- The day before you plan to make the bread, you want to feed your starter as normal in the morning with equal parts water and rye flour. In the evening (around dinner time), you need to make the pre-dough.
- Spoon 25 grams of rye starter into a large glass bowl. Pour in 140 grams of water that is room temperature or slightly warmer, it should not be warm. Stir to combine.
- Add 150 grams of rye flour into the bowl and stir again until fully combined. Cover the bowl with a lid, doesn't need to be airtight but there shouldn't be any gaping holes. Leave the pre-dough on your counter overnight.
Dough
- The next day, the pre-dough should be bubbly and puffy. If it isn't, wait a couple more hours until it is (it can take up to 16-18 hours).
- Once the pre-dough is ready, pour in 170 grams or water approximately the same temperature as before. Use a spoon to stir together until combined.
- Pour in the 130 grams of rye flour and 150 grams of bread flour. Use your hands to stir the mixture together until fully combined. Lay a lid or cover over the dough and leave it to sit for 20 minutes.
- After 20 minutes, add the 10 grams of salt and remaining 30 grams of water and use your hands mix the dough together.
- Cover the dough again and let it sit for 35-40 minutes.
Fold
- Place a bowl of water next to the bowl of bread dough. After the 40 minutes, take the lid off of the bowl, wet one hand and imagine that the bowl has four sides. Use the wet hand to gently pull up one side of the dough.
- Lift the side over the top of the rest of the dough and gently press down. Rotate the bowl 90 degrees and repeat the lifting and folding. Do this twice more until all sides have been folded.
- Place the lid back over the bowl and leave it to sit for 35-40 minutes.
- Repeat the folding and resting process 2 more times.
First Shaping
- In a small bowl, or sealable container, mix together equal parts brown rice flour and bread flour. Line a brotform with the flour mixture. The first time you use it, you will need to first mist the basket with water to allow the flour to stick.
- After the last rest, sprinkle a work surface with bread flour. Sprinkle flour over the top of the dough and use your hands or a bowl scraper to scoop the dough out of the bowl onto the floured surface.
- Gently pat the dough into a roundish shape that is about 1"-2" thick. Similar to the folding process, grab the top edge of the dough round, gently pull it up and press it into the center of the round. Do this all the way around the dough round.
- It will be more than four folds, probably 6-8.
- Flip the round over so that the seam is face down. Cover the round of dough with a dish towel and leave it to rest for 20 minutes.
Second Shaping
- After 20 minutes, flip the dough over so the seam side is up, and pat the dough into another round about 1" thick. Grab the top edge and pull the dough up and over to just past the middle point of the round. Grab the right side of the dough and pull it up and over the center of the dough. Then, repeat with the left side and then the bottom. This time it is only four folds.
- Flip the round back over. Clean off your work surface and use both hands to cup under the dough from the top side and pull the dough towards yourself, rotating it slightly. Continue to reset the dough and pull it, rotating to seal the bottom of the dough.
- Sprinkle the top of the round with the brown rice flour mixture. Flip the loaf over into the brotform and sprinkle the seam side, which is now face up, with more of the mixed flour.
- Cover the bowl with the fabric cover that comes with the bowl or some other type of lid. Place the whole thing into a large plastic bag or put a plastic shower cap over the top of the fabric.
- Place the whole thing in the fridge overnight.
Prepare to Bake
- The next day, take the bread out of the fridge and remove the plastic bag or shower cap. Leave the dough to sit for an hour.
- After the hour has passed, put the dutch oven with the lid into the cold oven on the middle rack and preheat to 450 degrees F. Allow the oven to really heat up, I recommend leaving it to sit for about 20-30 minutes once hot to make sure the dutch oven is fully heated.
- Lay a piece of parchment down close to your oven on the counter, sprinkle it liberally with more of the mixed flour. Take off the fabric cover from the basket and tip the dough onto the baking sheet.
- Use a razor blade or a bread lame to make a slice at a 45 degree angle in a slight curve through the middle of the loaf. It should be between 1/2" and 1" deep.
- If you have two, take two cooling racks out and set them side by side close to the oven or on your stove top.
Bake
- Use potholders (I usually double them up because the dutch oven is hot), to take the heated dutch oven out of the oven. Place onto one of the cooling racks. Remove the lid and carefully scoop the bread, I like to use the help of a bowl scraper, to lift the bread off the parchment and into the dutch oven.
- BE CAREFUL, the dutch oven is hot and you will burn yourself. It's ok if you need to sort of drop the loaf in to avoid burning your hands.
- Immediately place the lid back on and put it in the oven for 25 minutes. After 25 minutes, remove the lid and leave it to bake for another 20 minutes.
- Once baked, remove the dutch oven and place it on a cooling rack. Tip the loaf out of the dutch oven and place it on the second cooling rack to cool fully before cutting into the loaf.
Notes
For information on making your rye starter and more shaping images, refer to the blog post! Rye does best when it has time to sit and develop flavor. It may seem like the whole process is lengthy but there's very little time actually working and it is so worth the end result!
Nutrition
Serving: 1slice | Calories: 152kcal | Carbohydrates: 32g | Protein: 5g | Fat: 1g | Saturated Fat: 0.1g | Polyunsaturated Fat: 0.3g | Monounsaturated Fat: 0.1g | Sodium: 390mg | Potassium: 120mg | Fiber: 4g | Sugar: 0.4g | Vitamin A: 0.3IU | Calcium: 10mg | Iron: 1mg